CREATING AN MQTT BROKER CONNECTION
Creating Access to MQTT Broker
To interact with the location API, you first need to obtain a bearer token. Follow these steps to acquire the required credentials and connect to your MQTT broker.
Obtain a Bearer Token
-
Click on the link corresponding to your platform :
-
Click on "Try it out", enter your ThingPark login credentials and execute the request.
-
In the response body, locate and copy the value of the
access_tokenattribute.
![]()
Retrieve Your API Token for the MQTT Broker
Available Platforms:
Note: The platform link you select depends on the environment where you obtained your initial token. For example, if you retrieved a token using PROD EU credentials, you should select the PROD EU link.

Steps to Follow:
- Open the appropriate Swagger UI link based on your platform.
- Click the Authorize button to open the authorization window.
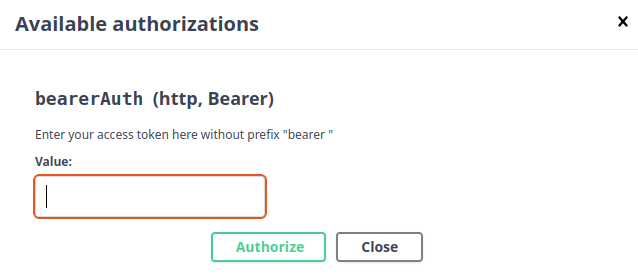
- Paste your bearer token into the value input field and click Authorize.
- If the login is successful, you will see a confirmation message similar to the image below:
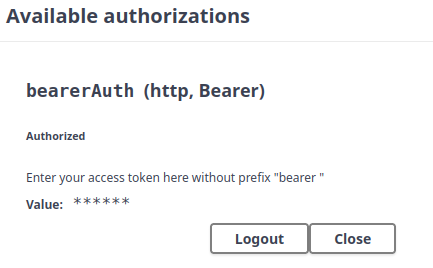
- Navigate to the API Key section, specifically the
POST /apiKeysrequest.

- Click Try it Out and execute the request to generate an API Key.
- The response will contain your
apiKey, which you can use to authenticate with your MQTT broker. Make sure to note which platform you used (e.g., PROD US) since the broker access will depend on it.
Connect to Your MQTT Broker
Below are the broker URLs and ports for each platform:
| Environment | Broker URL | Port |
|---|---|---|
| BROKER ECO | mqtt-eco.thingpark.com | 8883 |
| BROKER PROD EU | mqtt-eu.thingpark.com | 8883 |
| BROKER PROD AU | mqtt-au.thingpark.com | 8883 |
| BROKER PROD US | mqtt-us.thingpark.com | 8883 |
Authentication Details:
- Username: You can use any value, but the convention is to use
unused_username. - Password: Use your
apiKeygenerated in the previous step.
With these details, you should be able to successfully connect to the MQTT broker for your respective platform.
How to Test the MQTT Connection
To ensure your MQTT setup is properly configured, follow these steps carefully:
Download an MQTT Client
Start by downloading and installing an MQTT client. Here are two recommended options:
Retrieve Your Subscription ID
- Go on TPE.
- Click on your profile icon located in the top-right corner of the interface.
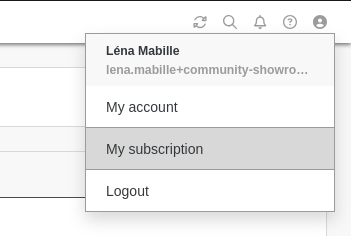
- Navigate to the Subscription section.
- Copy the ID which is the subscribtion ID.
Configure and Test the MQTT Connection
Create a New Connection
- Launch your MQTT client.
- Create a new connection.
- Enter the authentication details provided here.
- Enable Encryption in the connection settings.
- Use your apiKey that you get before as the password.
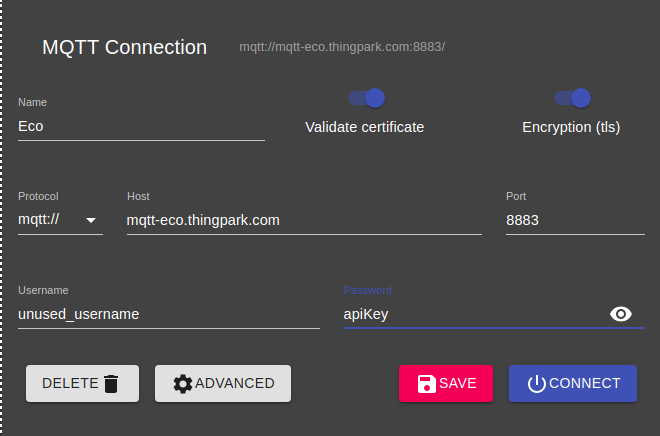
Before saving and connecting, you must configure the topic settings.
Configure the Topic Settings
- Open the configuration for the connection you just created.
- Navigate to the Advanced settings.
- Delete all existing topics.
- Add a new topic using the following pattern:
Replace
actility-tpe-ope|<SubscriptionId>/mqtt/#<SubscriptionId>with your actual Subscription ID.
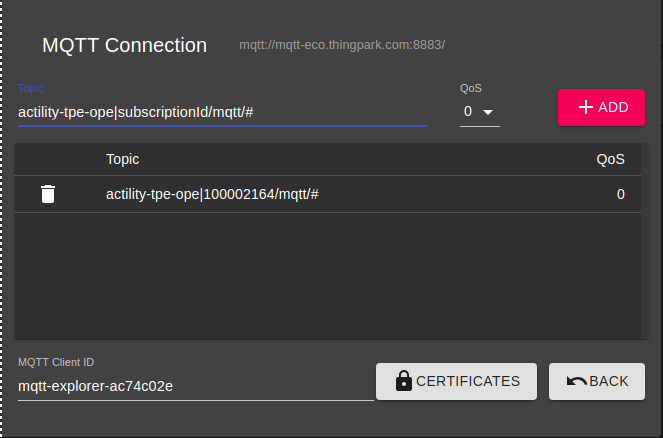
5. Save the changes by clicking Back.
Finalize the Connection
- Save and connect to the broker using the updated configuration.
- Test the connection by publishing or subscribing to the topic.
Whenever you publish or subscribe to your topic, always include the following prefix:
actility-tpe-ope|<SubscriptionId>/mqtt/
Limitations
There are currently no known limitations to the MQTT broker.
Troubleshooting
As for now, there are no detected bugs.