CREATING AN AWS CONNECTION
Collecting Expected Information
Parameters required
| Field | Description |
|---|---|
Application Name | Name of the application that you want to register (Editable). |
Downlink Port | If downlink is supported and enabled, indicate which LoRaWAN® port should be used to send the downlinks to the associated devices. As only one type of Amazon AWS platform can be created, you should set a homogeneous set of devices in the Amazon AWS IoT account. |
AWS Region |
|
Access Key Id | The ID of the access key generated on your AWS IoT account, and necessary to access it. |
Secret Access Key | A secret access key generated on your AWS IoT account, and necessary to access it. |
Protocol |
|
Certificate Id |
|
Certificate |
|
Private Key |
|
Device Type | AWS IoT device type to be associated with the devices processed by the application for example waterSensorType. Only one device type is supported. |
Account Prefix |
|
Account Prefix and Region
After you have created your AWS IoT account, you need to retrieve the parameter values that will be required to configure the AWS connector.
- Type :
https://eu-central-1.console.aws.amazon.com/iot/home?region=eu-central-1#/dashboard to open AWS IoT.
- This looks like this:
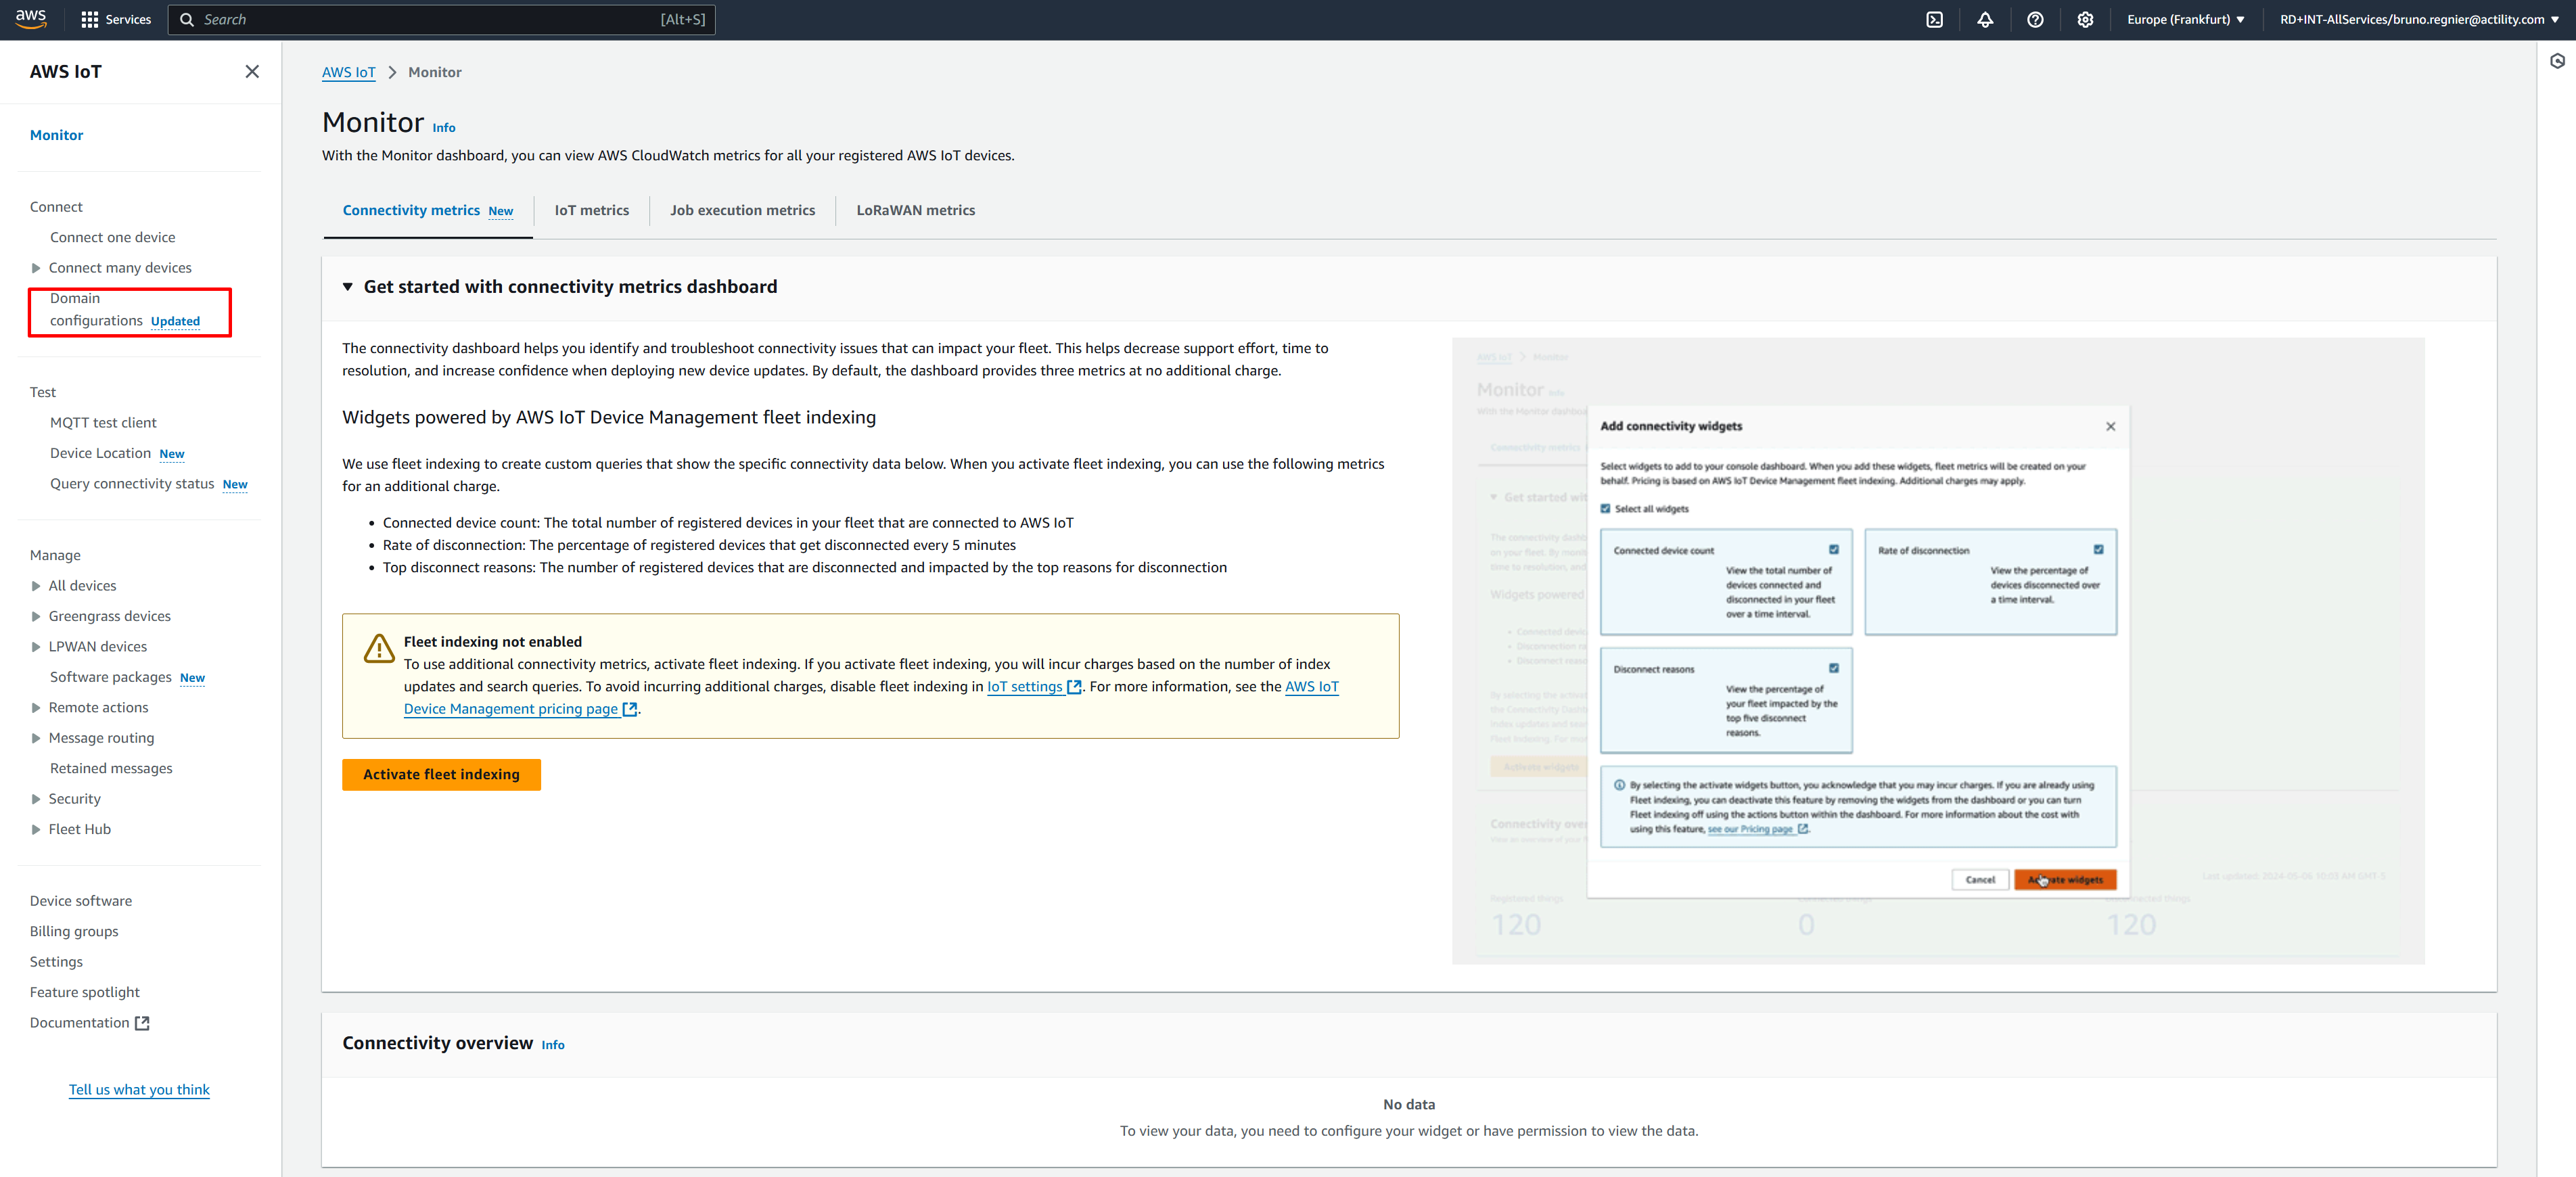
- Click Domain configuration.
- This opens the page showing the Custom endpoint information. It looks like this:
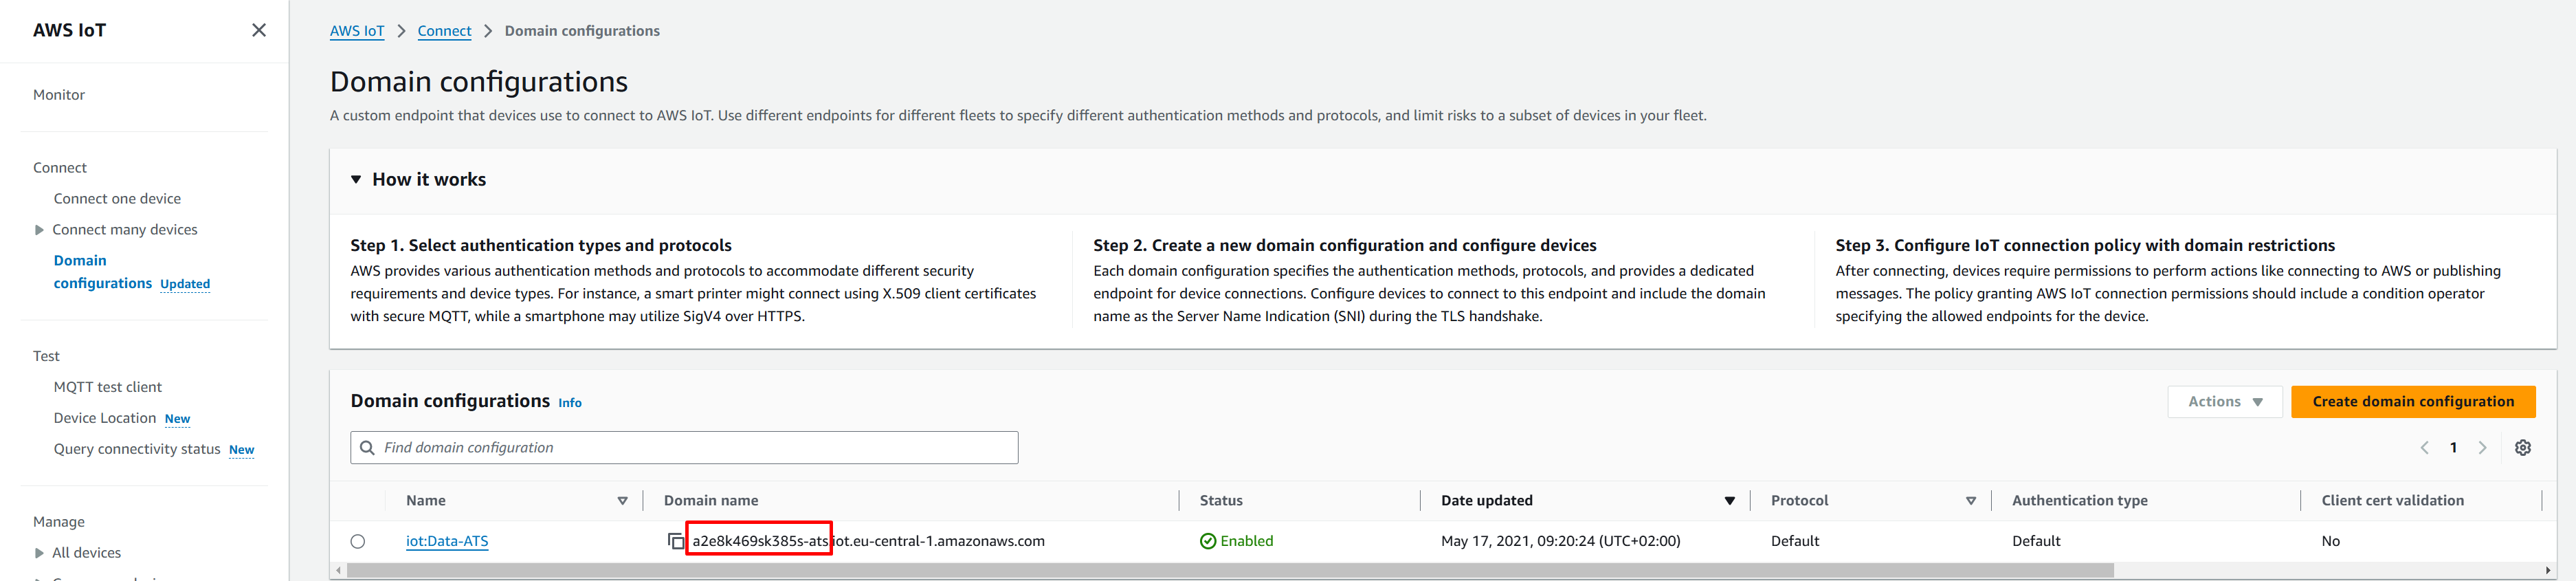
The Endpoint string has the following format accountPrefix.iot.region.amazonaws.com. If the accountPrefix does not end in ‘-ats’, follow the instructions for setting up your Amazon Trust Services (ATS) endpoint to avoid connection issues due to deprecated trust CAs.
TPE-OCP only: Please configure your firewall to authorize the outgoing traffic on ports 443, 8443, 8883 towards:
- accountPrefix.iot.region.amazonaws.com
- iot.region.amazonaws.com
- Copy the accountPrefix and region connector parameters (respectively
'a2e8k469sk385s-ats'and'eu-central-1'in the following example).
Device Type
- Go back to the Manage section and click Types to access the list of Device types.
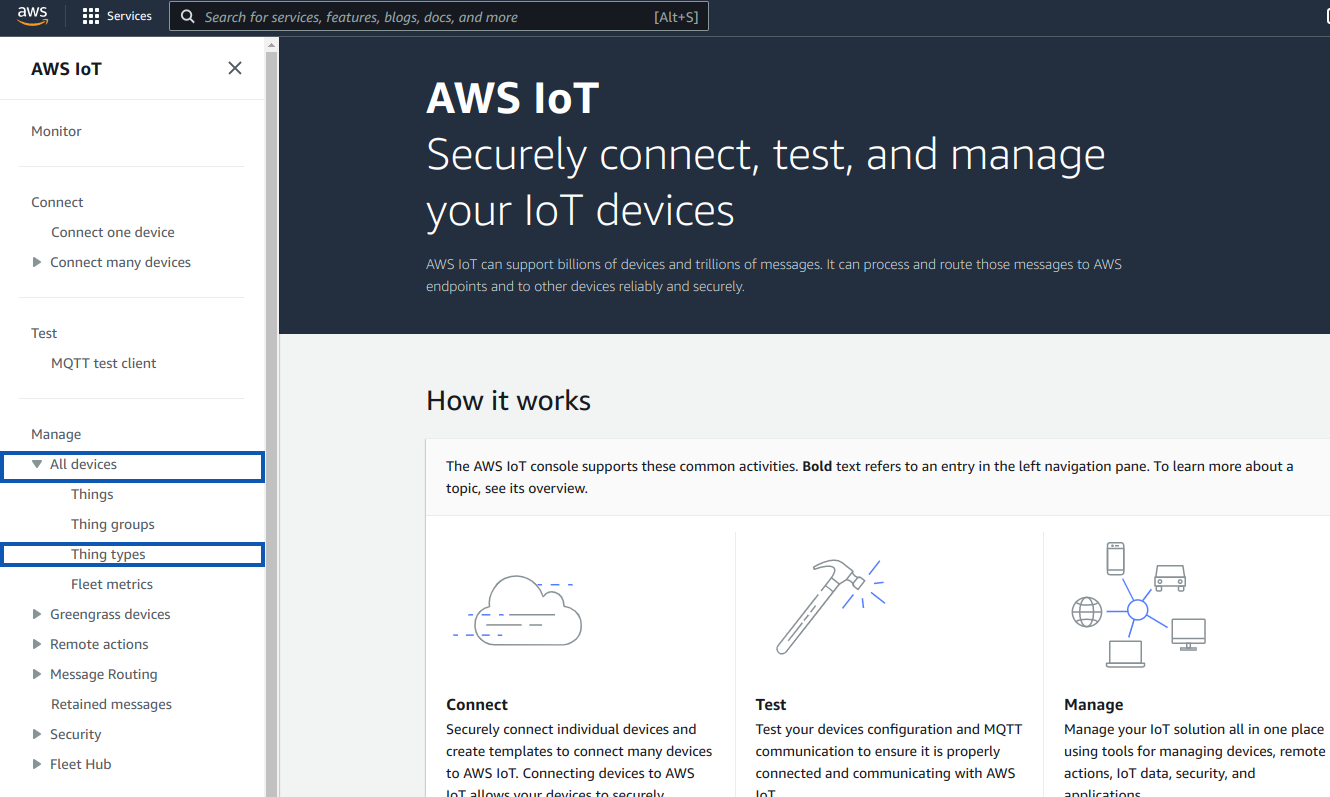
- The page that opens displays all existing types of Devices.
- Click Create.
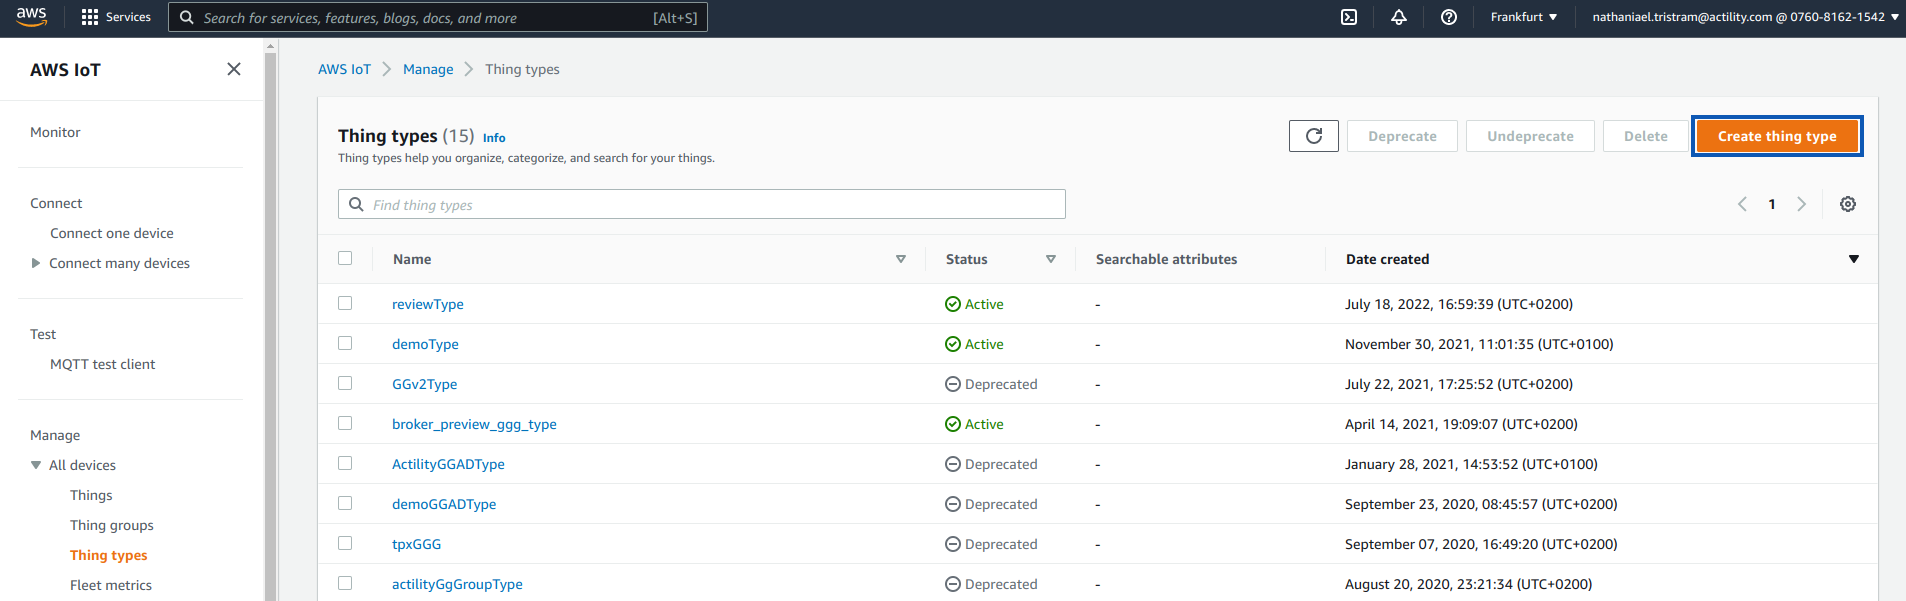
- Fill in the form by entering the name of the new thing type such as below and click on Create thing type.
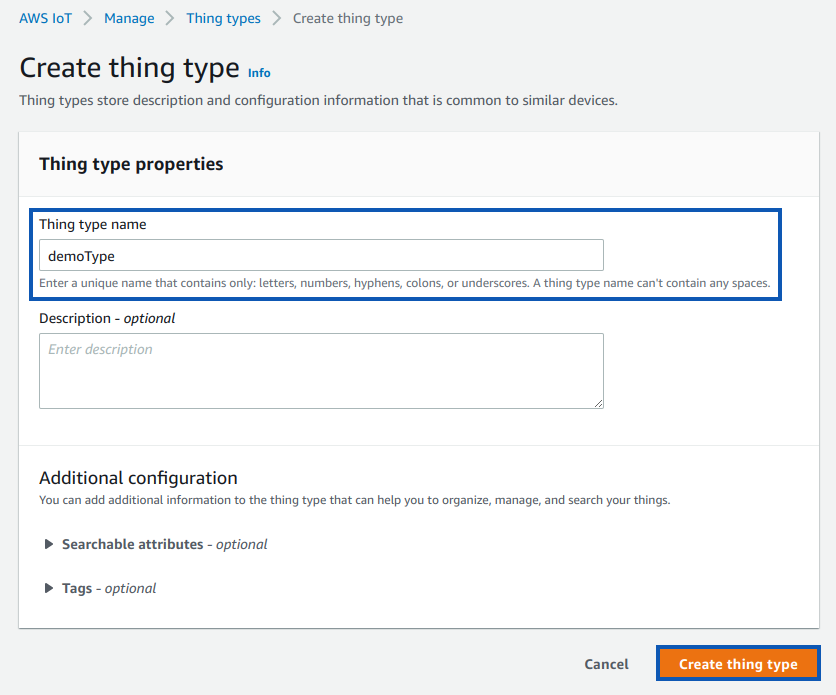
- The Device type is created and appears in the Types’ page.
Access Key Id and Secret Access Key
An Access key id and a Secret Access Key are required for the Device registration. To retrieve this information you must create a user.
-
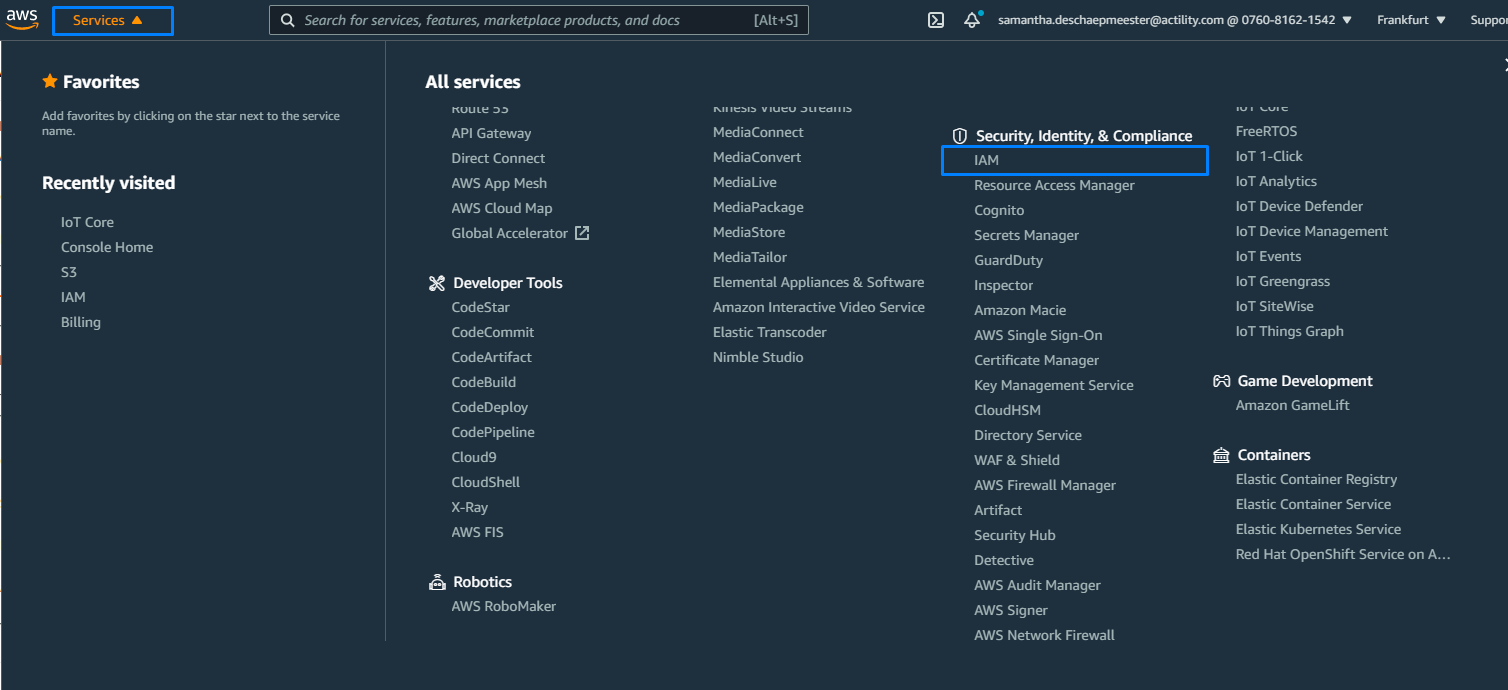
Click Services in the Banner.
-
Click the (Identity and Access Management)IAM link as shown in the following capture.
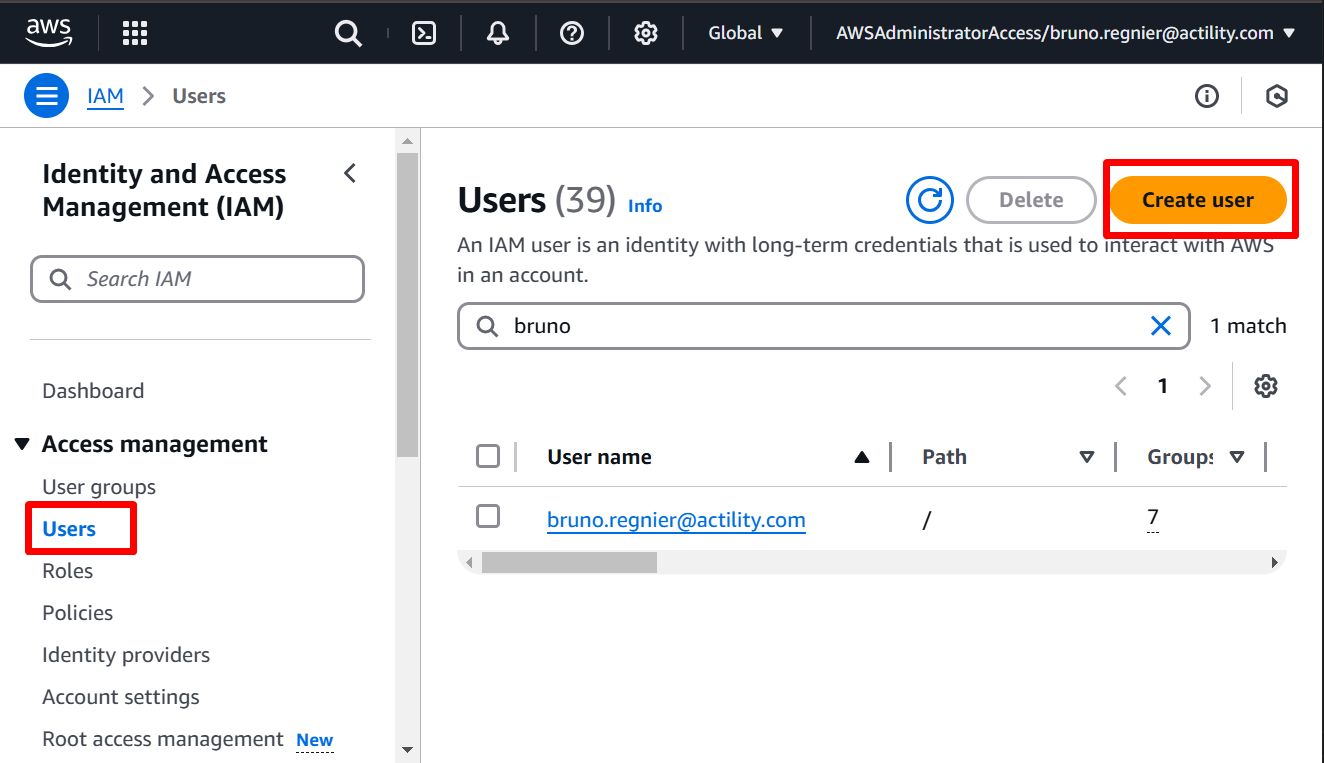
- In the dashboard page that opens, click Users. This looks like this:
-
Click Add user.
-
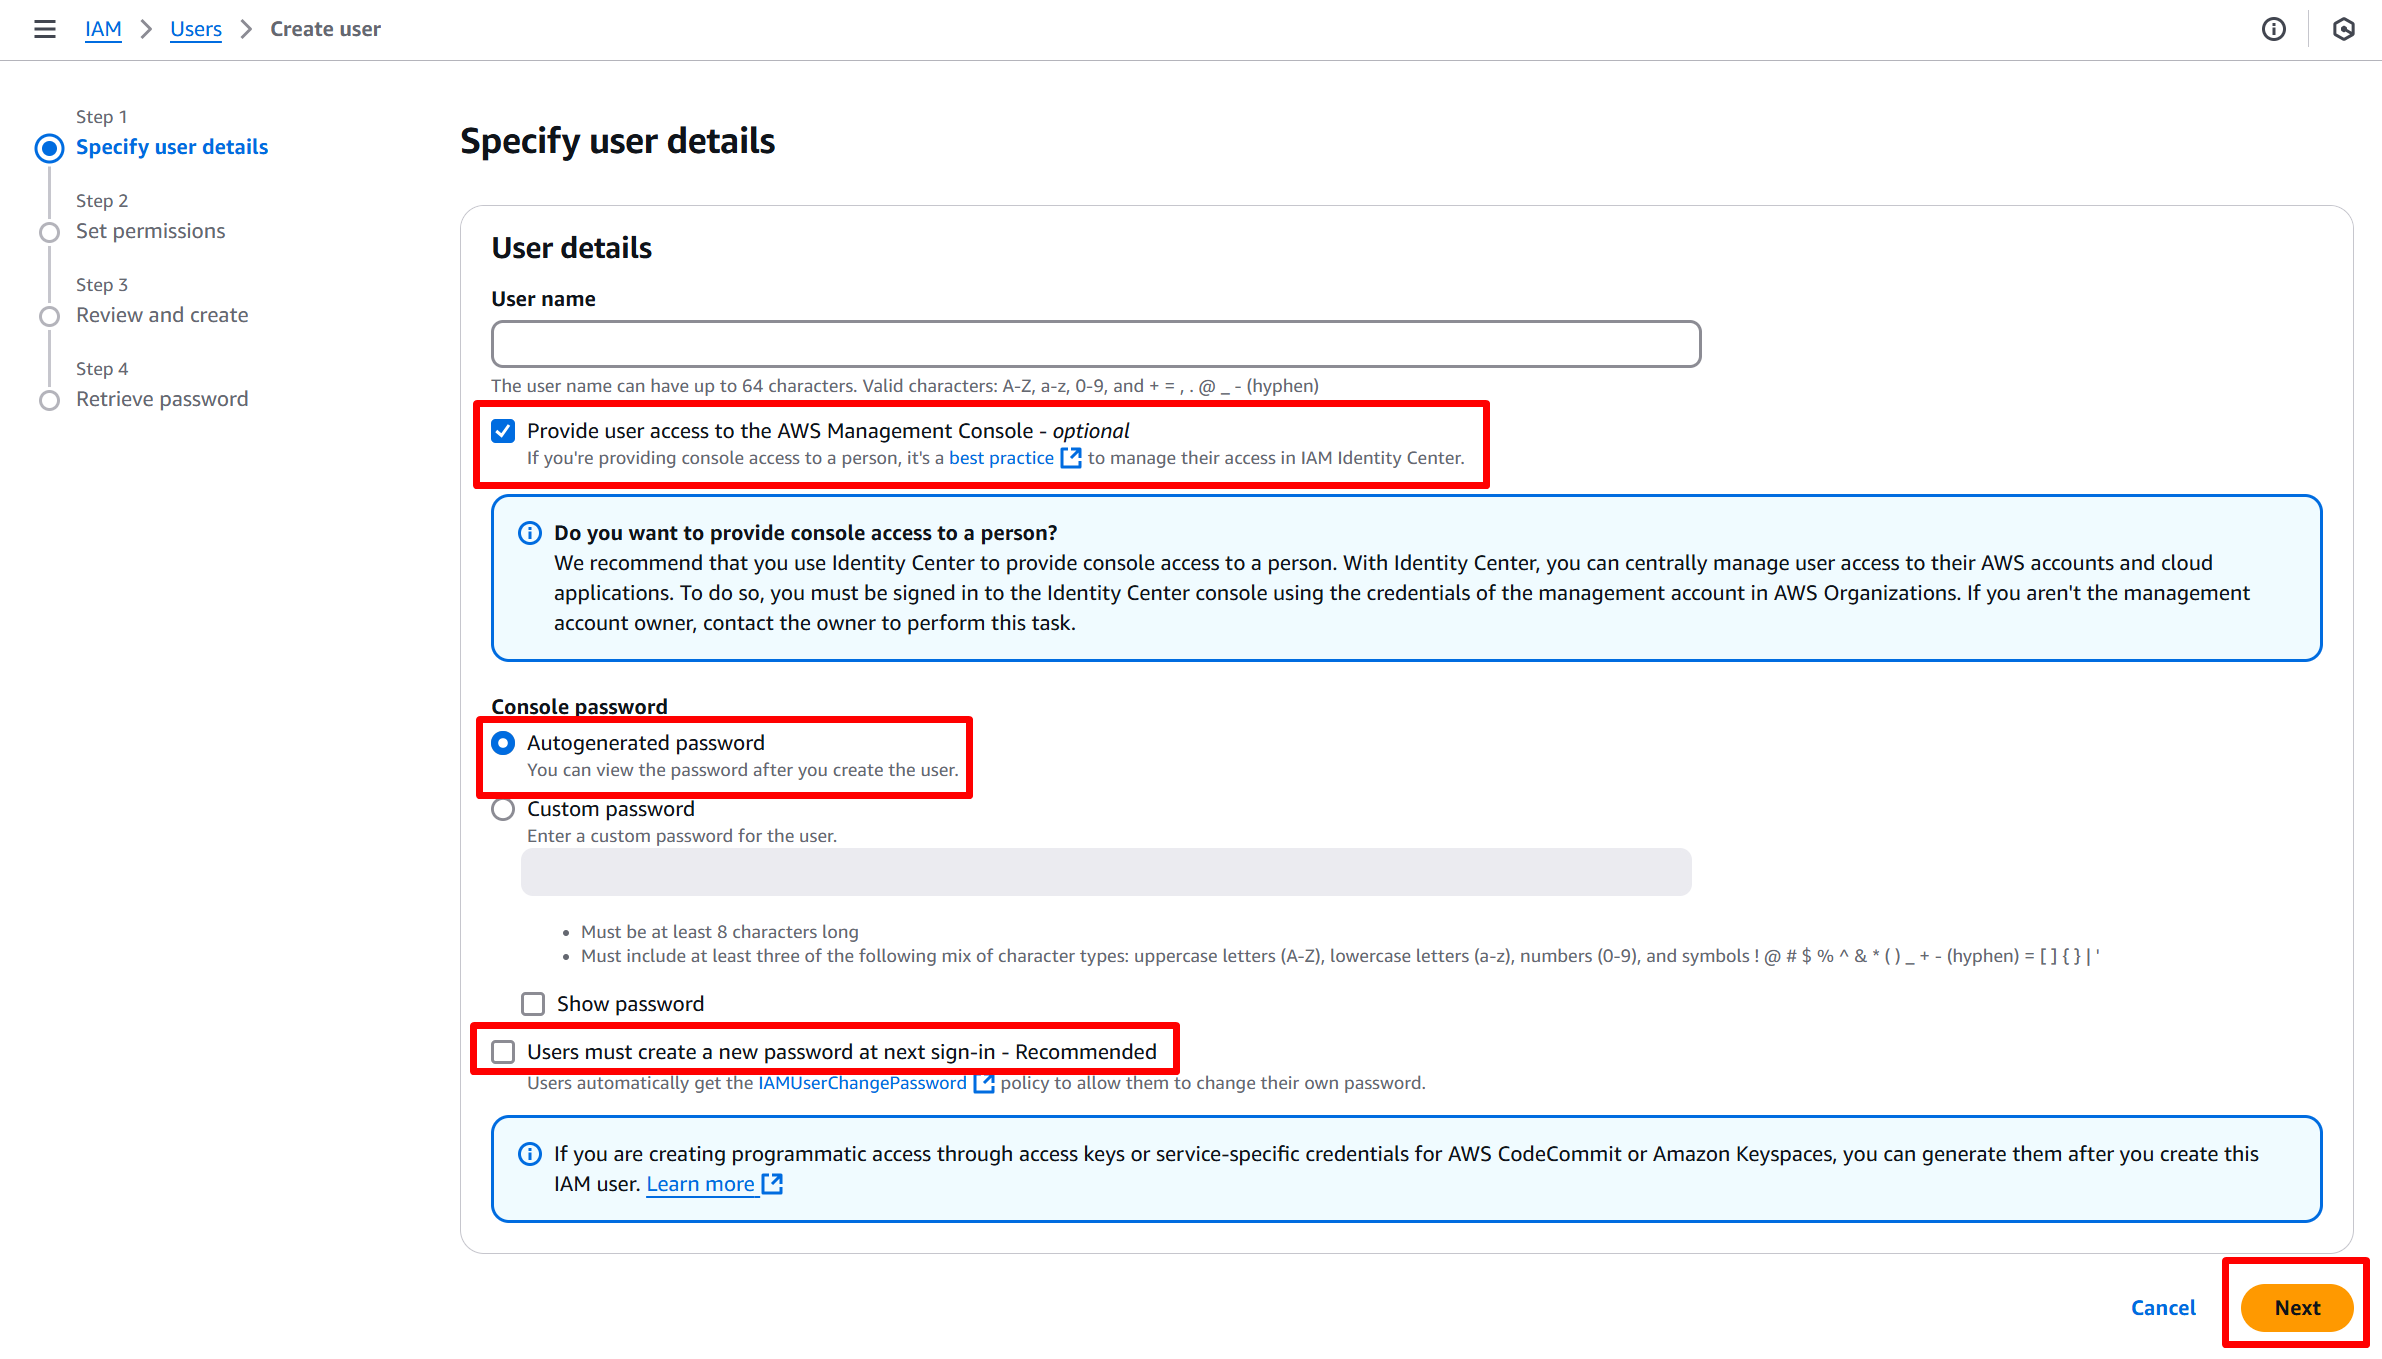
In the Add user’s page that opens type a Username as shown in the following capture:
-
Click Next Permissions.
-
In the Set Permissions’ page that opens click Attach existing policies directly as shown in the following capture:
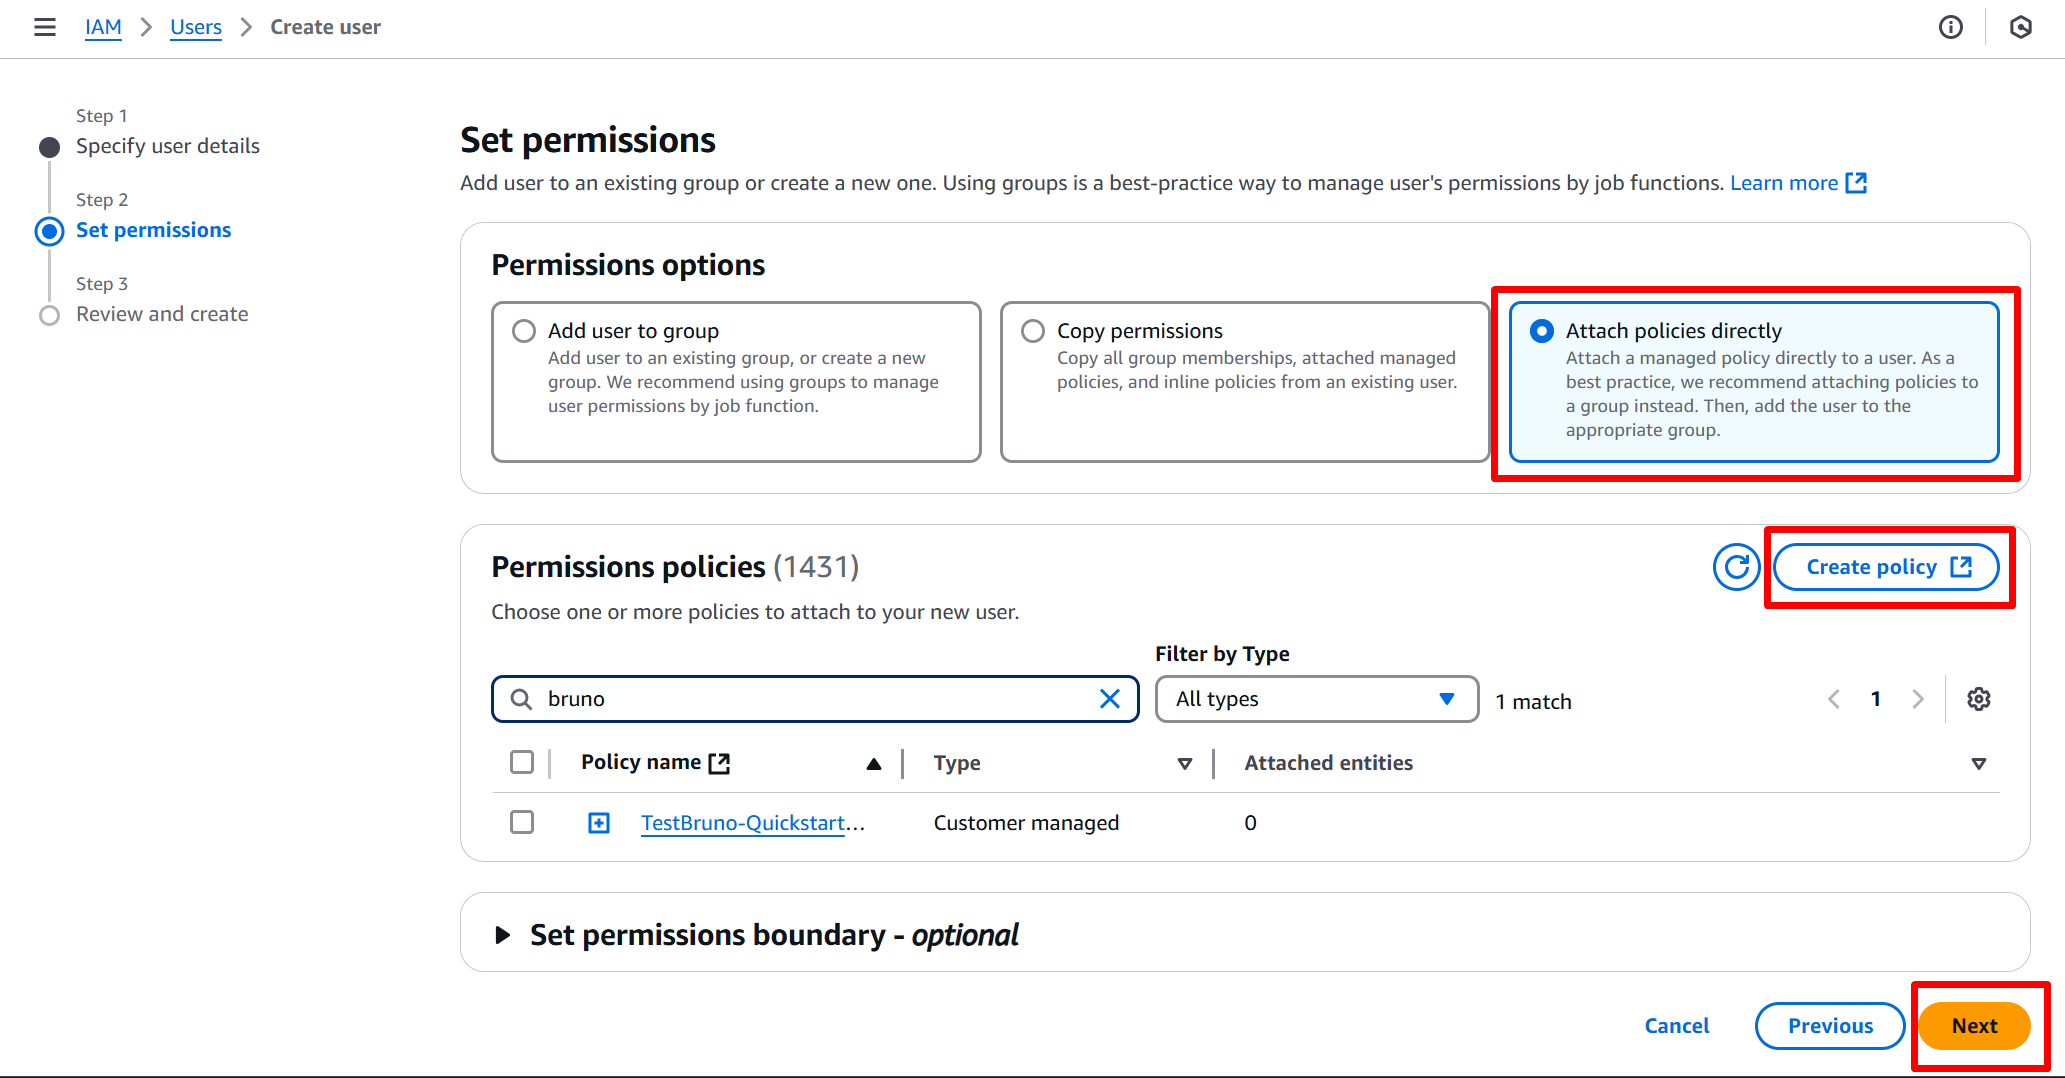
-
Click Create policy.
-
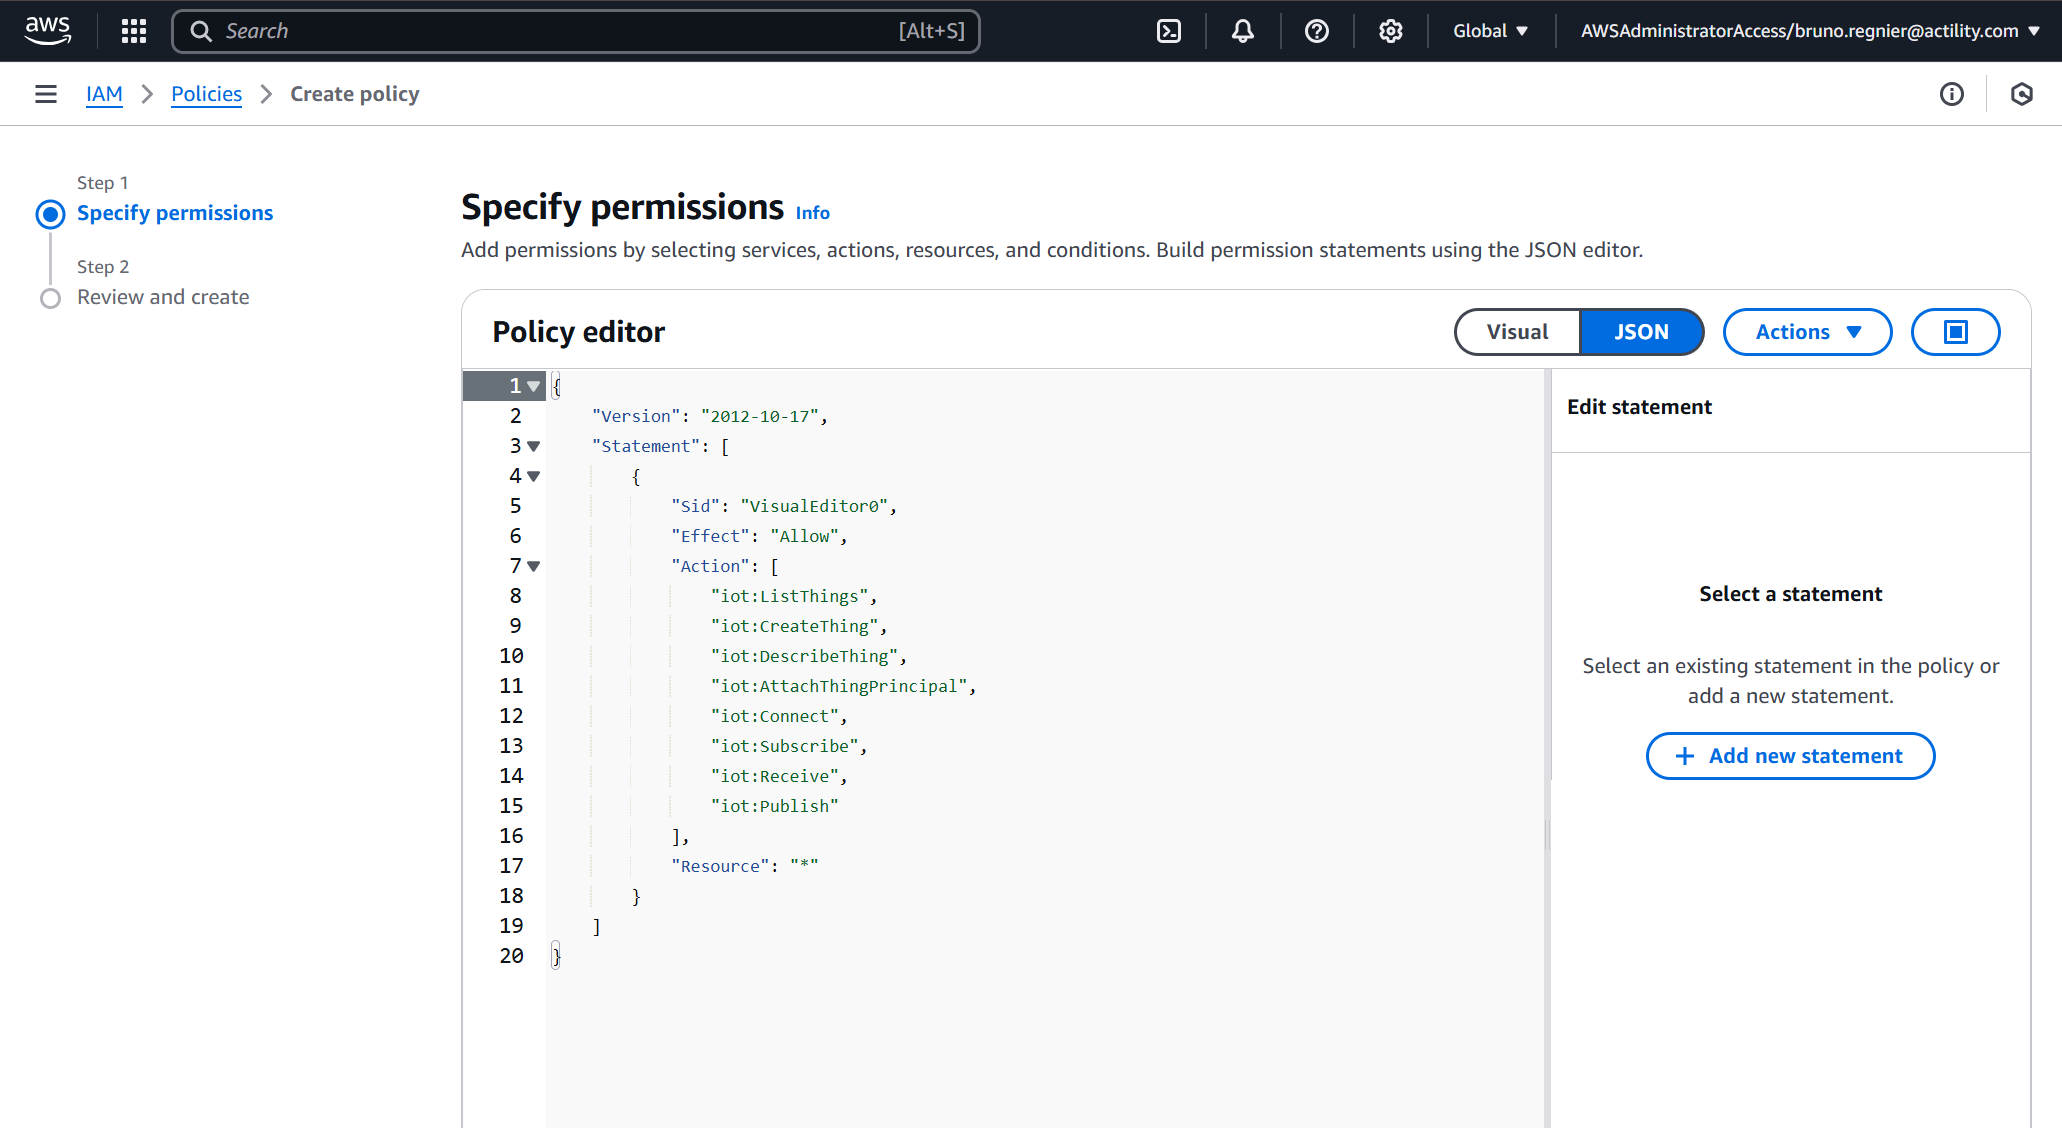
In the Create Policy’s page that opens select the policies that you are interested in either by using the JSON editor as shown in the following capture.
In this release the minimum rights that are granted to the policies are the following actions:
- iot:ListThings
- iot:CreateThing
- iot:AttachThingPrincipal
We recommand the usage of this list of actions.
{
    "Version": "2012-10-17",
    "Statement": [
        {
            "Sid": "VisualEditor0",
            "Effect": "Allow",
            "Action": [
                "iot:ListThings",
                "iot:CreateThing",
                "iot:DescribeThing",
                "iot:AttachThingPrincipal",
                "iot:Connect",
                "iot:Subscribe",
                "iot:Receive",
                "iot:Publish"
            ],
            "Resource": "*"
        }
    ]
}
This looks like this in the Editor:
-
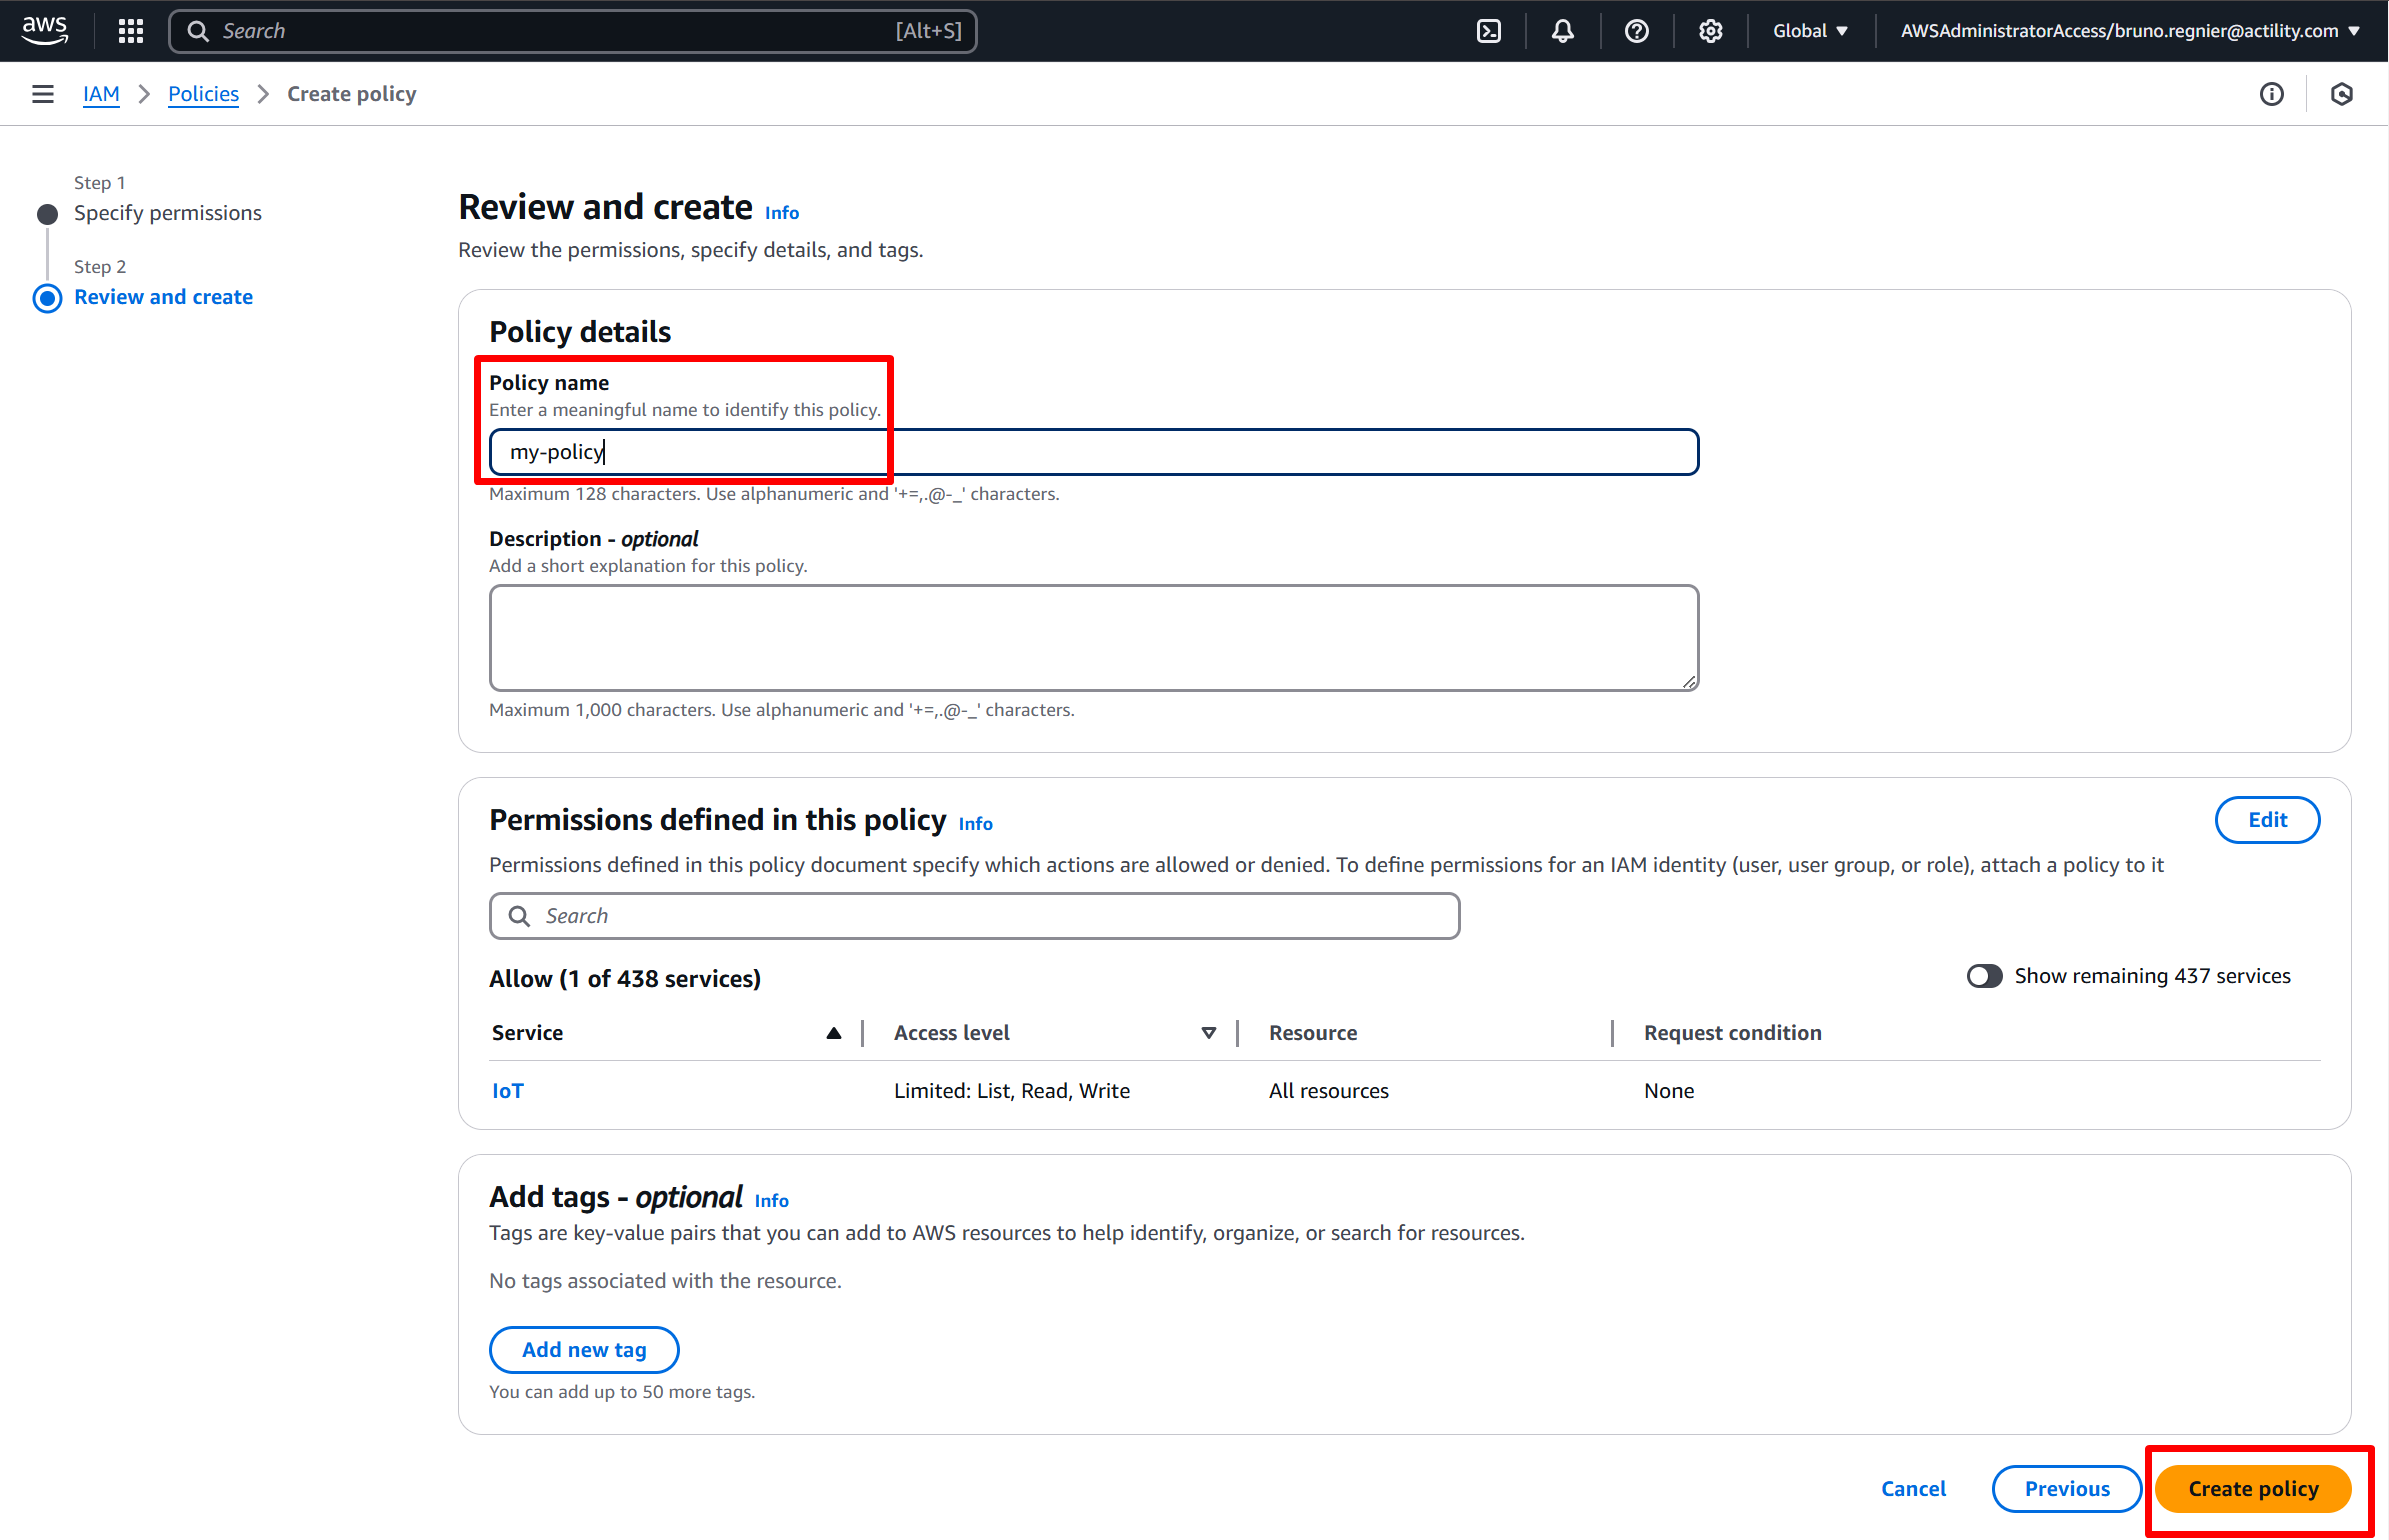
Click Review policy.
-
In the Review page that opens click Create Policy.
-
Close the Policy tab.
-
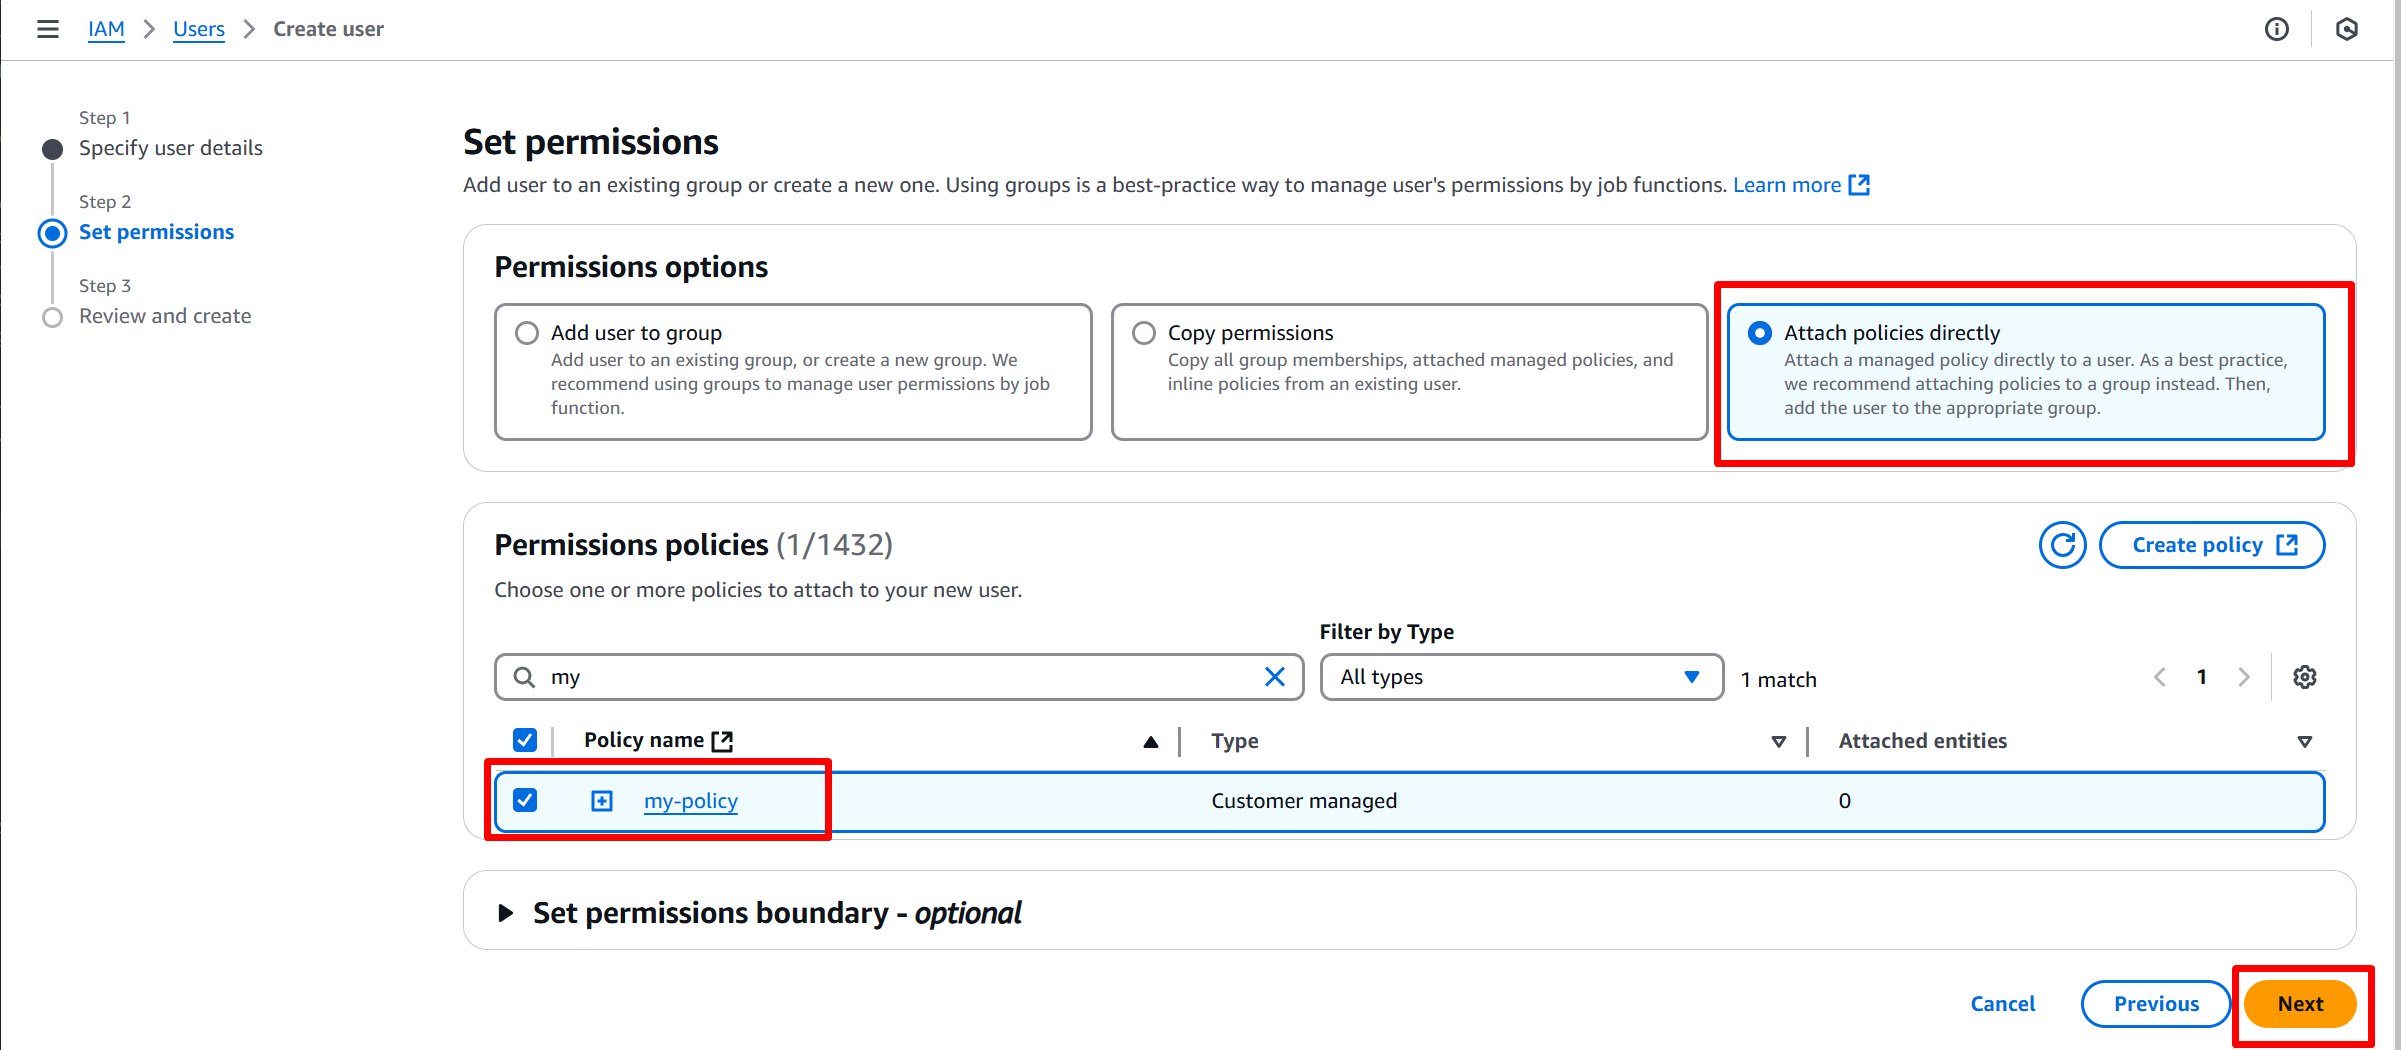
On the Add user page, click Refresh.
-
Select the policy that you created and click Next as shown in the following capture:
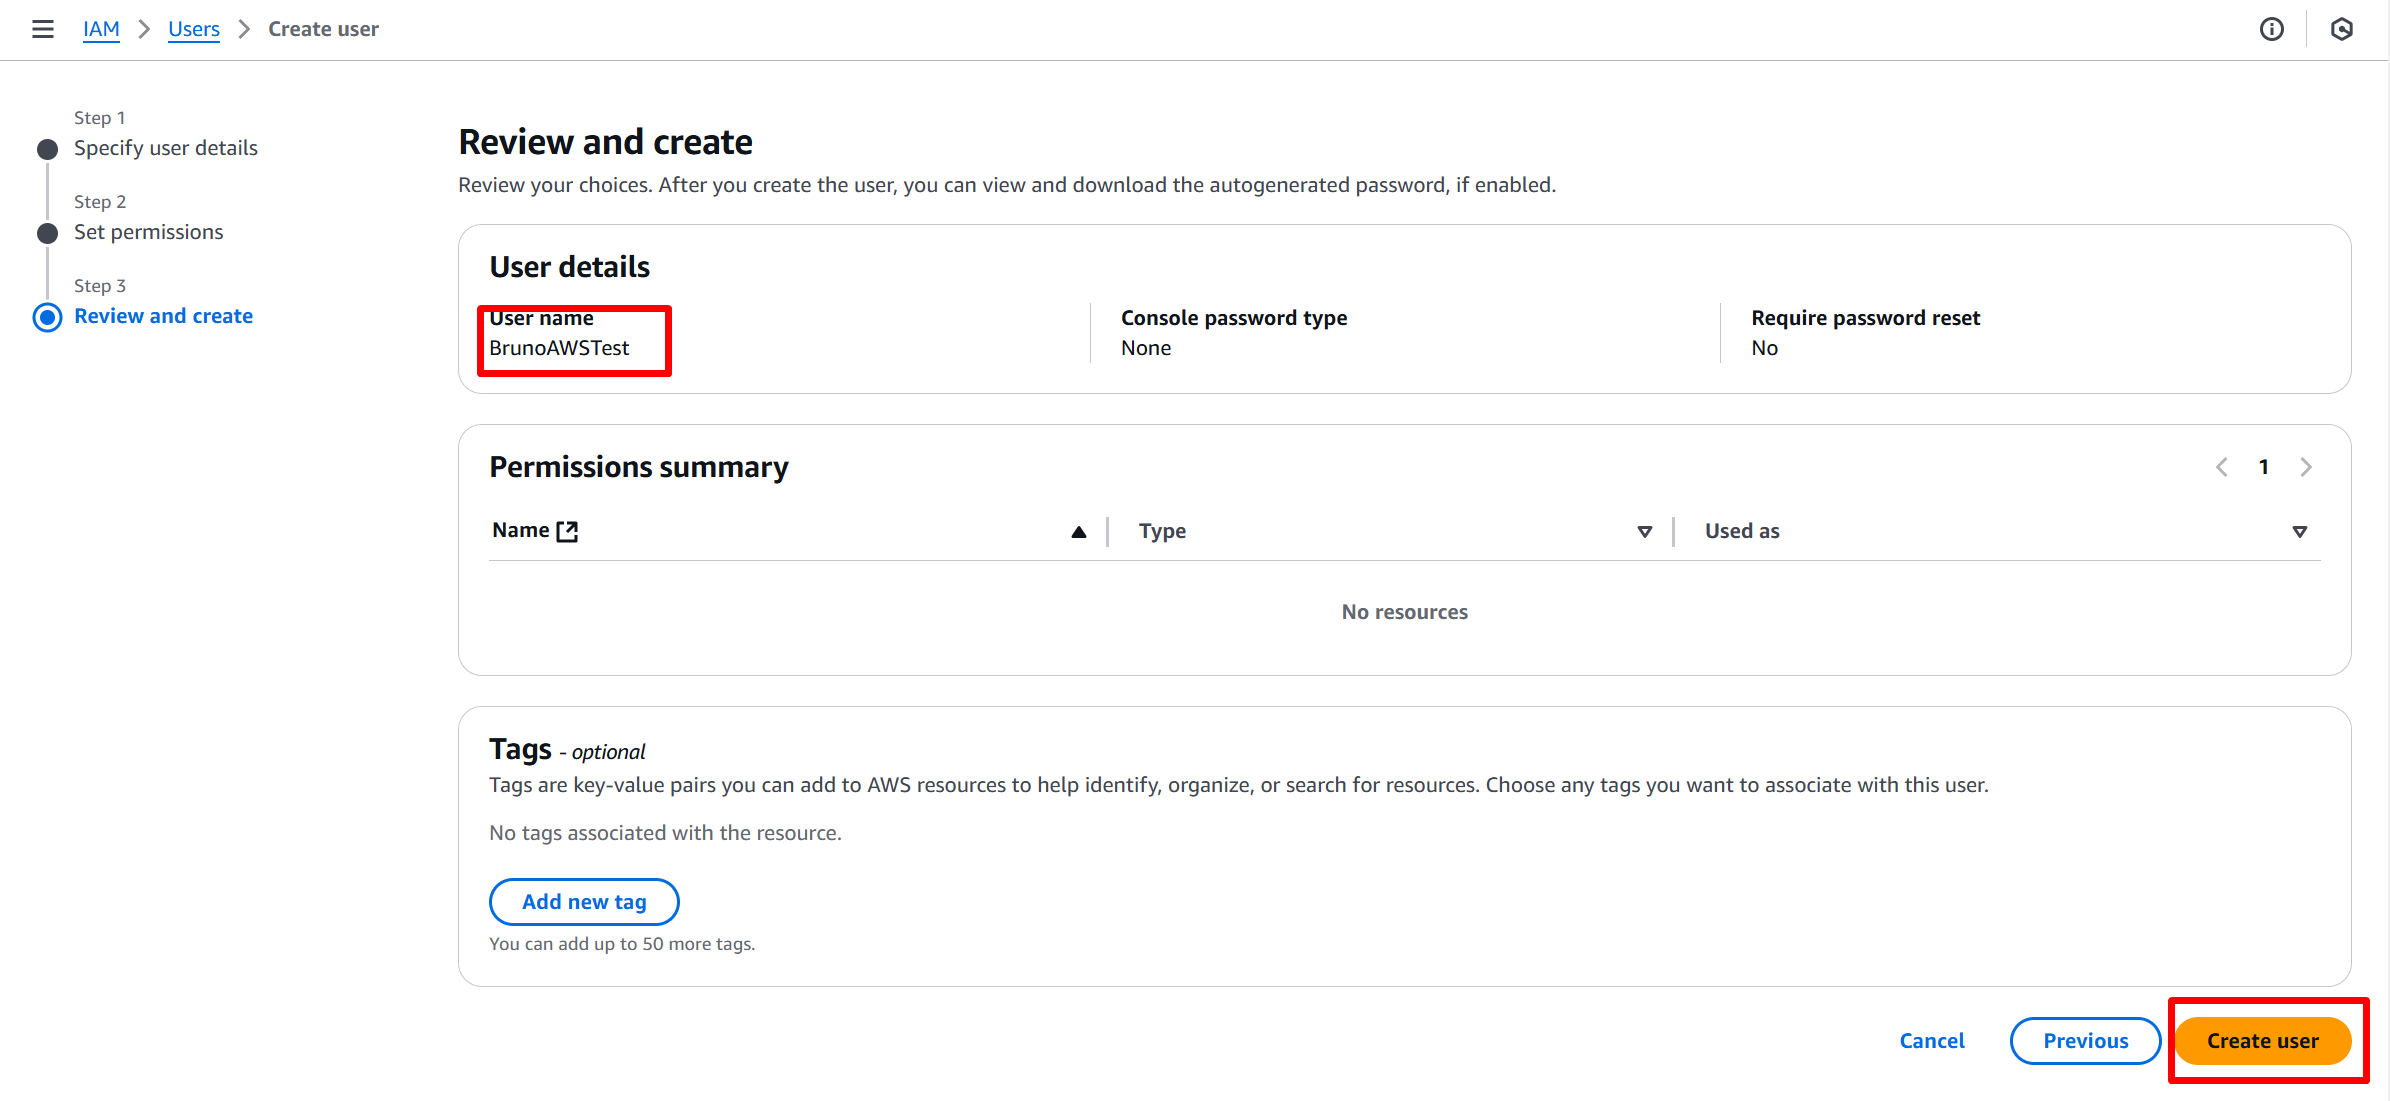
- On Review and create page, click on the Create user button as shown in the following capture.
- A screen informing that you created the user displays.
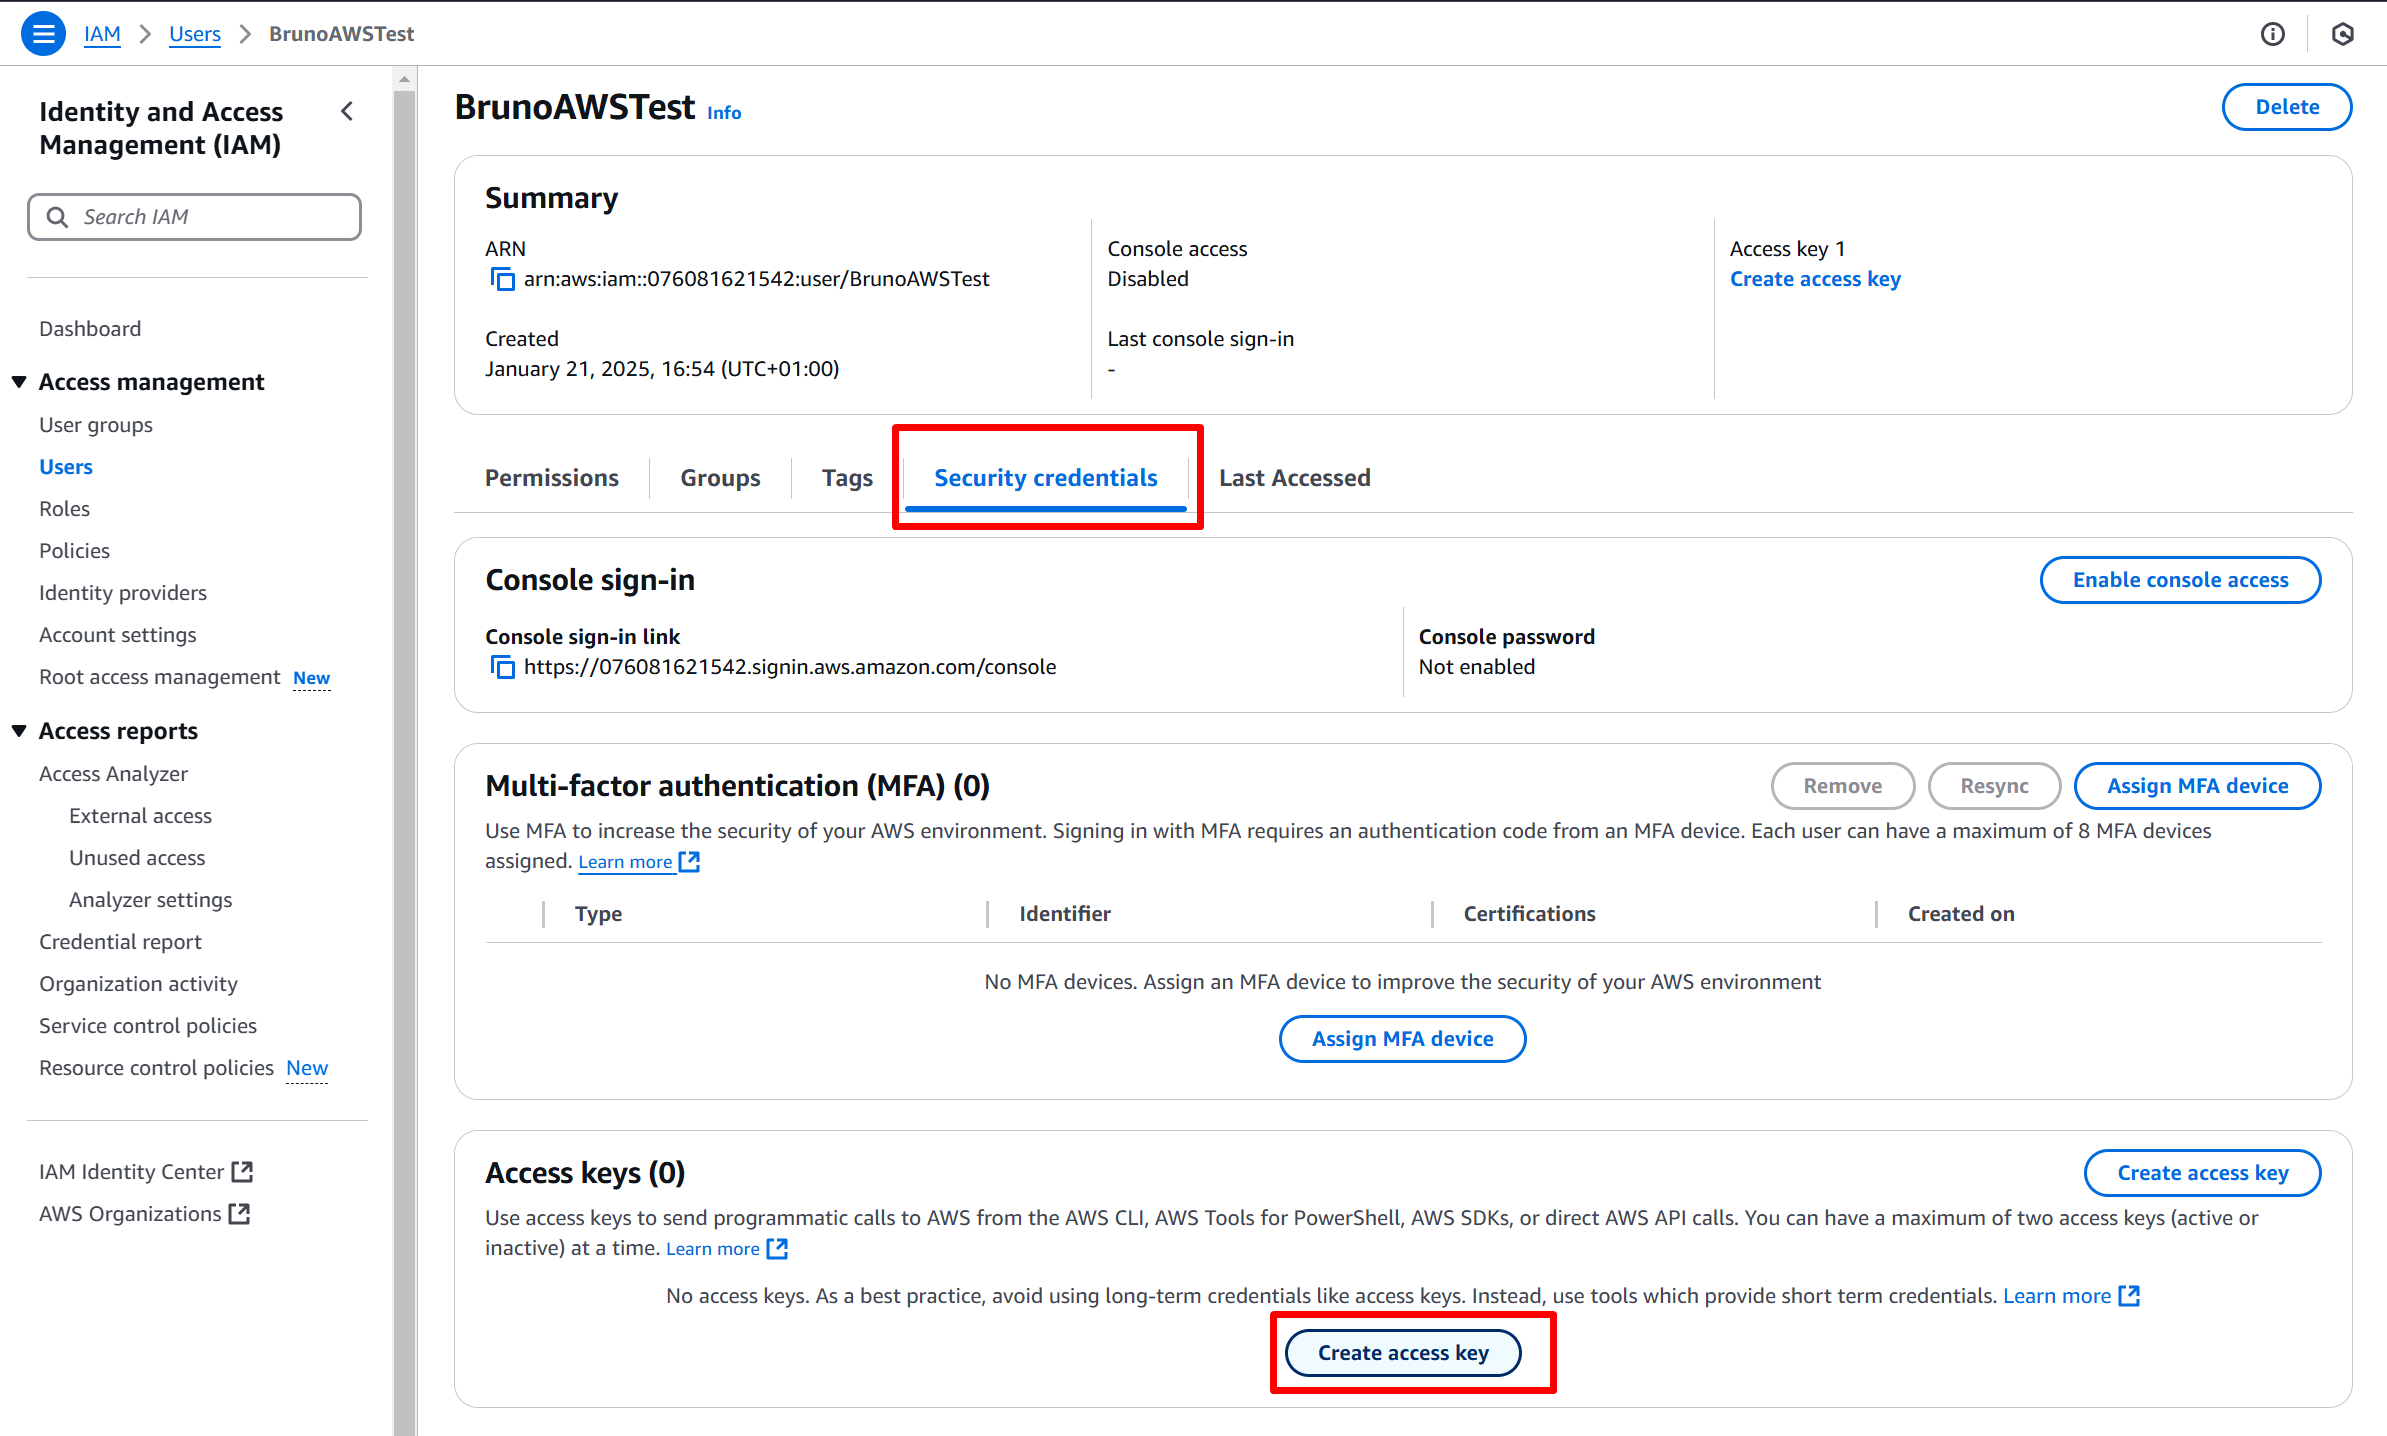
- Back to the created user and go to the Security credentials tab, click on the Create access key button as shown in the following capture.
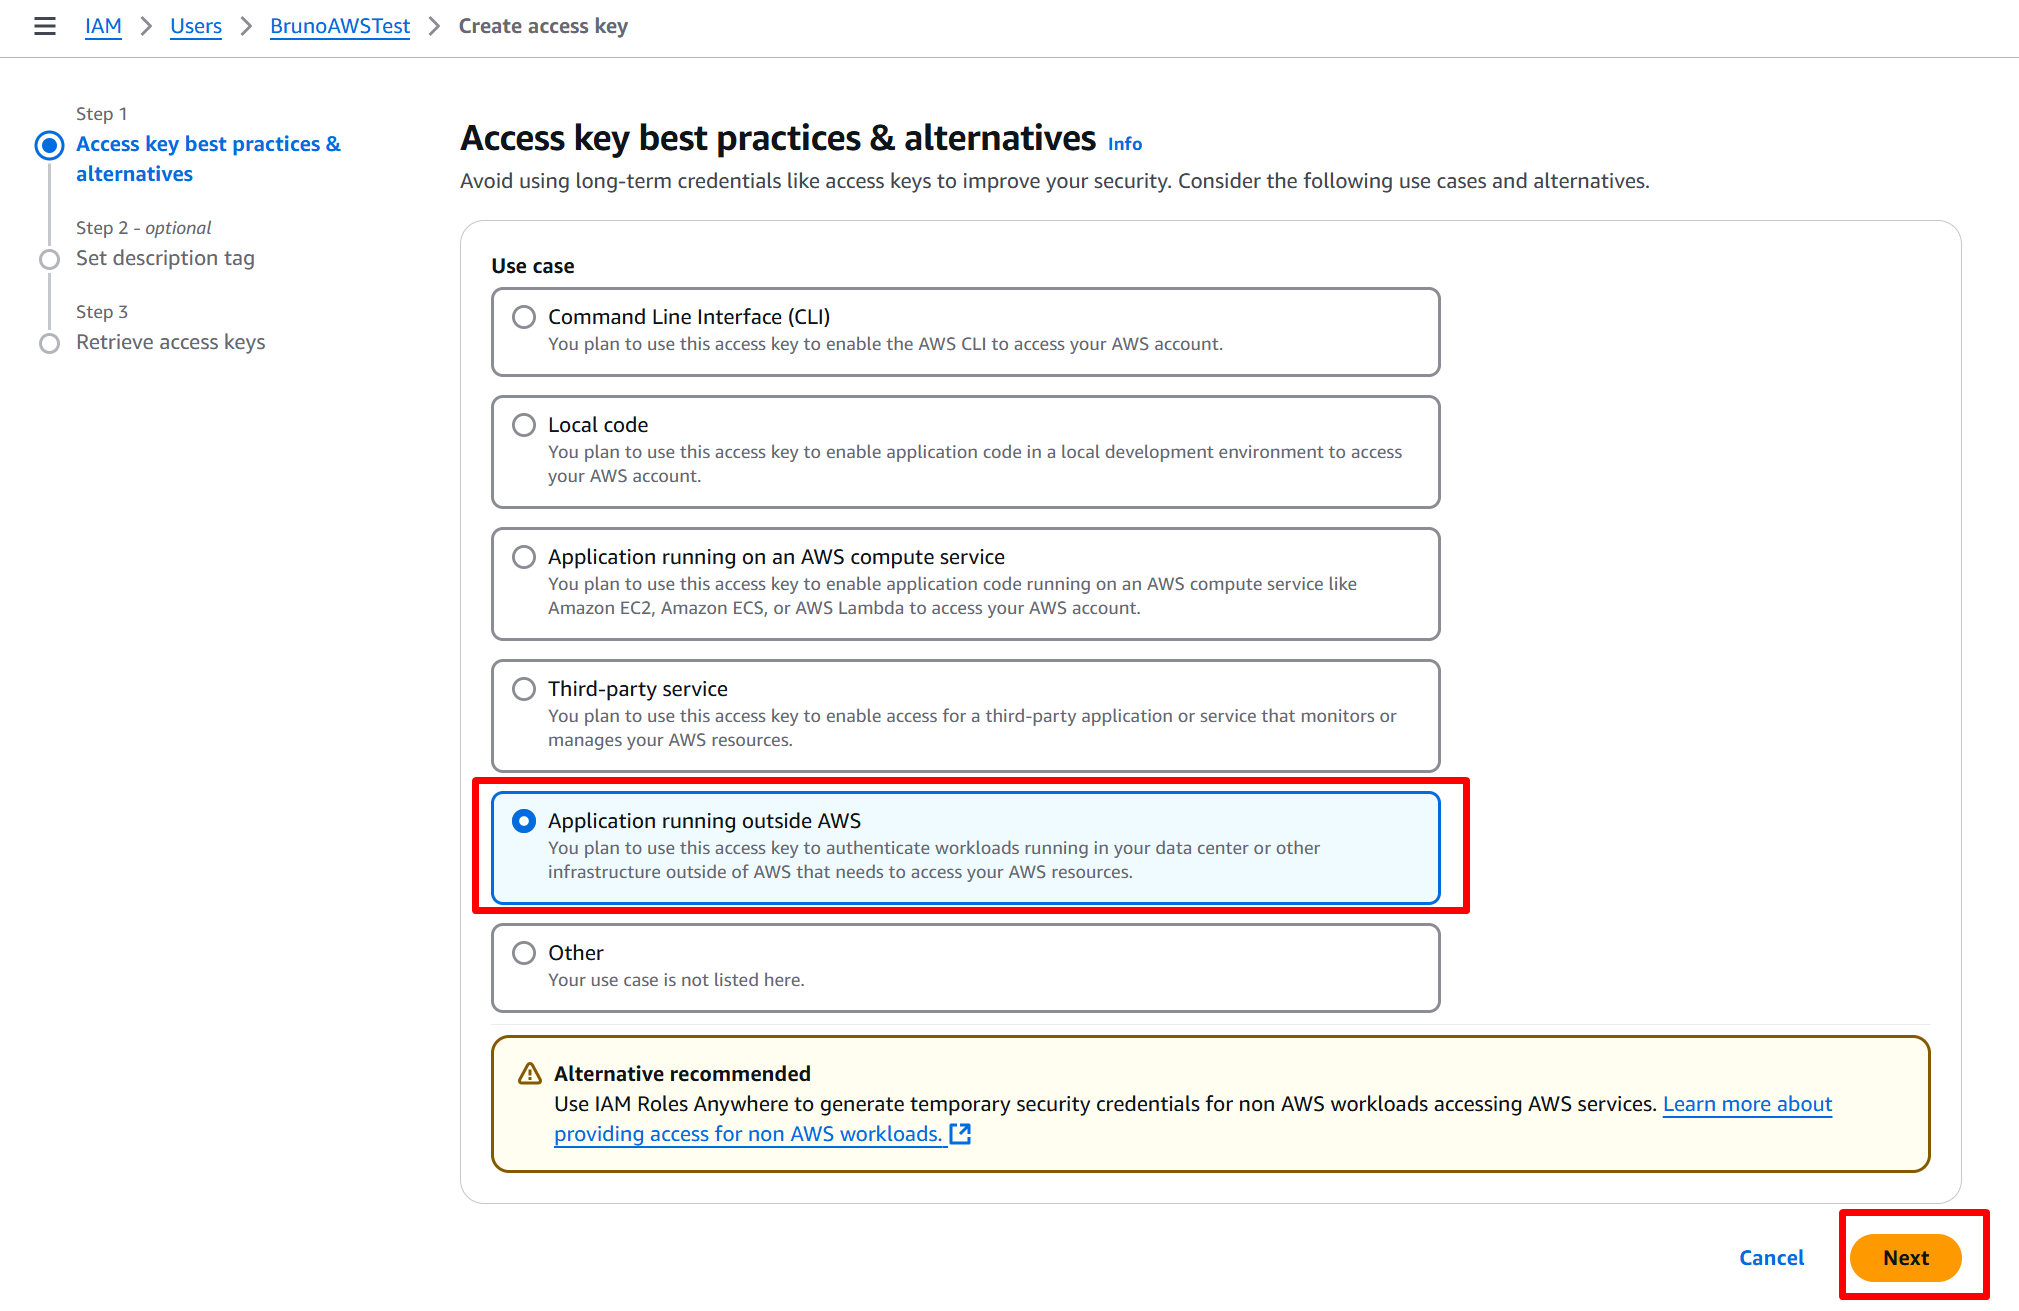
- Select the type of Access key Application running outside AWS and click Next as shown in the following capture.
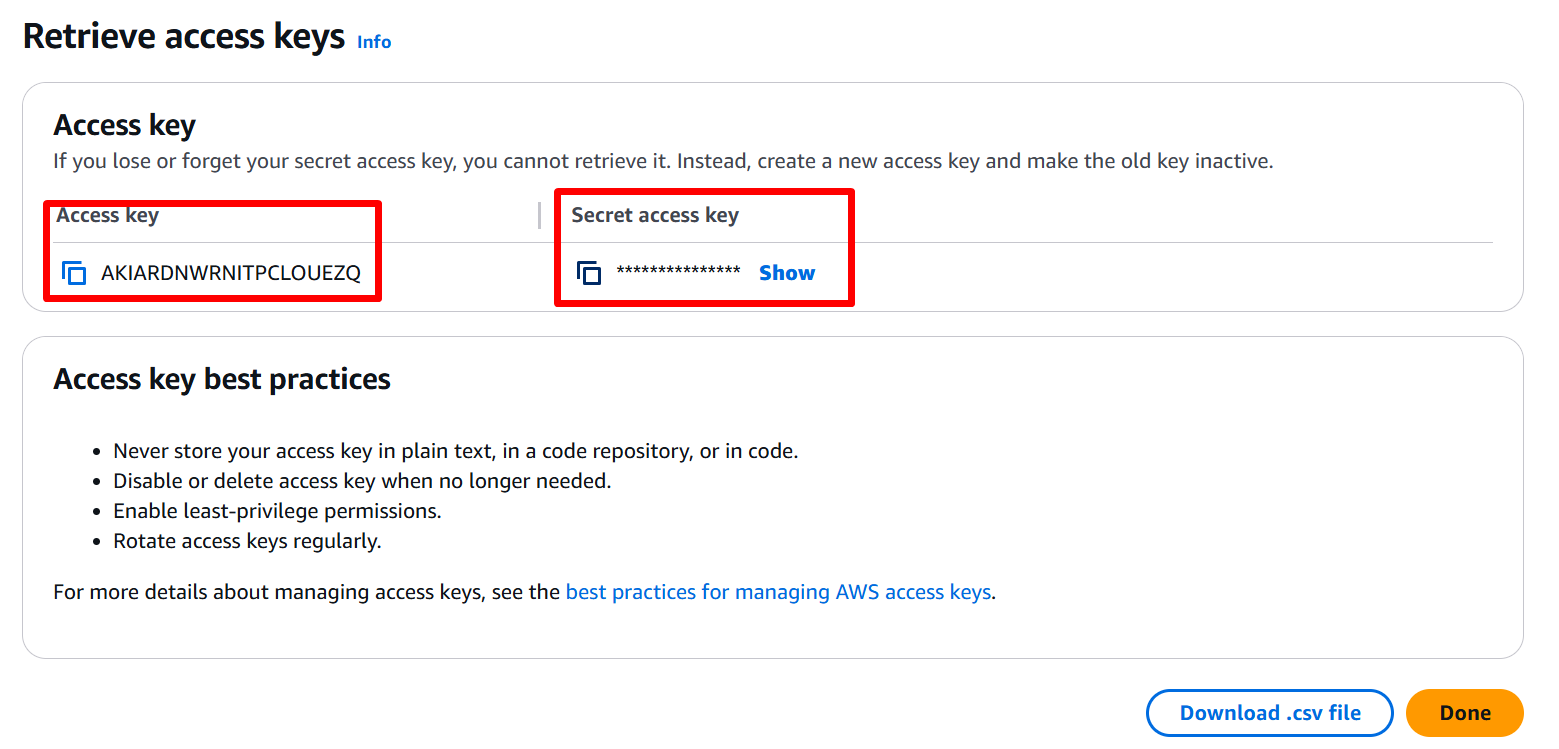
- Once clicked on Create access key, collect your Access key and Secret access key. Click on Done.
Certificate and Policy
A certificate is required for the registration of the TLS connection protocol (MQTT over TLS v1.2 connection) and the Device.
- Go to the IoT-Core product and navigation to Manage/Security/Certificates section.
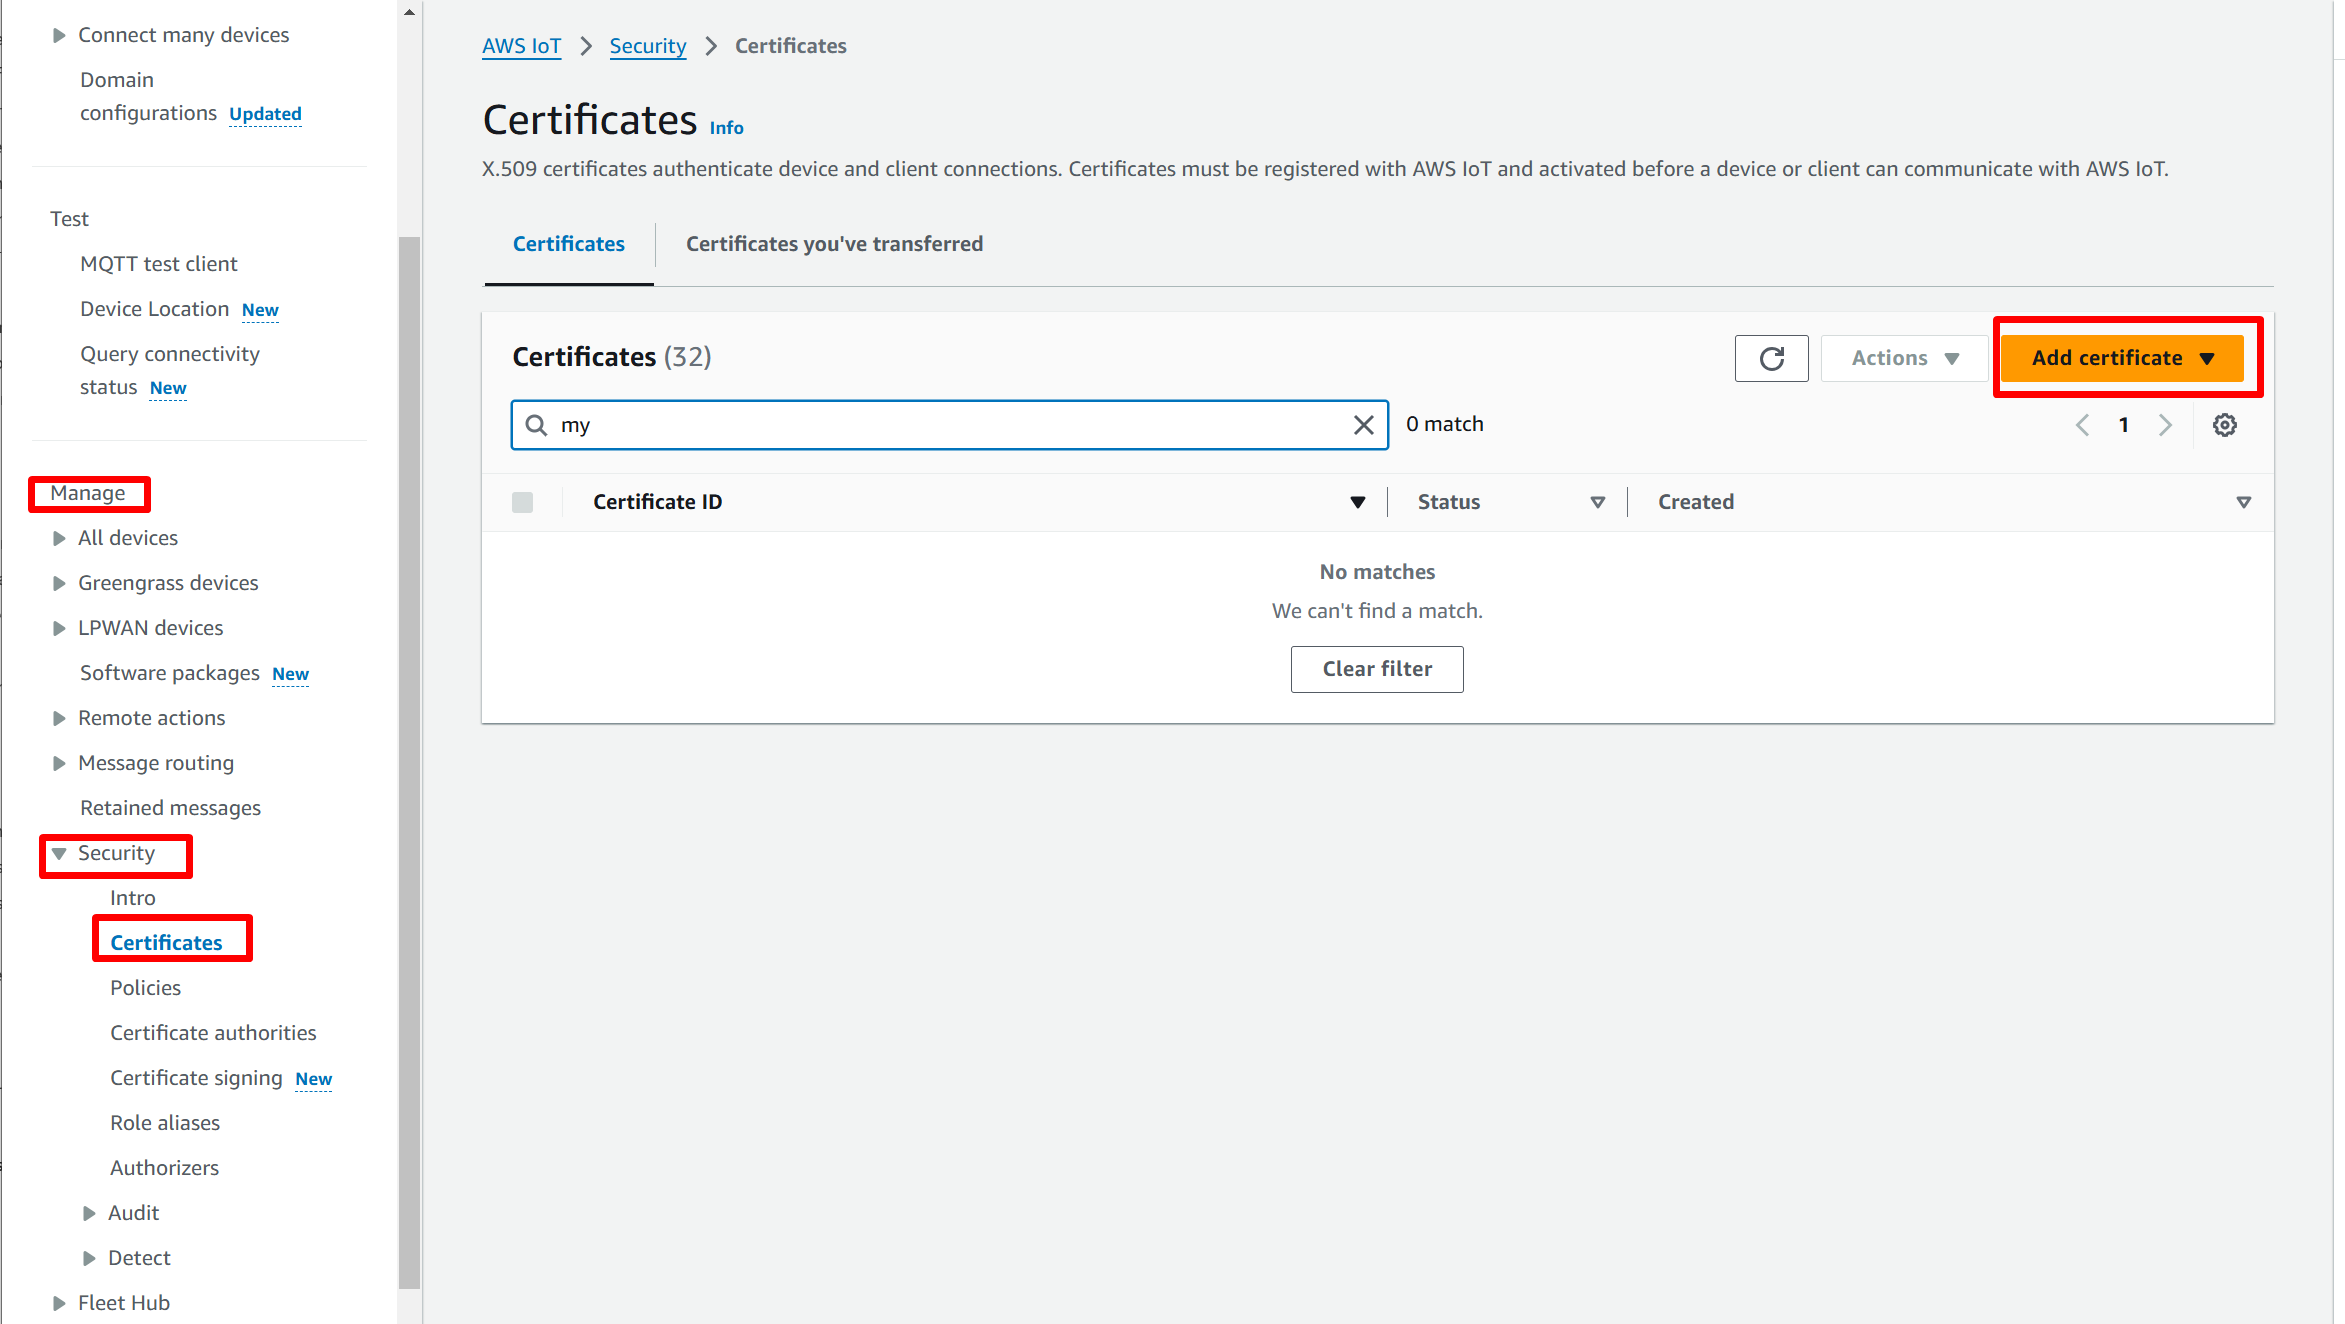
-
Click Add certificate.
-
In the Create a Certificate’s page, choose Auto-generate new certificate (recommended) and Active.
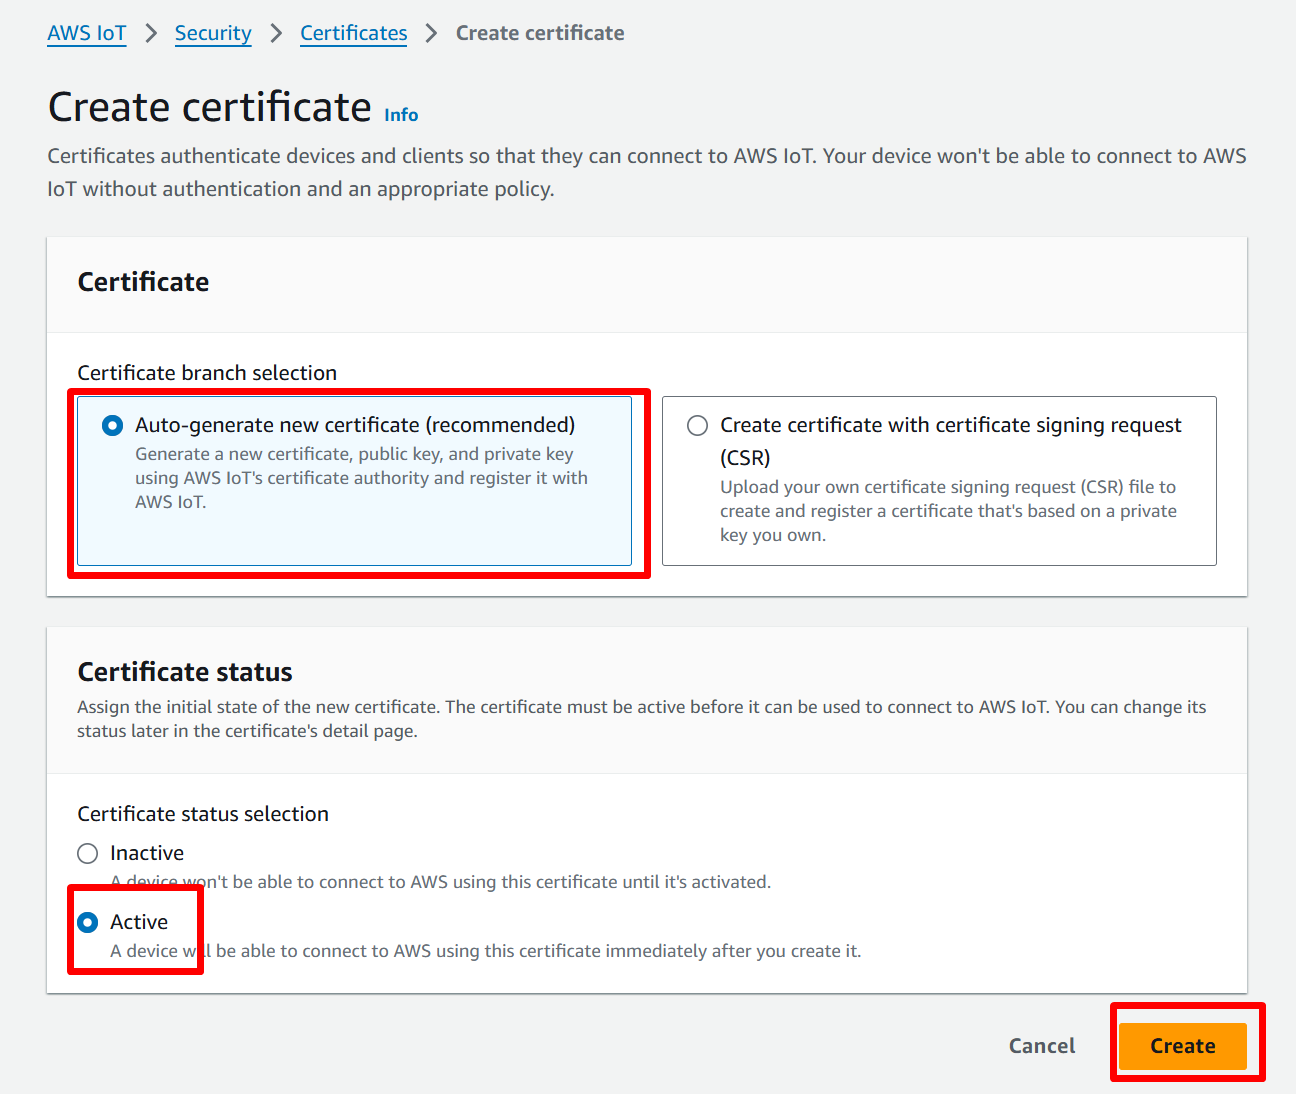
-
Click Create.
-
Once the certificate is created, you will be able to download the certificate file and the associated private key.
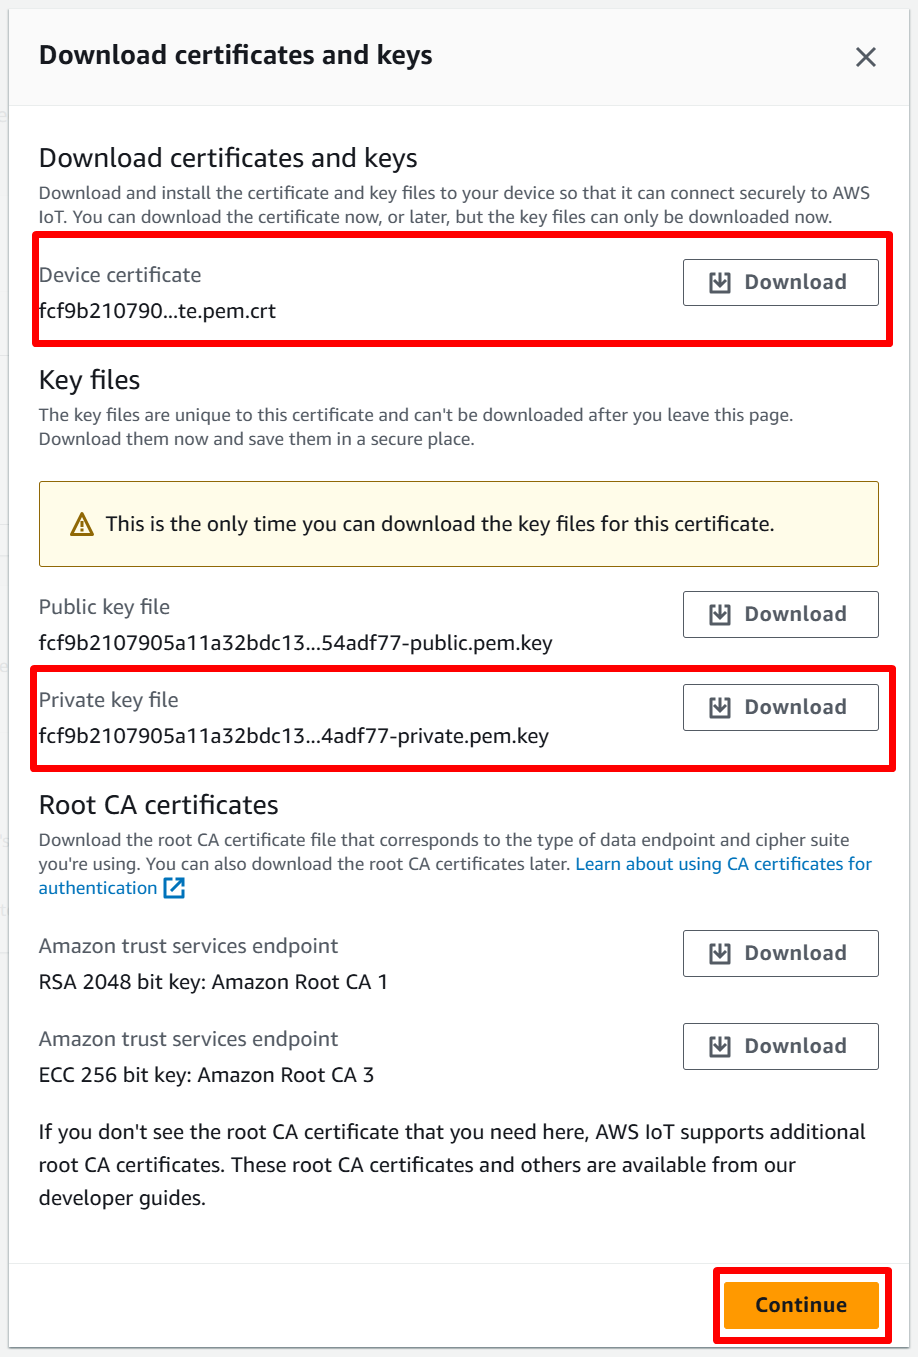
- Click Continue.
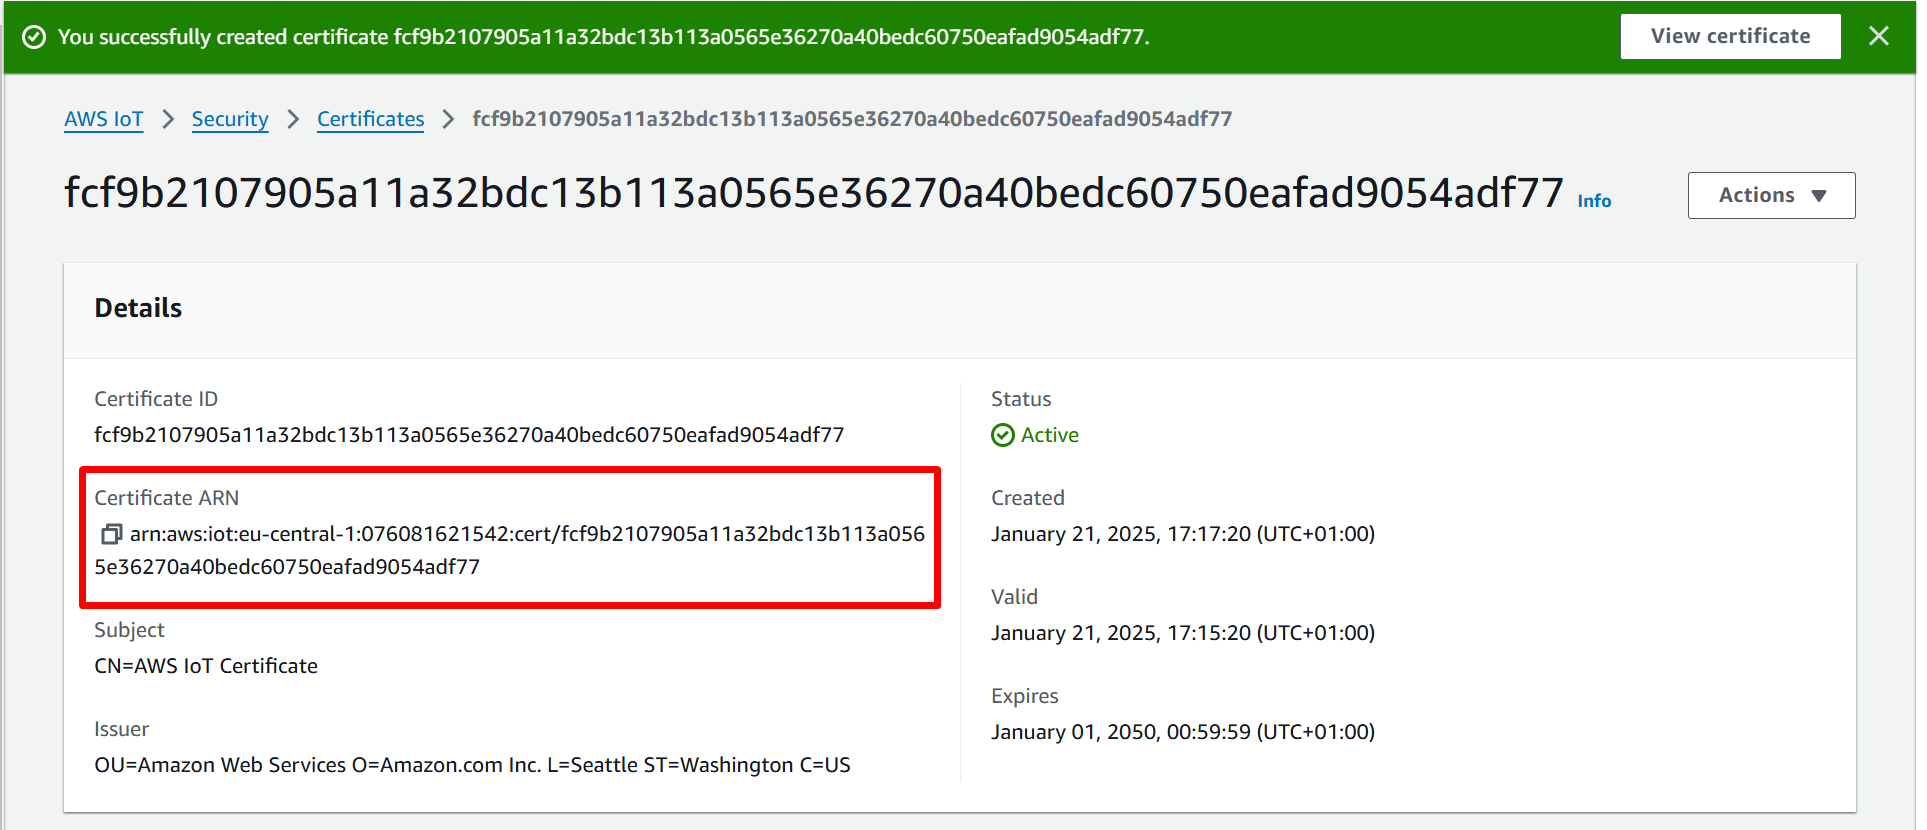
- A notification appears to confirm that the certificate is created.
- By clicking on your certificate you just created, you'll be able to get the Certificate ARN required to accomplish a connection
- Now, go to Policies section, and click on Create policy.
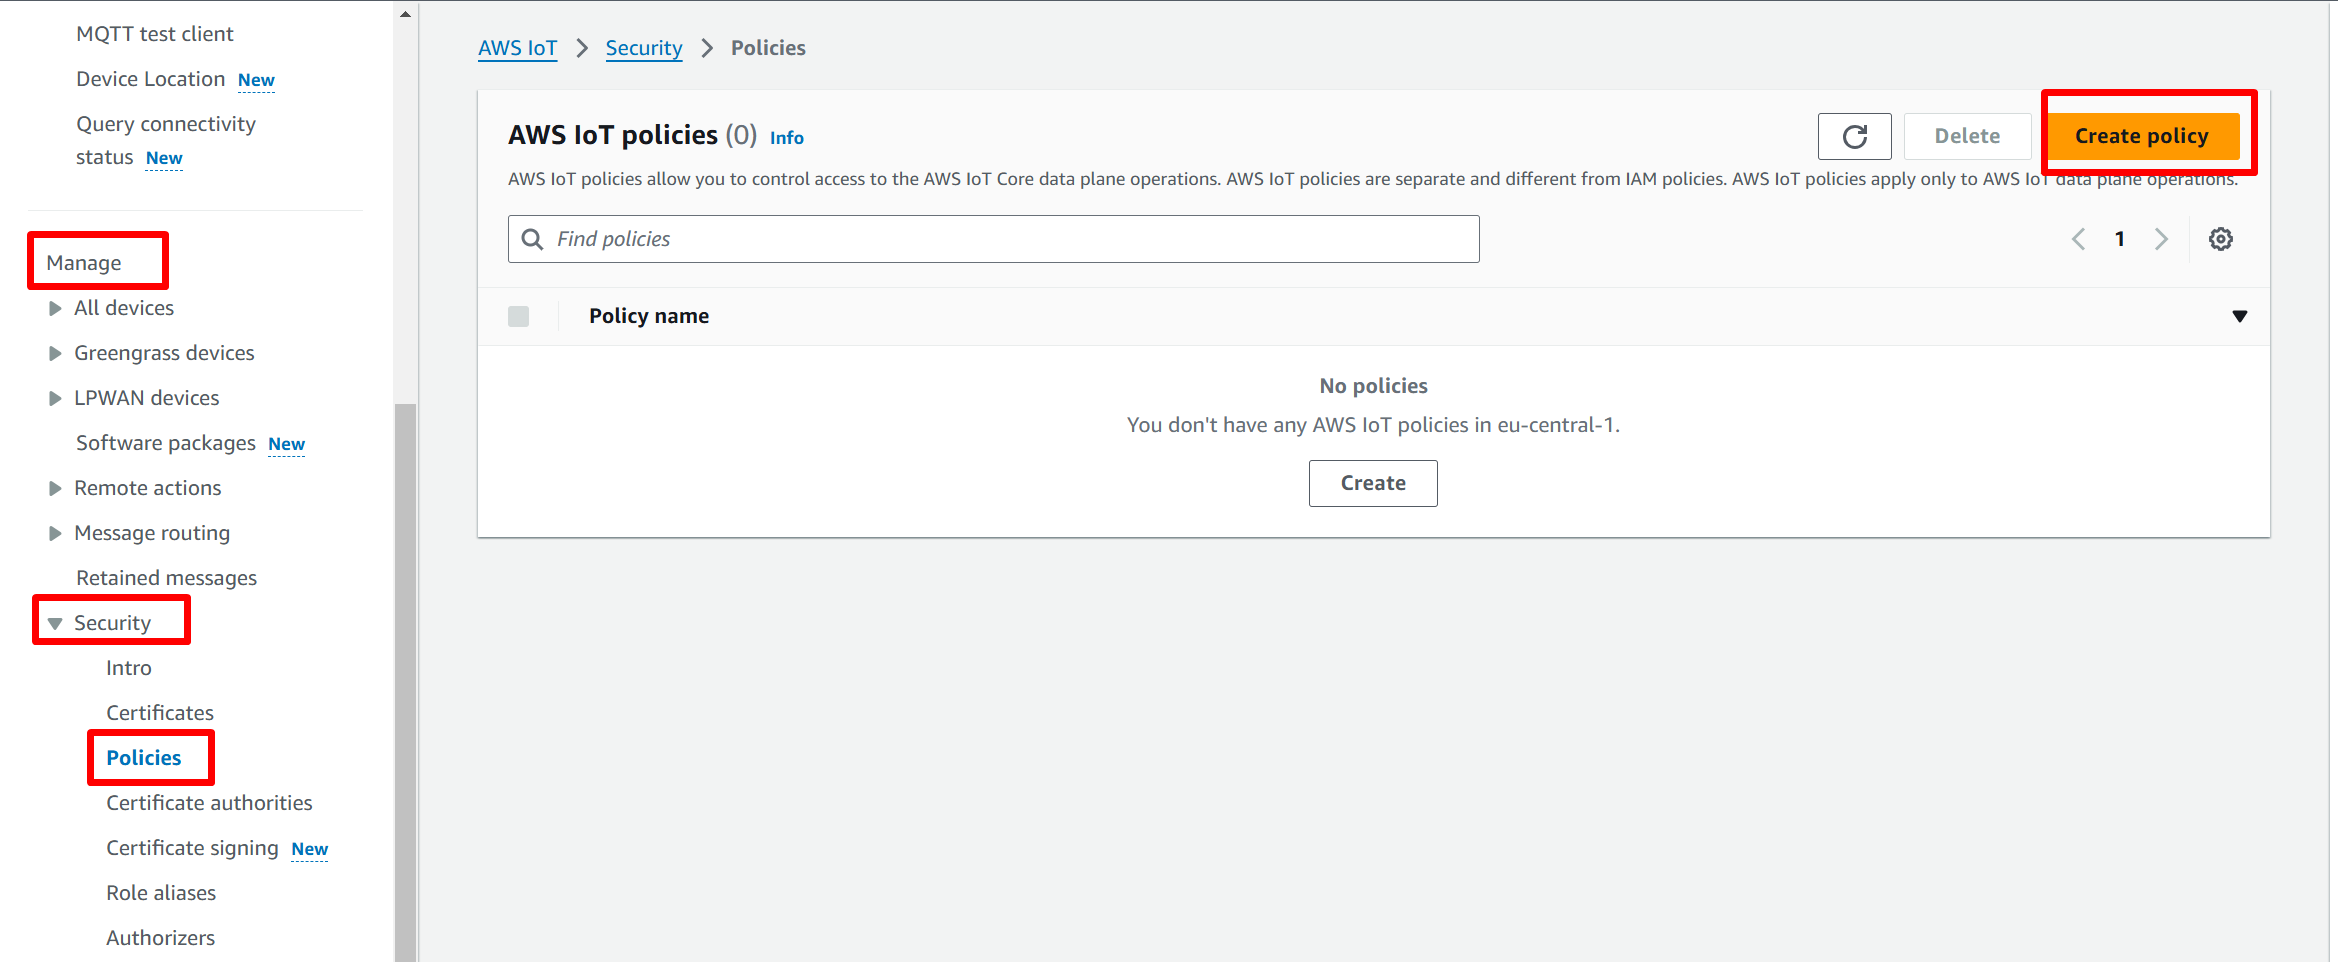
- Give it a name, Copy this JSON body, and paste it in Policy statements after clicking on JSON switch:
{
  "Version": "2012-10-17",
  "Statement": [
    {
      "Effect": "Allow",
      "Action": "iot:Publish",
      "Resource": "*"
    },
    {
      "Effect": "Allow",
      "Action": "iot:Subscribe",
      "Resource": "*"
    },
    {
      "Effect": "Allow",
      "Action": "iot:Connect",
      "Resource": "*"
    },
    {
      "Effect": "Allow",
      "Action": "iot:Receive",
      "Resource": "*"
    }
  ]
}
- Click Create.
- A notification appears to confirm that the policy is created.
- Return to your certificate details page and click Attach policy.
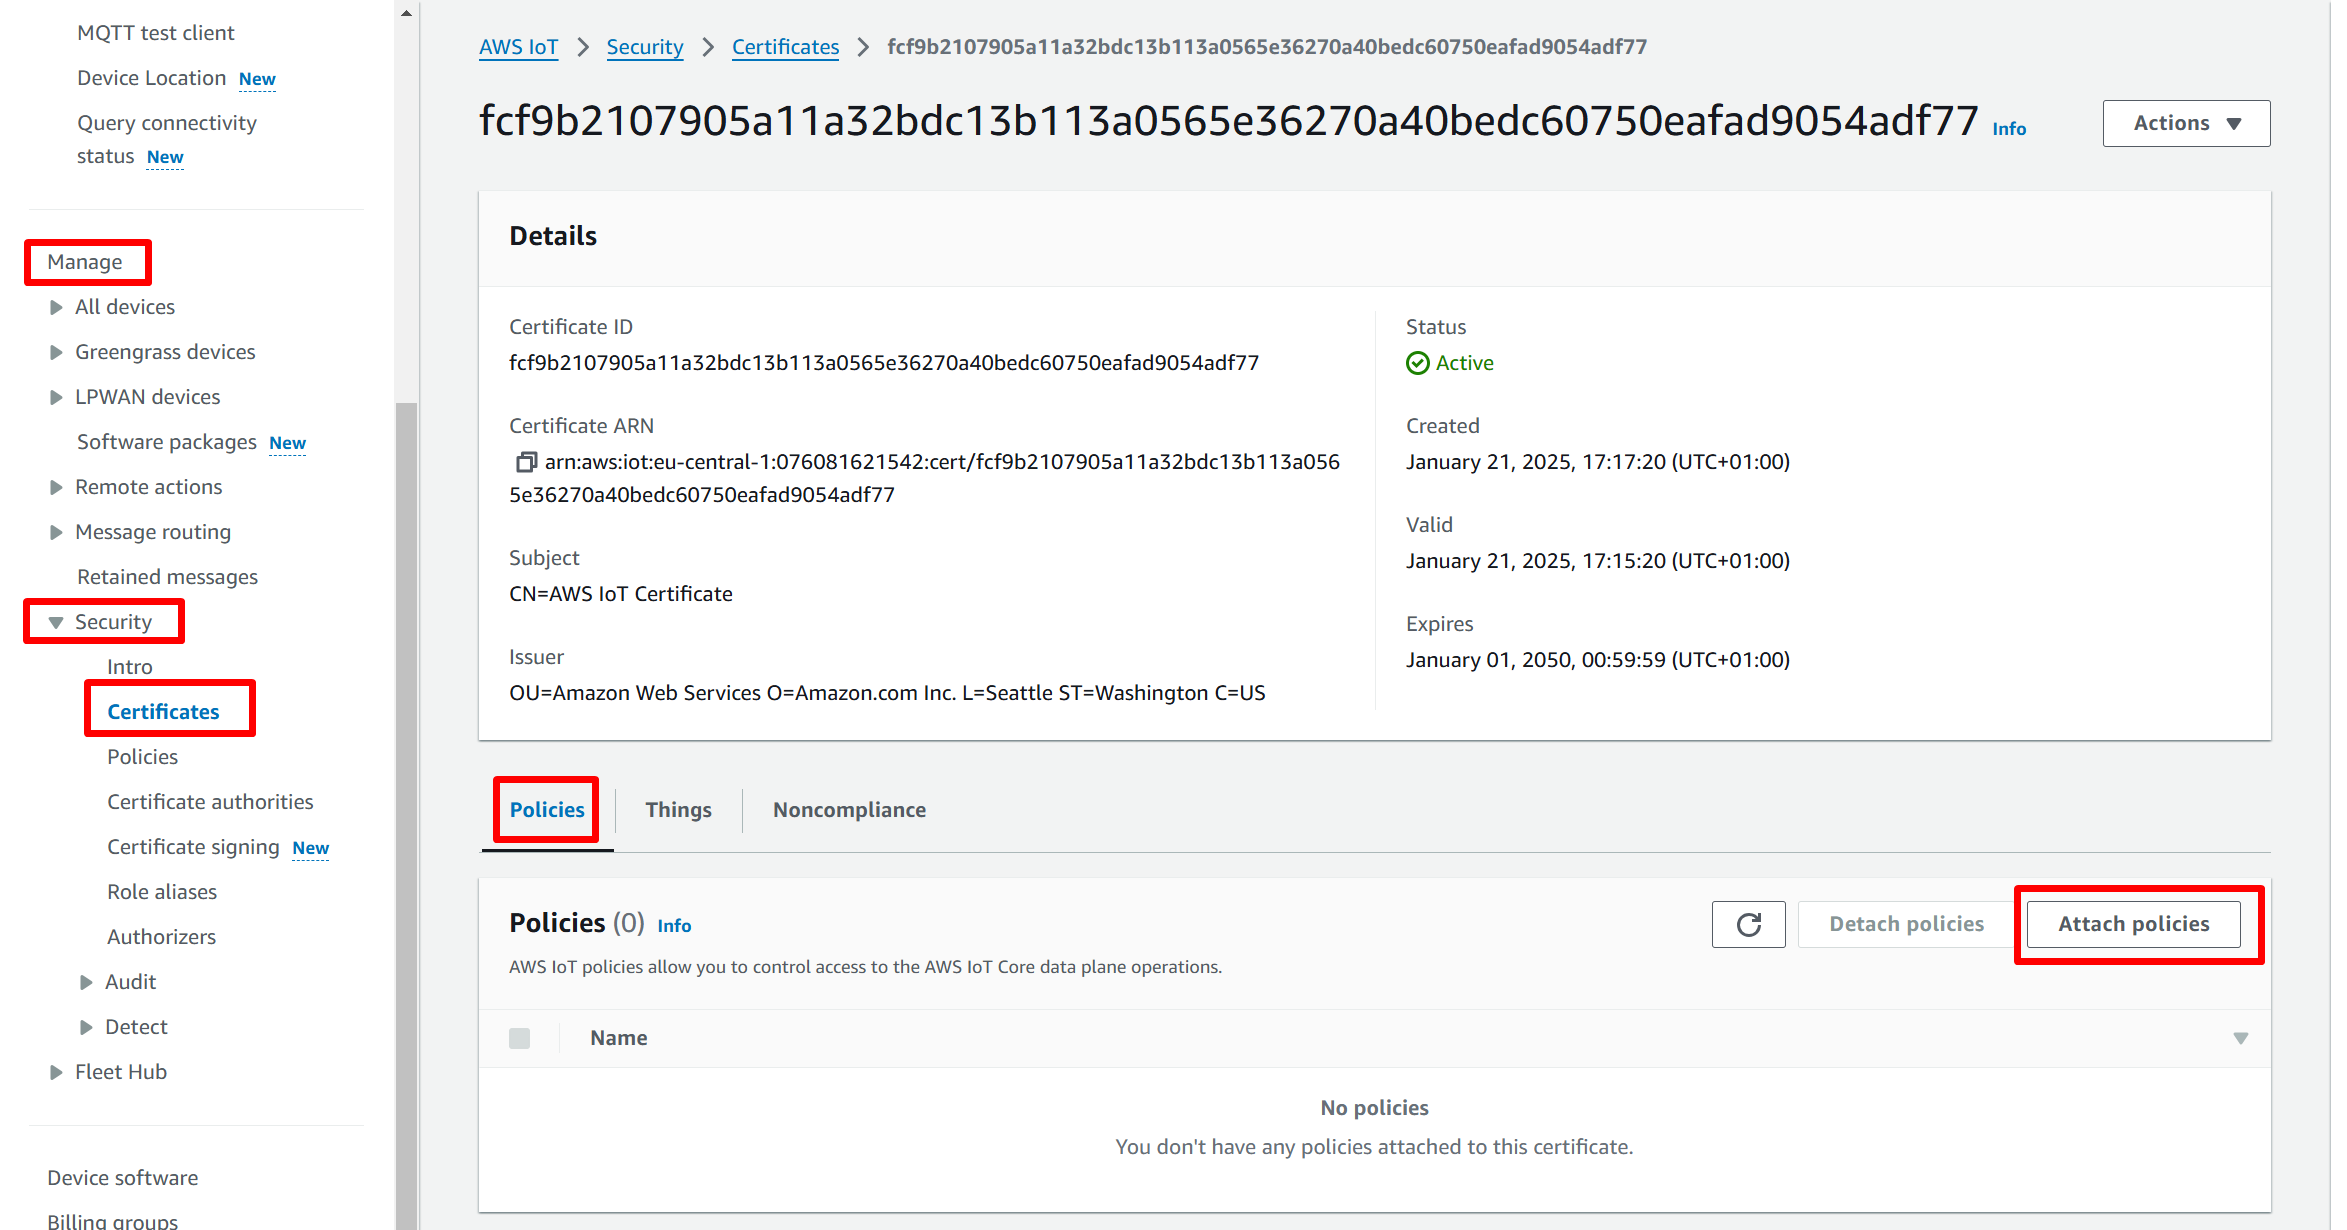
- Select your policy and click Attach Policy.
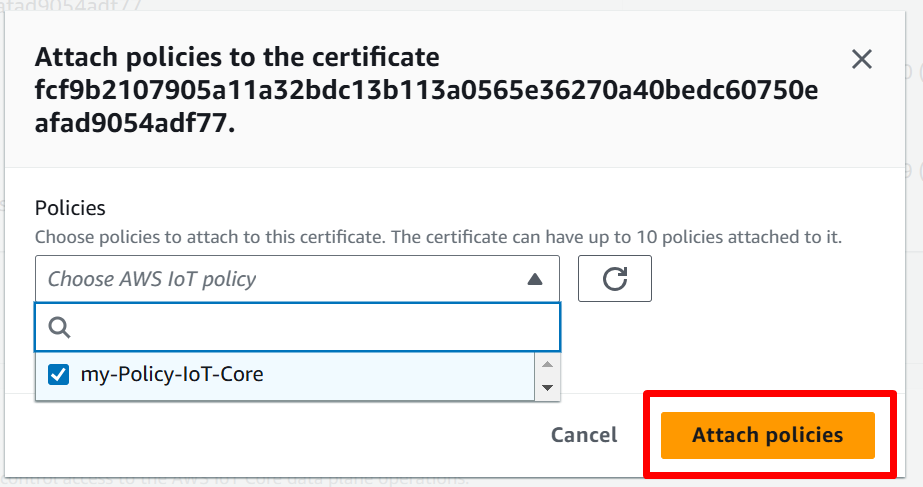
- Your policy is now attached to your certificate. A notification appears to confirm it.
Creating a Connection With API
MQTT over TLS v1.2 connection is the transport protocol recommended by Amazon and its use is mandatory in ThingPark X IoT Flow to connect to AWS cloud platform. You need to create an instance of AWS connection first, before you can use it is an IoT Flow instance.
The creation of a connection establishes a bidirectional messaging transport link between ThingPark X IoT Flow and the cloud provider. Events and commands from multiple Devices will be multiplexed over this messaging transport link.
To do this, you need to use the Connections group resource:
POST/connectionsto create a new Connection instancePUT/connectionsto update a Connection instanceDELETE/connectionsto delete a Connection instance
We follow the REST-full API pattern, when updating configuration properties for a connection resource. Thus, you must also provide the whole configuration again.
Example for the creation of a new connection instance :
POST /connections

{
"connectorId": "actility-aws-iot",
"name": "Actility AWS Connection",
  "configuration": {
    "description": "AWS Europe Datacenter",
    "uplinkTopicPattern": "tpx/things/{DevEUI}/uplink",
    "downlinkTopicPattern": "tpx/things/{DevEUI}/downlink",
    "deviceType": "actilitytestsensor",
    "region": "eu-central-1",
    "accountPrefix": "a2plmnutiyt-ats",
    "secretAccessKey": "lymHcNdzkkolnhZHnV5Q5YN/GTMFNiARtAj/7dz6758",
    "accessKeyId": "AKIFAQFMTO34B3XZGHYA",
    "certificateId": "arn:aws:iot:eu-central-1:101510985872:cert/8be79f58542e4f2345t45fjuk08424657ee3azd4554fa974",
    "certificate": "-----BEGIN CERTIFICATE-----...-----END CERTIFICATE-----",
    "privateKey": "-----BEGIN RSA PRIVATE KEY-----...-----END RSA PRIVATE KEY-----"
  }
}
The following table lists the properties applicable to a connection instance.
| Property | Configuration value |
|---|---|
connectorId | Must be set to actility-aws-iot for AWS IoT cloud platform. |
configuration/uplinkTopicPattern | Defines a pattern of MQTT topic for Uplink messages. Note Ensure to be compliant with AWS topic semantics, e.g.: For more information on available dynamic keywords, see the chapter about Keywords and patterns in the AWS documentation.
|
configuration/downlinkTopicPattern | Defines a pattern of topic for the Downlink.
tpx/things/{DevEUI}/uplink is matches AWS expression tpx/things/+/uplink |
configuration/deviceType | AWS IoT Device type to be associated with the Devices processed by the connector. |
configuration/region | Region of the AWS IoT datacenter:
|
configuration/accountPrefix | Account prefix of the AWS IoT account. |
configuration/secretAccessKey | Secret access key for accessing the AWS IoT account, required for registering Devices. |
configuration/accessKeyId | Id of the access key for accessing the AWS IoT account, required for registering Devices. |
configuration/accessKeyId | Id of the certificate registered in the AWS IoT account, required for registering Devices. |
configuration/certificate | Contents of the certificate file registered in the AWS IoT account, required for building the MQTT over TLS v1.2 connection. |
configuration/privateKey | Contents of the private key file registered in the AWS IoT account, required for building the MQTT over TLS v1.2 connection. |
All properties are not present in this example. You can check the rest of these properties in the common parameters section.
Creating a Connection From UI
Prior to connecting a Cloud application to a ThingPark Enterprise platform you need to be aware of the application provisioning constraints. To learn more, click this topic.
You must have an active Amazon AWS IoT account prior to connecting to an Amazon AWS IoT Application. ThingPark does not create any AWS application instances.
You also need to know the parameters that are required to perform this task. To learn more, check Parameters required for connecting to an Amazon AWS IoT platform below in this topic.
You can connect this type of application using the SSL or the WSS protocol depending on the security level that you want to put in place.
This procedure describes how you can connect an Amazon AWS application using the SSL protocol. The difference between both protocols resides in the fact that there is neither a certificate, nor a private key that are required for creating a connection via WSS.
- Click Connections -> Create -> ThingPark X IoT Flow.
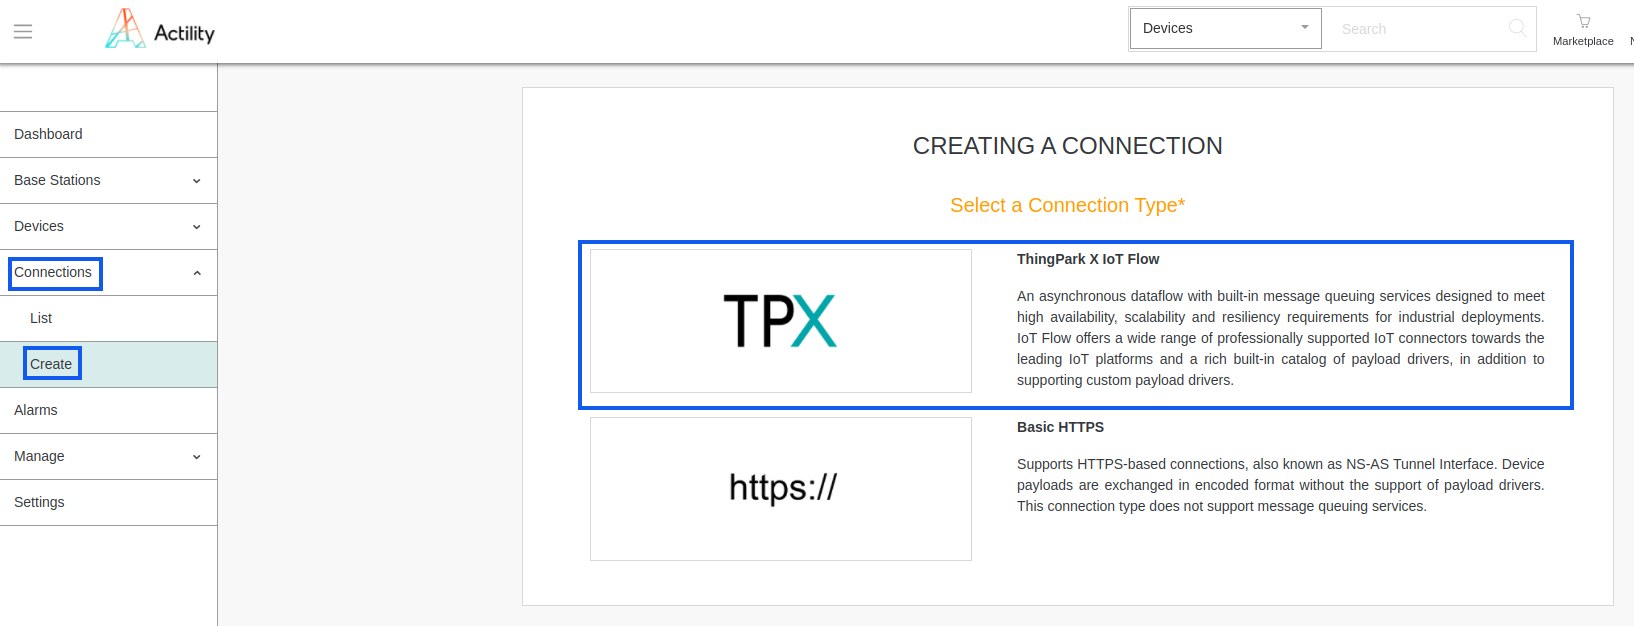
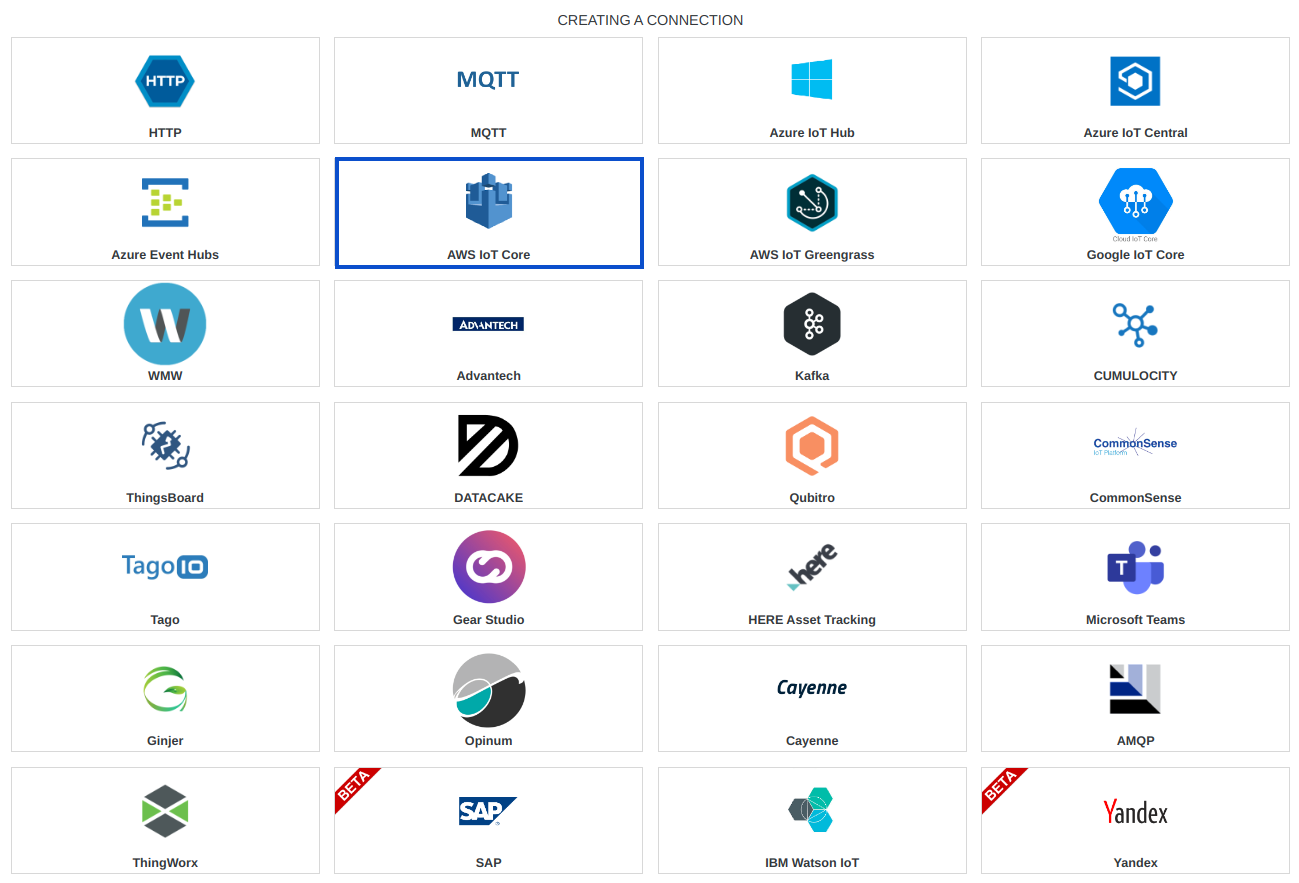
Then, a new page will open. Select the connection type : AWS IoT Core.
- Fill in the form as in the example below.
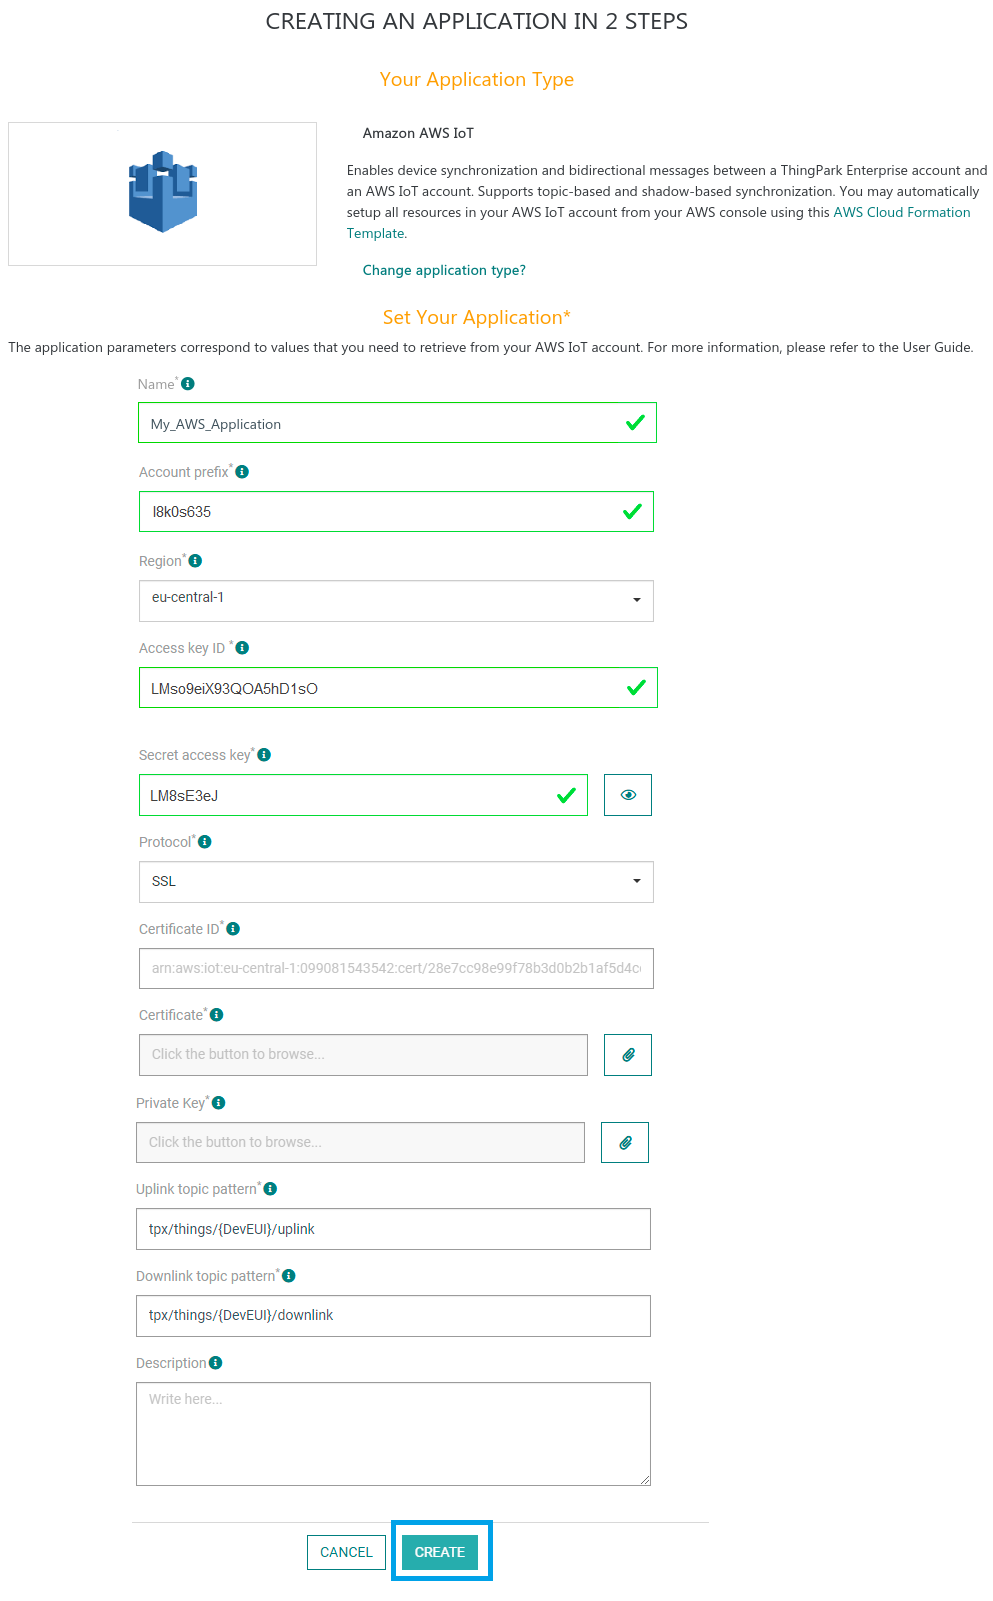
Parameters marked with * are mandatory.
- Click Save.
- A notification appears on the upper right side of your screen to confirm that the application has been created.
- Click View the Application to view the application details.
- You are redirected to the Application Information pane.
Changing the Protocol of the Amazon AWS Connection after Creation
You can change the protocol after the creation of the Amazon AWS application.
If you change the protocol from SSL to WSS, the Certificate ID, Certificate and Private Key fields are hidden, but their current values are kept and still provided in dataflow properties. The values are automatically recovered if the protocol is updated to "SSL", and the Certificate ID, Certificate and Private Key fields are displayed again.
If you change the protocol from WSS to SSL, the Certificate ID, Certificate and Private Key fields are displayed.
To do this, proceed as follows:
-
Select the AWS application for which you want to change the protocol.
-
In the application information dashboard, go to the Protocol and Authentication parameter.
-
Click Edit.
- The Protocol and Authentication window displays.

-
In the drop-down box in Protocol, change from WSS to SSL.
-
For each parameter enter a value. This look like this:

- Click Save.
Limitations
Protocol : MQTT over TLS v1.2 connection is the recommended protocol by Amazon and is mandatory for use with ThingPark X IoT Flow.
Uplink :
-
The Uplink rate is limited to 1000 msg/s max (connection pool can have max 10 mqtt clients).
-
Uplinks are sent using QoS 0.
Downlink : The Downlink rate limited to 100 msg/s.
Device :
- Device shadows are not supported in the current ThingPark X IoT Flow release.
- The number of Devices that you can use is unlimited.
| Limitation | Description |
|---|---|
| Protocol | MQTT over TLS v1.2 connection is the recommended protocol by Amazon and is mandatory for use with ThingPark X IoT Flow. |
| Uplink |
|
| Downlink | The Downlink rate limited to 100 msg/s. |
| Device |
|
For more information, see the following links:
-
AWS service quotas Messages are not stored in the AWS cloud. If the connection has not been established during a short time, all downlink messages cannot flow to ThingPark, they are lost. This message is displayed: “The message broker maintains a list of all client sessions and the subscriptions for each session. When a message is published on a topic, the broker checks for sessions with subscriptions that map to the topic. The broker then forwards the publish message to all sessions that have a currently connected client.”
-
Device communication protocols
This means that disconnected clients will not receive any uplinks/downlinks that were sent during the time they were offline.
Things could change in the future AWS SDK for Java
Displaying information to know if it worked
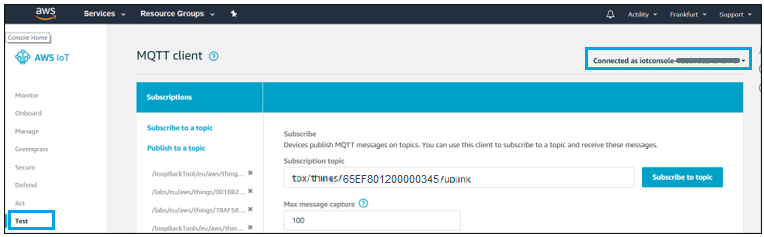
- Go to your AWS account, open the Test menu.

-
Check if you are connected to the right endpoint (On the right of the window).
-
Subscribe to a topic, for example:
tpx/things/65EF801200000345/uplink
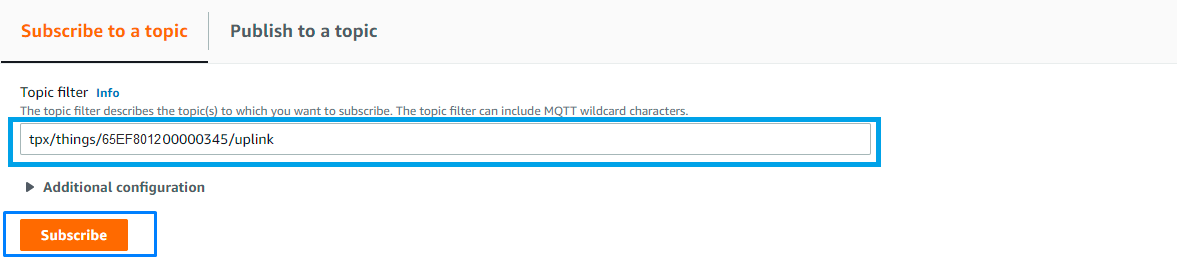
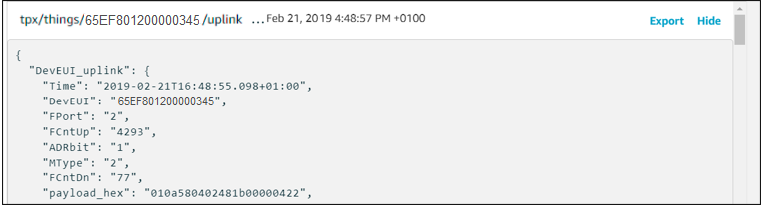
You should see something like that:
All received messages are displayed on the same window.
Troubleshooting
As for now, there are no detected bugs.