Creating an AWS Greengrass V2 connection
AWS Greengrass V2 overview
Why using Greengrass V2 with your ThingPark Enterprise instance ?
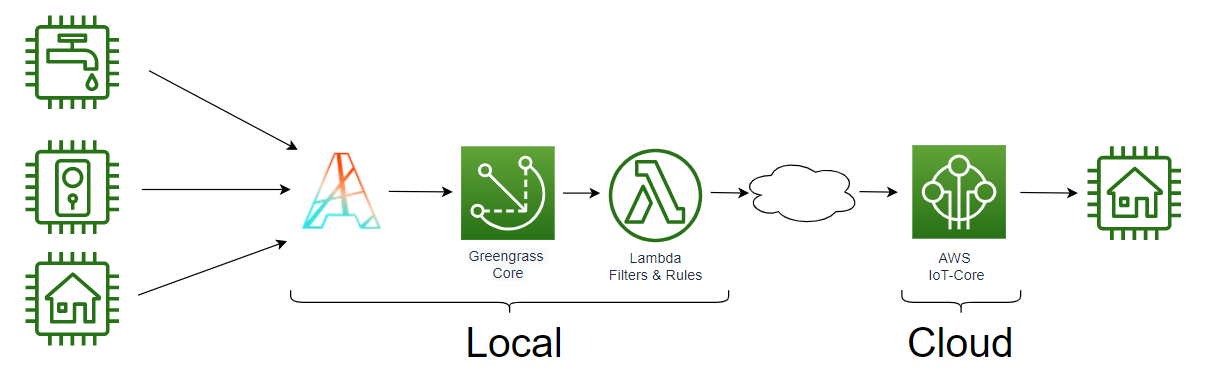
Combining ThingPark Enterprise on-premise (OCP) together with a local AWS IoT Greengrass V2 node provides enterprises with a dependable local infrastructure to implement their industrial IoT use cases. Everything runs locally, so critical data flows and services do not depend on any cloud service, yet it remains possible to export all important data to cloud services for storage or further processing.
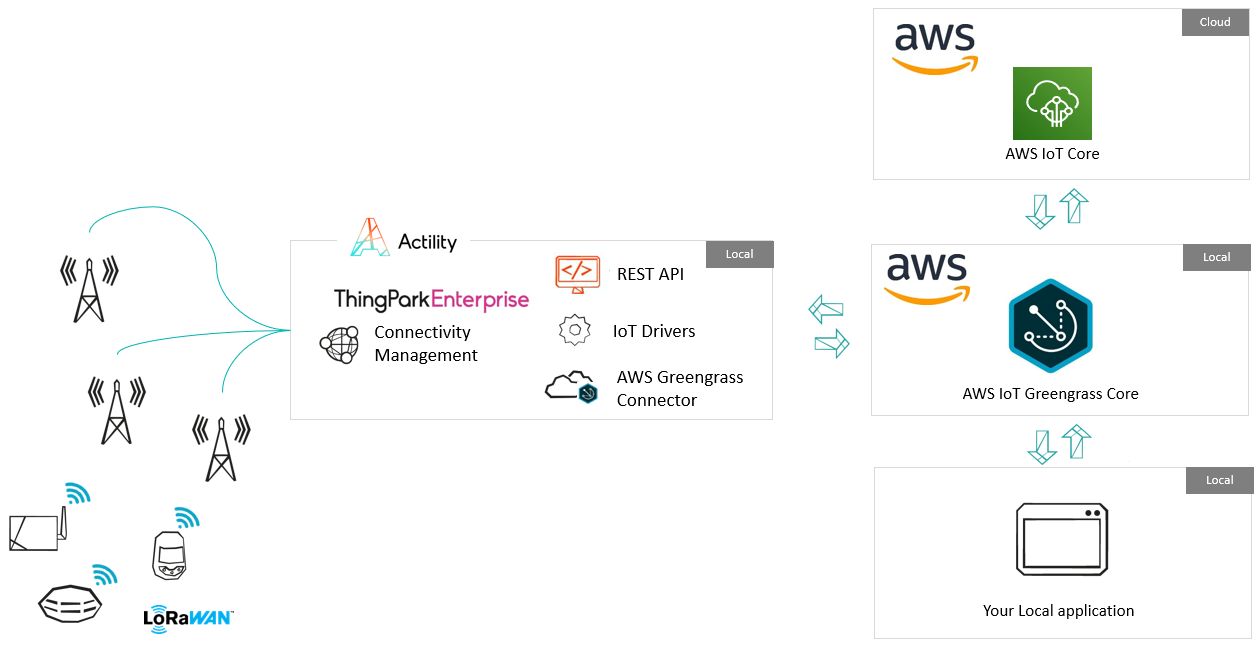
AWS IoT Greengrass V2 extends AWS services onto local devices, so that they can act locally on the data ingested, while still taking advantage of the cloud.
ThingPark Enterprise OCP powers highly available LoRaWAN(tm) private networks to ensure efficient sensor data aggregation, and smoothly connects to the local AWS Greengrass V2 Core instance using the built-in ThingPark X Greengrass Connector.
With this combined solution:
- the LPWAN sensor network is entirely managed locally,
- the sensor data is also fully decoded, aggregated and processed locally
- the data can either be synchronized to the Cloud or delivered to local applications (running on the Greengrass V2 instance as Lambda functions or connected to it). Both Cloud and local applications can initiate Json formatted commands which will be encoded as needed by ThingPark Enterprise and delivered to devices over the LPWAN network.
Key Benefits
Executed Locally – Managed globally - Combining Greengrass V2 with ThingPark Enterprise OCP, you don’t have to send your data to a distant cloud which saves you time in cases when milliseconds matter. Data is collected, processed and routed locally to ensure compliancy with the strictest security policies. Although the solution runs locally, Greengrass Core instances are managed from the cloud, ensuring a consistent deployment and maintenance of AWS workloads across multiple facilities, as well as a global application of the company security policies.
No cloud-dependency - AWS Greengrass V2 ensures service continuity with spotty or no cloud connectivity. You may continue to perform local logic and actions based on LoRaWAN sensor input, even during loss of cloud connectivity, and buffer data until the Internet connection is restored. This complements a similar local buffering feature in LoRaWAN infrastructure gateways provided by ThingPark Enterprise and ensures that all critical sensor data is recovered after infrastructure or local connectivity outages.
A dependable infrastructure - Mission critical applications require a fully redundant system, end to end. At radio level this can be provided by leveraging macro-diversity, ensuring that 2 or more gateways provide connectivity to each sensor. ThingPark Enterprise Network Server can also be deployed in HA mode with or without georedundancy, and the same applies to your Greengrass V2 server. Note that peering routes may be set-up between local ThingPark Enterprise instances through ThingPark Exchange, so that devices which roam across corporate sites (or to a public network) can receive seamless service.
Optimal cloud service consumption - Not all data is worth being sent to the cloud, especially when using high-cost or bandwidth-limited backhaul connections. AWS Greengrass V2 embeds local Lambda compute, local messaging and machine learning inference capabilities to allow data aggregation, transformation or filtering according to your needs. Such data processing is made simple with ThingPark Enterprise support for device CoDecs, making data available in JSON format to the Greengrass Core instance.
How to install AWS Greengrass V2 in 6 steps
This documentation provides an overview for the installation and configuration of a local AWS IoT Greengrass V2 instance. Please refer to the reference documentation from AWS for further details: AWS IoT Greengrass V2 tutorials

- Step 1. Prepare IAM roles
- Step 2. GG Core Device installation
- Step 3. Components installation & setup
- Step 4. Create a bridge device
- Step 5. Connect with Thingpark
- Step 6. End to end test
Step 1 - Prepare IAM roles
Before installing a Greengrass V2 instance locally, you first need to obtain IAM credentials as described here: Managing access keys for IAM users All expected operations are outlined in Step 1 of the AWS getting started guide. You need to collect the following two parameters:
    "accessKeyId": "AKIAIOSFODNN7EXAMPLE",
    "secretAccessKey": "wJalrXUtnFEMI/K7MDENG/bPxRfiCYEXAMPLEKEY",
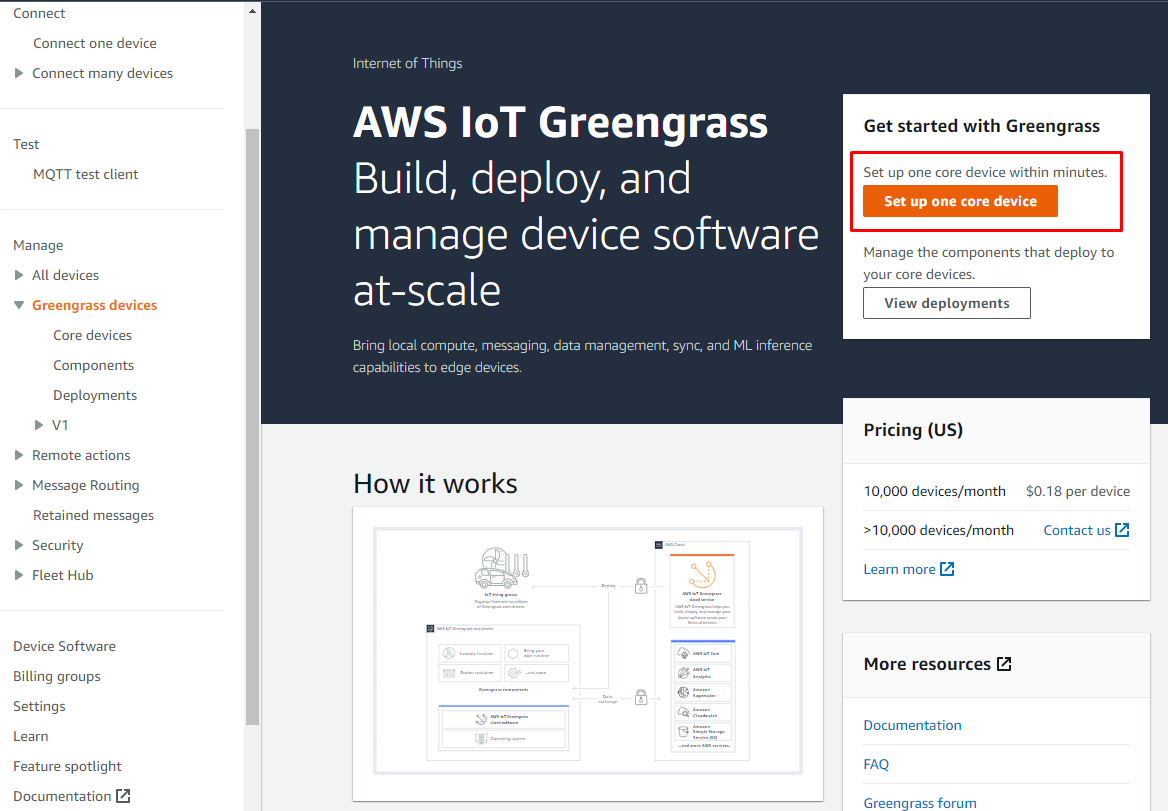
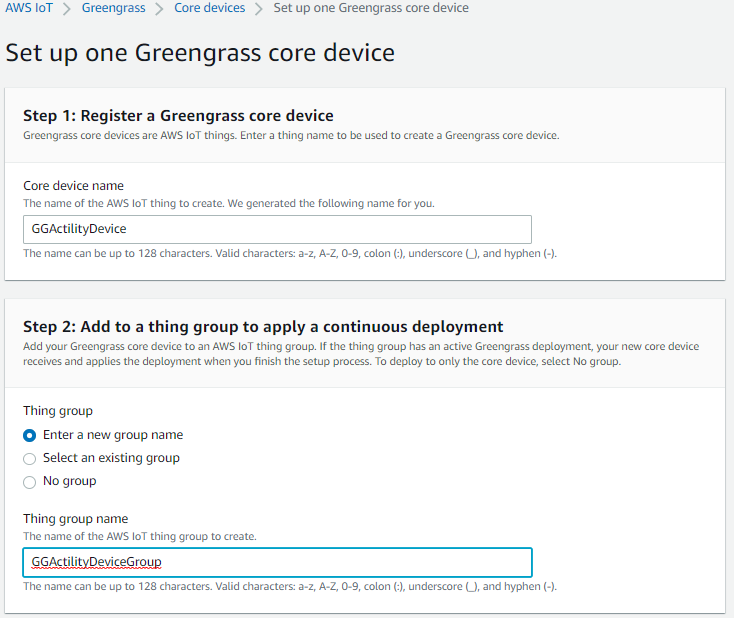
Step 2 - GG Core Device installation
Once you have set up your environment (Step 2 of the getting started guide), install your Greengrass core device following Step 3 of the Getting Started guide.
Step 3 - Components installation & setup
You need to follow this tutorial : Tutorial: Interact with local IoT devices over MQTT
The components that will need to be installed on your local Greengrass V2 instance are :
- aws.greengrass.clientdevices.Auth
- aws.greengrass.clientdevices.IPDetector
- aws.greengrass.clientdevices.mqtt.Moquette
- aws.greengrass.clientdevices.mqtt.Bridge (Optional) Only expected if you want relay messages from your local Greengrass instance to AWS IoT-Core.
Component aws.greengrass.clientdevices.Auth requires a configuration in order to allow communication between the local Greengrass core and AWS IoT-Core.
Here is the expected setup. Take care to adapt the thingName GGActilityBridge to your own value, but the policyName can stay unchanged.
{
  "deviceGroups": {
    "formatVersion": "2021-03-05",
    "definitions": {
      "MyDeviceGroup": {
        "selectionRule": "thingName: GGActilityBridge",
        "policyName": "ActilityDevicePolicy"
      }
    },
    "policies": {
      "ActilityDevicePolicy": {
        "AllowConnect": {
          "statementDescription": "Allow client devices to connect.",
          "operations": [
            "mqtt:connect"
          ],
          "resources": [
            "*"
          ]
        },
        "AllowPublish": {
          "statementDescription": "Allow client devices to publish to all topics.",
          "operations": [
            "mqtt:publish"
          ],
          "resources": [
            "*"
          ]
        },
        "AllowSubscribe": {
          "statementDescription": "Allow client devices to subscribe to all topics.",
          "operations": [
            "mqtt:subscribe"
          ],
          "resources": [
            "*"
          ]
        }
      }
    }
  }
}
Configuration of the Bridge component is expected if you want to relay your messages towards AWS IoT-Core.
Depending on your use case, you will need to make an architectural choice. Communication between ThingPark Enterprise and the local instance of Greengrass V2 Core can use a single MQTT topic that aggregates uplinks from all devices connected to the ThingPark LPWAN infrastructure ("Bridge topic"), or you can use a dedicated topic per device.
Bridge topic architecture (recommended)
A Bridge topic aggregates uplinks of all devices for processing by a Lambda function running on the local instance of Greengrass V2 Core. From there you can create your own processing and filtering rules and dispatch only selected messages towards AWS IoT-Core Cloud. You fully control the traffic exchanged with the AWS Cloud.
Your Bridge configuration will look like this (Component aws.greengrass.clientdevices.mqtt.Bridge):
{
  "mqttTopicMapping": {
    "ThingParkToAwsIoTCoreMapping": {
      "topic": "tpx/things/ActilityGreengrassBridge/uplink",
      "source": "LocalMqtt",
      "target": "IotCore"
    }
  }
}
On Thingpark Enterprise, the Greengrass V2 Connector uplinkTopicPattern should be similar to this : tpx/things/ActilityGreengrassBridge/uplink
Collect this MQTT topic name for later when you will setup the Greengrass V2 Connector on ThingPark Enterprise in step 5 of this guide.
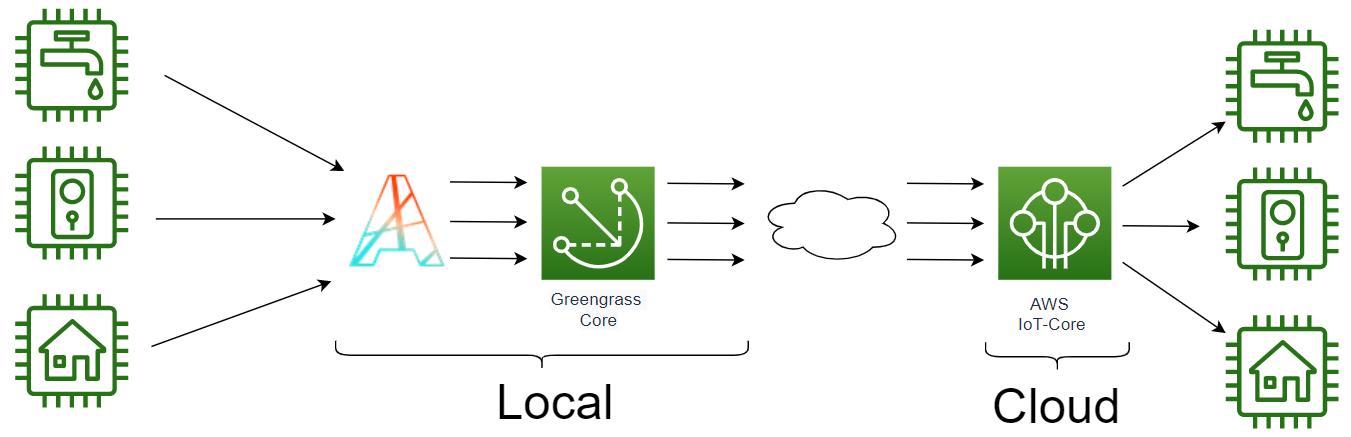
Device topic architecture
Each device is allocated its own dedicated MQTT topic. This architecture assumes that all of your local devices will communicate with the cloud-based AWS IoT-Core. If you already use AWS IoT-Core, this behavior is an easier migration path, but it is not optimal for a Greengrass V2 architecture as you have no control over the traffic toward the cloud. However, you may optimize this later by transitioning to the Bridge topic architecture.
Your Bridge configuration should be similar to this (Component aws.greengrass.clientdevices.mqtt.Bridge):
{
  "mqttTopicMapping": {
    "ThingParkToAwsIoTCoreMapping": {
      "topic": "tpx/things/+/uplink",
      "source": "LocalMqtt",
      "target": "IotCore"
    }
  }
}
On Thingpark Enterprise, the Greengrass V2 Connector uplinkTopicPattern should be similar to this : tpx/things/{DevEUI}/uplink
Collect this MQTT topic name for later when you will setup the Greengrass V2 Connector on ThingPark Enterprise in step 5 of this guide.
Step 4 - Create a Greengrass "Thing" to represent the ThingPark Connector
The ThingPark Enterprise MQTT connector is seen as a client device by Greengrass V2; therefore, you need to create a Greengrass 'Thing' that represents the ThingPark Connector instance. You need to follow the instructions in Step 2 of the AWS Tutorial: Interact with local IoT devices over MQTT
During this step, you will create a ThingPolicy. This example setup can help you :
{
  "Version": "2012-10-17",
  "Statement": [
    {
      "Effect": "Allow",
      "Action": [
        "iot:Publish",
        "iot:Subscribe",
        "iot:Connect",
        "iot:Receive"
      ],
      "Resource": [
        "*"
      ]
    },
    {
      "Effect": "Allow",
      "Action": [
        "greengrass:*"
      ],
      "Resource": [
        "*"
      ]
    }
  ]
}
Once you have completed this step, you need to collect the following elements :
- The Public key file (also named Certificate)
- The Private key file
- The AWS CA Certificate file (RSA 2048 Amazon Root CA 1)
- The ARN Certificate for the Thing (Explore the created Things certificates)
Step 5 - Connecting with Thingpark Enterprise
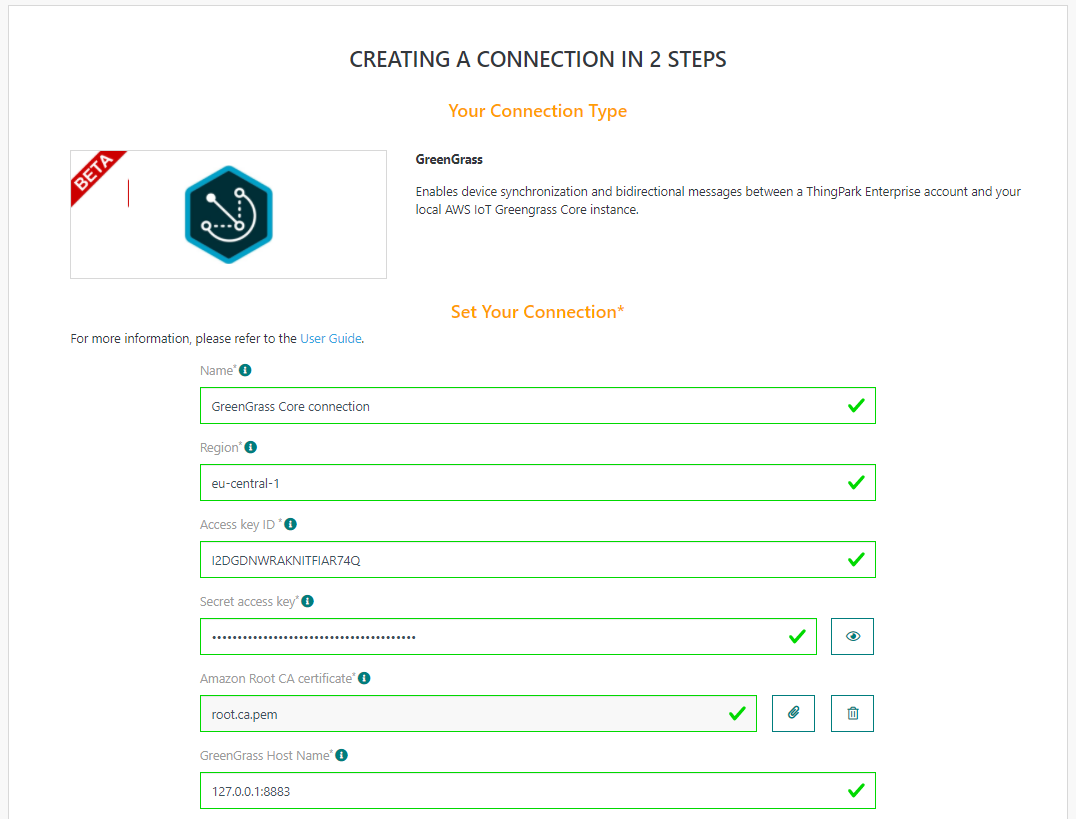
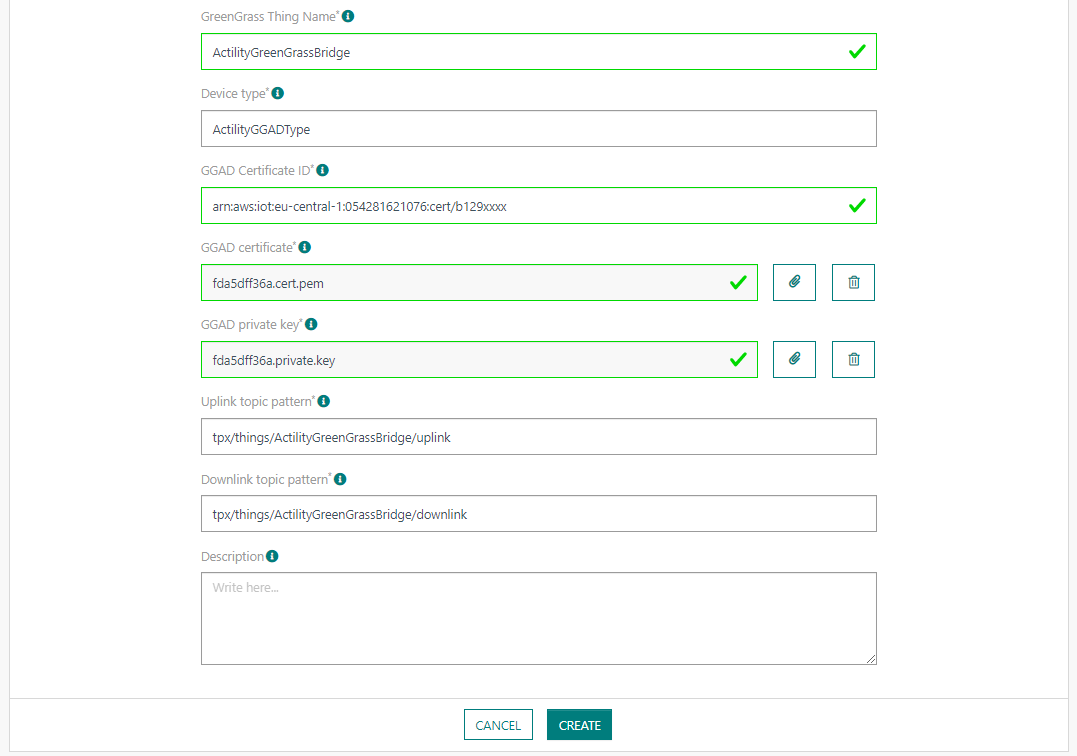
Using ThingPark Enterprise UI
On ThingPark Enterprise (TPE), you can create your Greengrass connection and use the information collected in the previous steps to fill up the form.
Using REST API
The connection can be created through the ThingPark REST API by using:
POST/connectionsto create a new Connection instancePUT/connections/{connectionId}to update a Connection instanceDELETE/connections/{connectionId}to delete a Connection instance
Example for creation of a new connection instance :
{
  "connectorId": "actility-aws-iot-greengrass",
  "name": "Greengrass Core connection",
  "configuration": {
    "region": "eu-central-1",
    "accessKeyId": "I2DGDQPEUJNDTGFAR98Q",
    "secretAccessKey": "UKLctg3V/rFORwr9EF8Gxs/ciZlbI5bDNmPoellj",
    "deviceType": "ActilityGGADType",
    "uplinkTopicPattern": "tpx/things/ActilityGreengrassBridge/uplink",
    "downlinkTopicPattern": "tpx/things/ActilityGreengrassBridge/downlink",
    "ggHostName": "<ip detected="">:8883",
    "ggadThingName": "ActilityGreengrassBridge",
    "ggadCertificateId": "arn:aws:iot:eu-central-1:054762841076:cert/b129xxxx",
    "ggadCertificate": "-----BEGIN CERTIFICATE-----MIIDWTCQAkGsAwIB-----END CERTIFICATE-----",
    "ggadPrivateKey": "-----BEGIN RSA PRIVATE KEY-----MIIEsr-----END RSA PRIVATE KEY-----",
    "awsRootCa": "-----BEGIN CERTIFICATE-----MIIDQTCAAimgAwIBGxxxx-----END CERTIFICATE-----"
  }
}
We recommend you to follow these steps to generate the inline certificates ggadPrivateKey and ggadCertificate:
ggadPrivateKey:
- Inside your greengrass/certs folder, save the .private.key file on a linux machine
- Execute the following command:
cat cb908e54bc.private.key | sed 's/$/\n/' | tr -d '\n' - Copy and paste the value inside the json payload
ggadCertificate:
- Inside your greengrass/certs folder, save the .cert.pem file on a linux machine
- Execute the following command:
cat cb783e54bc.cert.pem | tr -d '\n' - Copy and paste the value inside the json payload
Step 6 - End to end test
Now we can test the end to end uplink data path.
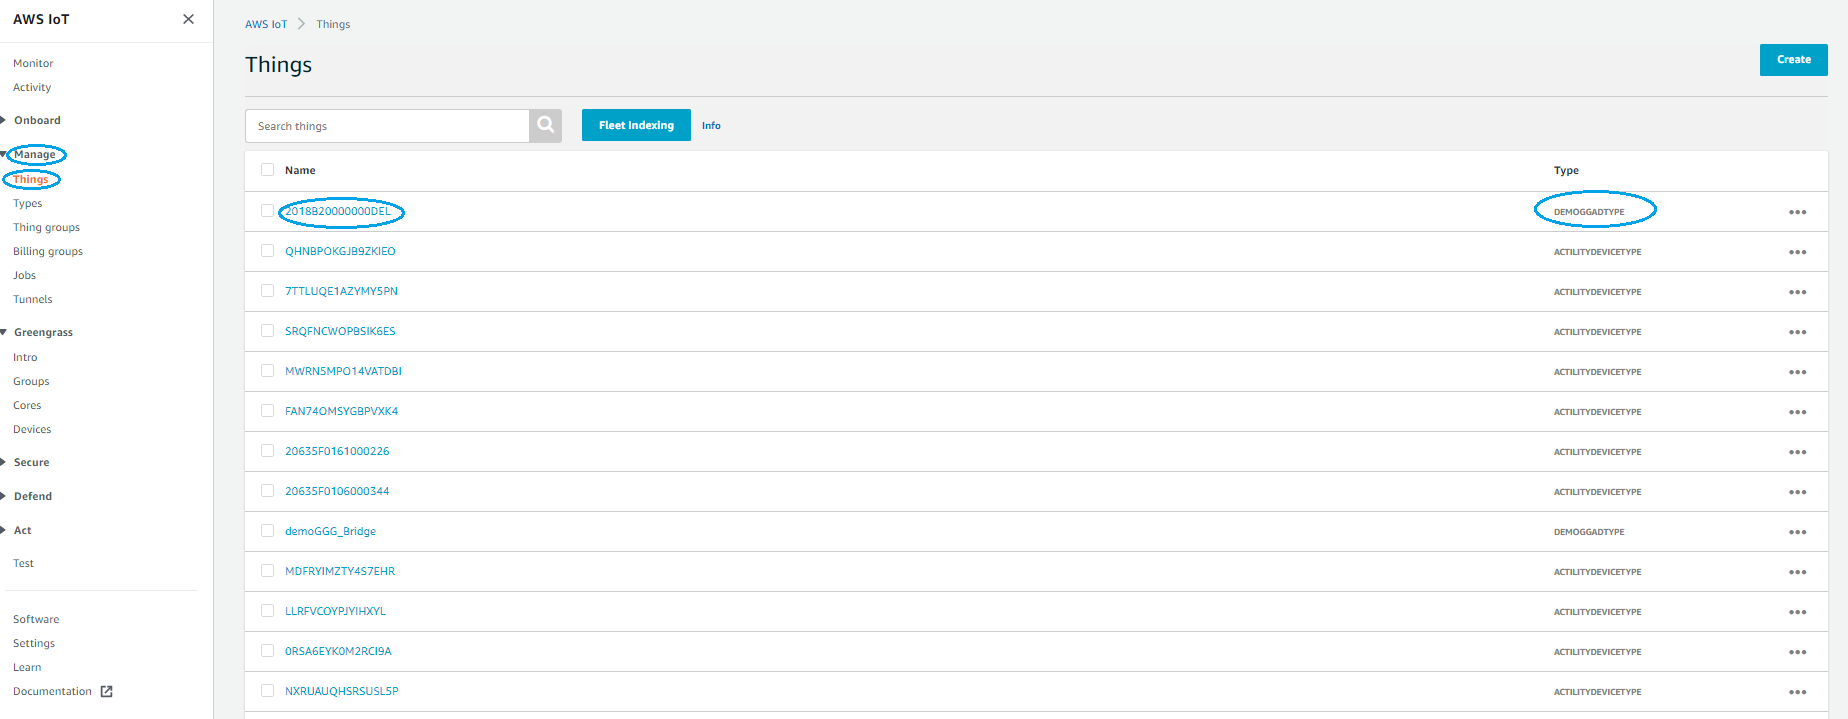
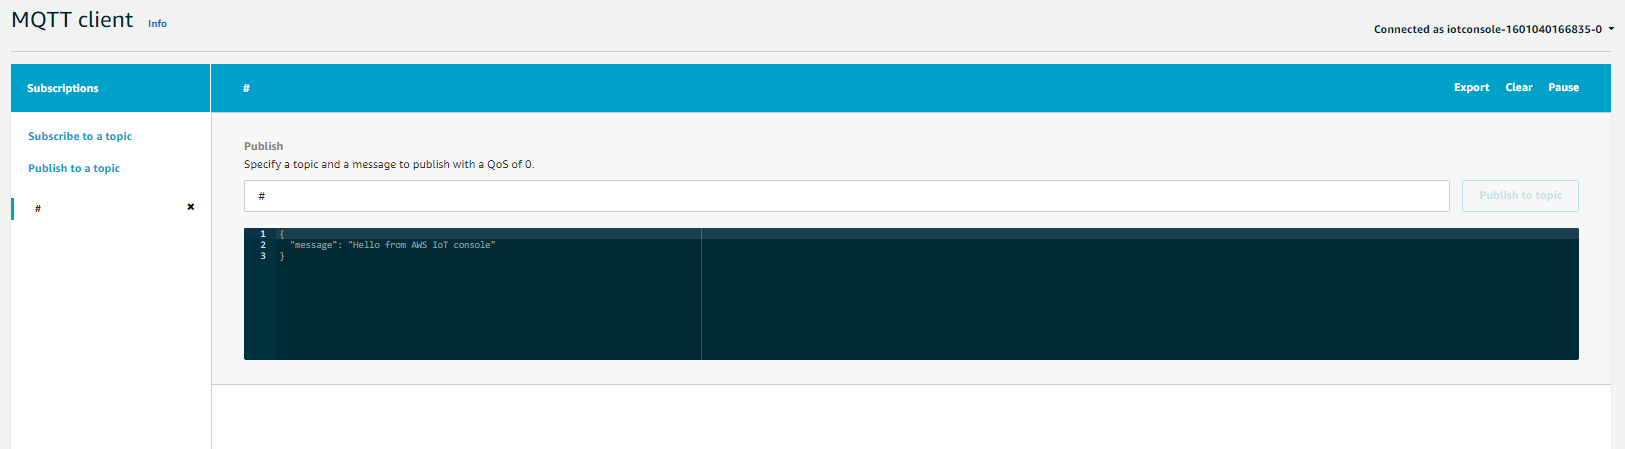
- On the AWS IoT Console, go to the Test section and subscribe to your topic (tpx/things/ActilityGreengrassBridge/uplink)
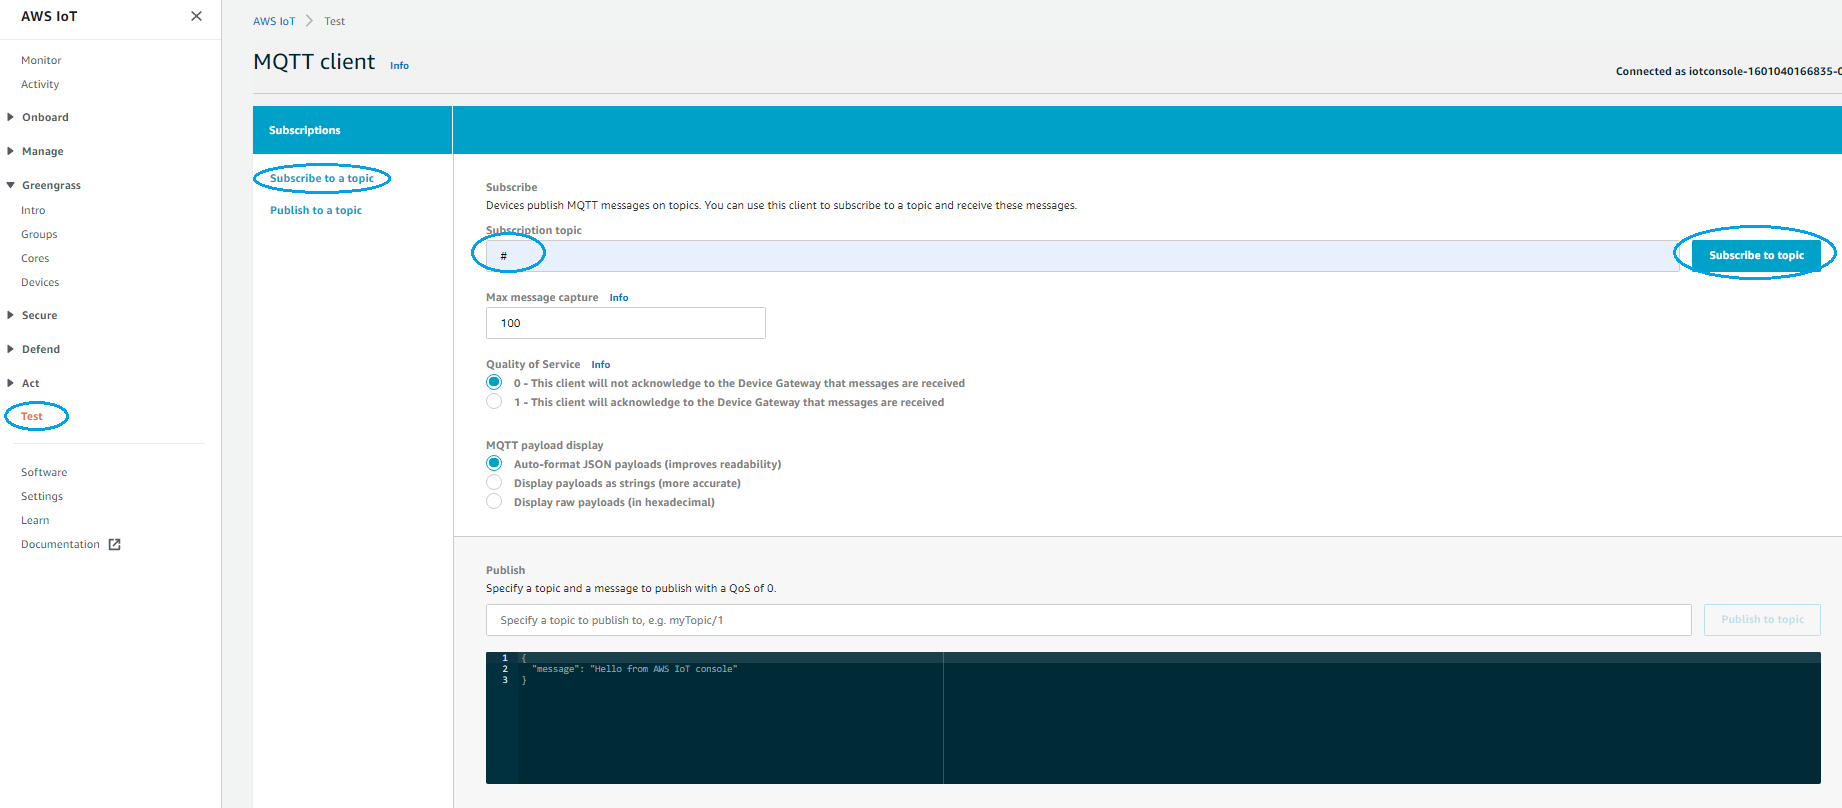
- Start the Actility AWS Greengrass connection and wait for the LPWAN devices to send uplinks.
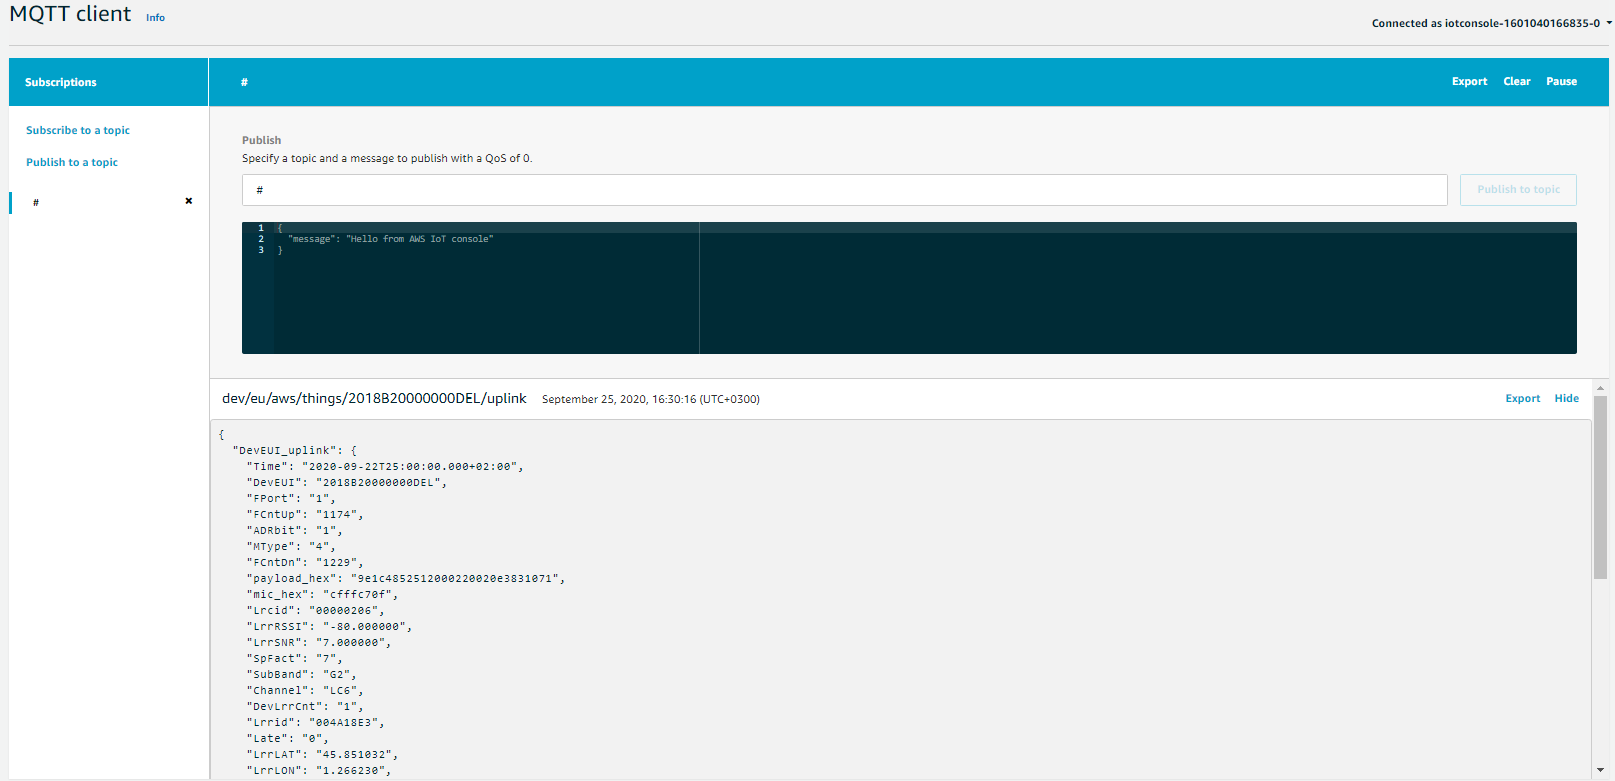
The missing devices are automatically created on Greengrass V2 by ThingPark (unless createDevices is set explicit to false in the ThingPark Connection configuration) using the deviceType specified in the ThingPark Connection config and having same thingPrincipal as the Thing we created in step 4 to represent the ThingPark connection instance on the Greengrass v2 node.