CREATE A CONNECTION TO YOUR BACNET SERVER
Access to MQTT Broker
Refer to the MQTT documentation for this step.
Creating a BACnet Adapter Node with Node-RED
With access to your MQTT broker, let's create a Node-RED flow to connect your MQTT broker to your BACnet server. All messages will be exchanged via your MQTT broker, and Node-RED will handle these messages to interact with the BACnet server.
Create an MQTT Input Node

-
Drag an "mqtt in" node from the palette onto your Node-RED workspace.
-
Double-click the node to configure it.
-
Fill in the connection details for your MQTT broker (click on the pen next to the server input):

- Server: Enter the broker address, e.g.,
mqtt-eco.thingpark.com, depending on the platform you are logged into. - Port: Use the associated server port, e.g.,
8883. - Use TLS: Check this option and configure the TLS settings if necessary.
- Protocol: Choose
MQTT V3.1.1. - Client ID: Leave this field empty to auto-generate a unique ID.
- Keep Alive: Set it to
60. - Session: Check the option to "Use a clean session" for a fresh connection each time.
Refer to the screenshot below for a visual guide:

- Server: Enter the broker address, e.g.,
-
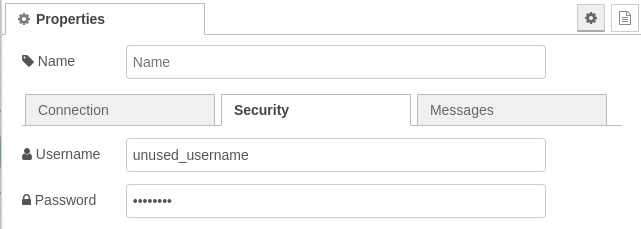
In the "Security" tab, enter your MQTT broker credentials. Use any username, but ensure your apiKey is entered as the password.
-
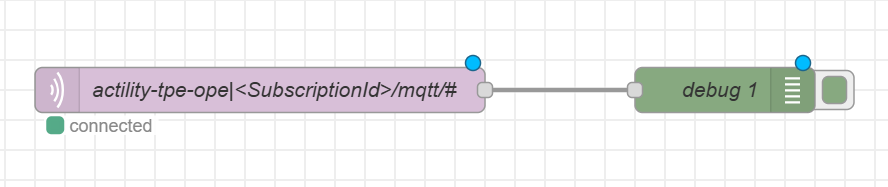
Select your server and specify the topic you want to subscribe to in the "Topic" field:
 Note
NoteAlways include the following prefix when publishing or subscribing to your topic:
actility-tpe-ope|<SubscriptionId>/mqtt/ -
Click Done to save the configuration.
Test the MQTT Connection
-
Add a "Debug" node from the palette.
-
Link both components.
-
Deploy your flow in Node-RED.
-
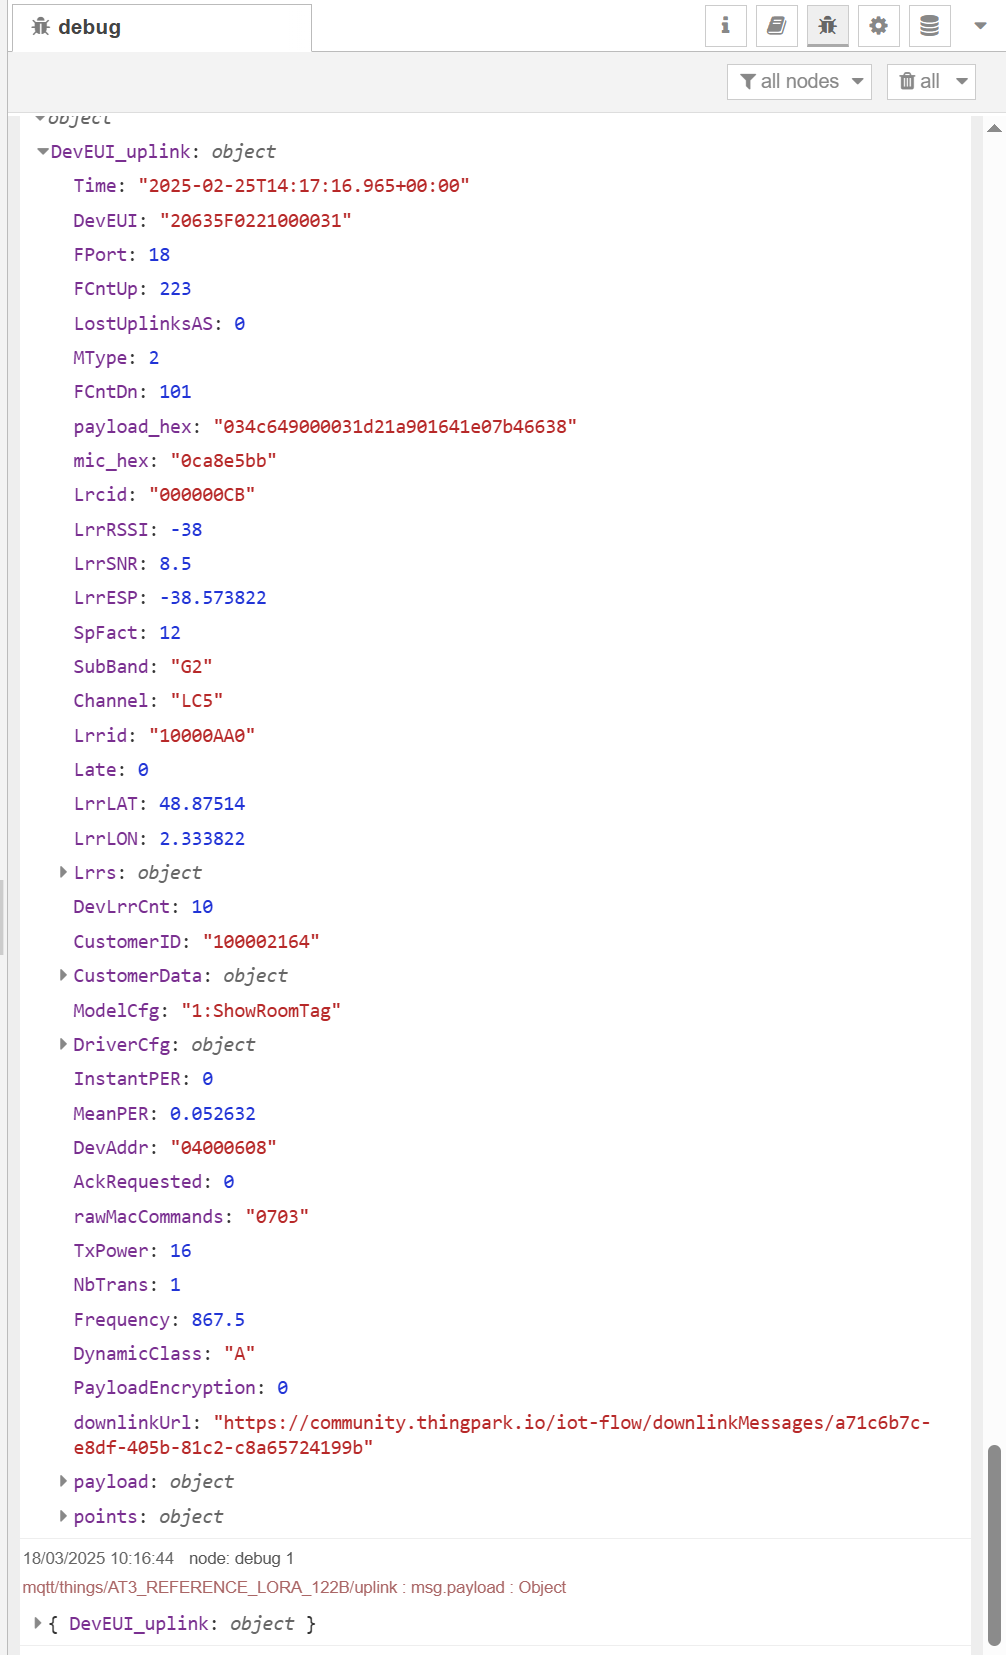
Check the debug console to ensure that the "mqtt in" node is successfully connected to your broker. You should also see a green square under the "mqtt in" node, indicating that the connection is active. Once connected, you should start receiving messages from the broker.
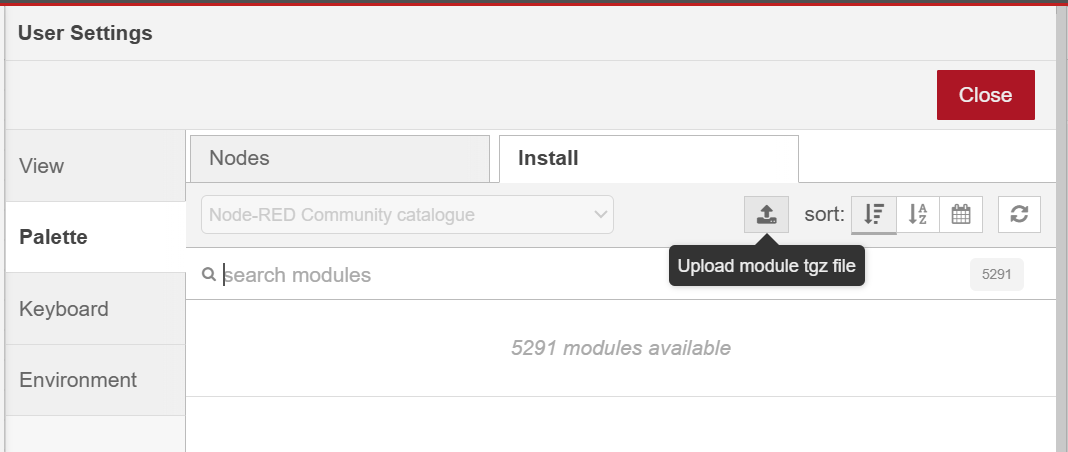
Add Actility BACnet Adapter Node
-
Download the actility-node-red-contrib-acy-tao-bacnet-adapter-x.x.x.tgz file by clicking here.
-
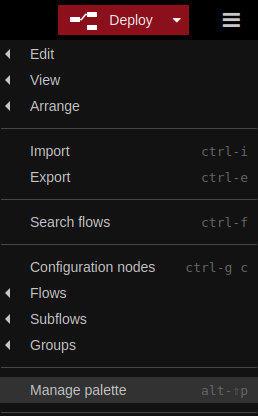
Import it into your palette by clicking on "Manage palette".
-
Go to the install tab and click on the import icon to drop your .tgz file.
-
You should see the "bacnet-adapter" node available in your palette. Drag the node from the palette onto your Node-RED workspace.

-
Connect the output of the "mqtt in" node to the input of the "bacnet-adapter" node to link them together. This connection allows messages received from the MQTT broker to be processed by the BACnet adapter. The BACnet adapter is already set up, but you can still configure it.

Specificities of BACnet Adapter
Double-click on your BACnet adapter to see the settings. It is divided into two tabs: Server properties and Object mapping.
Server Properties
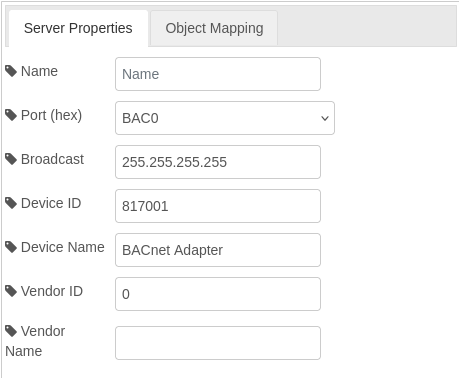
- Name: Specifies the name of the BACnet adapter in your Node-RED flow.
- Port (hex): Defines the hexadecimal port number used for BACnet communication. The default is
BAC0. - Broadcast: Indicates the broadcast IP address used for sending messages to all devices in a BACnet/IP network. In this example, it is set to
255.255.255.255, which is a global broadcast address. For more efficient communication, this can be set to a specific subnet's broadcast address (e.g.,192.168.1.255for a/24subnet). - Device ID: A unique identifier for the BACnet device. Here, it is set to
817001. - Device Name: Descriptive name for the BACnet device, such as
BACnet Adapter. - Vendor ID: Identifies the vendor of the BACnet device.
0is used when no specific vendor ID is assigned. - Vendor Name: Field reserved for the vendor's name, left empty in this example.
Object Mapping
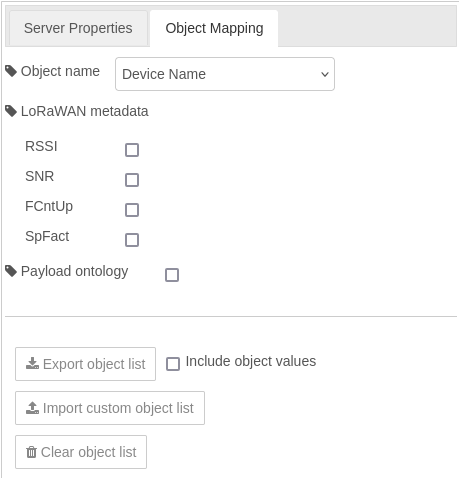
-
Object Name: Dropdown menu to select the name of the object to map. For example, it can be set to
Device Nameto link BACnet objects to specific device identifiers. The second option isDevice EUI. -
LoRaWAN Metadata: A set of optional checkboxes to include metadata from LoRaWAN in the object mapping:
- RSSI: Received Signal Strength Indicator.
- SNR: Signal-to-Noise Ratio.
- FCntUp: Frame counter for uplink messages.
- SpFact: Spreading factor used in LoRaWAN communication.
-
Export BACnet Object List: Checkbox to enable the export of the object list as a CSV file. This feature allows you to review the BACnet object list, even if you don't have a BACnet client. It is particularly useful to verify that all MQTT messages have been successfully converted into BACnet objects by the server.
-
Import Custom Object List: Button to import a custom object mapping configuration from an external CSV file (BACnet Objects).
-
Clear Object List: Button to clear the current object list.
To deploy your Node-RED workflow, click the Deploy button.
Displaying Information to Know if It Worked
Install YABE
YABE (Yet Another BACnet Explorer) is an open-source tool designed to explore, test, and debug BACnet/IP networks.
- Download YABE available for free on SourceForge.
- Extract the files on your computer.
- Install Required Dependencies: .NET Framework 4.0 or higher.
- Run
Yabe.exeavailable in the extracted folder.
If you are using Linux, follow these steps to install and run YABE:
- Install the
mono-completepackage:sudo apt install mono-complete - Navigate to the folder where you extracted YABE and run it using the mono command:
This will launch YABE on your Linux system.
mono ./Yabe.exe
How to Use YABE
Once YABE is installed and ready, follow these simple steps to explore your BACnet devices and objects:
-
Search Devices:
- Open YABE and click on the "+" icon to search all devices.

- This will open a configuration window where you can specify the interface details.
- Open YABE and click on the "+" icon to search all devices.
-
Configure the BACnet Search:
- Enter the BACnet Port (e.g.,
47808, which corresponds toBAC0in hexadecimal) and the server address of your BACnet device. - Note: You can use
0.0.0.0as the server address. This works because YABE scans all devices within the same IP segment. However, if you have multiple servers, it is recommended to specify the exact IP address of the BACnet server to avoid ambiguity. (You have to be in the same network as your BACnet server to do that, it's UDP protocol so be sure that your firewalls won't block you.) - Confirm the settings to establish the connection.
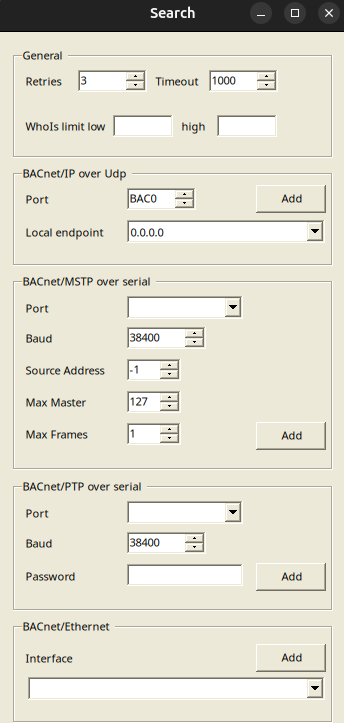
- Enter the BACnet Port (e.g.,
-
View the Device List:
- Once the search is done, YABE will display a list of detected devices.
- Double-click on your device from the list to access its associated BACnet objects.

-
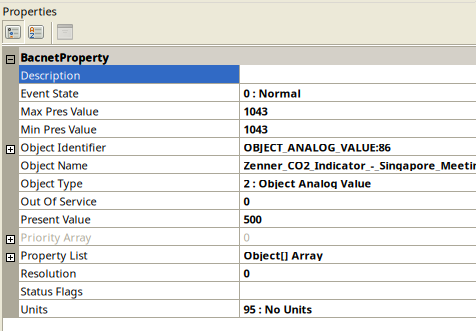
Explore BACnet Objects:
- After selecting your device, YABE will display the list of BACnet objects available on the server.
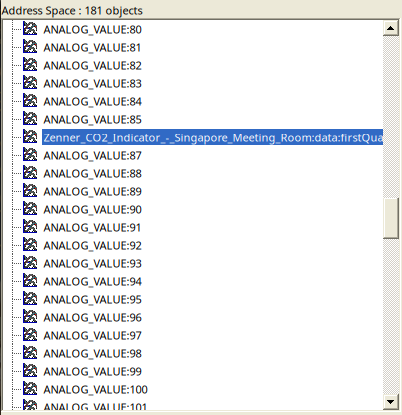
- On the right-hand side, if you click on one sensor, you will see detailed data associated with each object, such as properties, current values, and additional metadata.
- After selecting your device, YABE will display the list of BACnet objects available on the server.
Limitations
The current BACnet node is not functioning on local machines. However, it operates correctly on remote servers.
Troubleshooting
As far as we know, there is no problem with the BACnet server.