Configuring PKI and core network endpoints
PKI stands for Public Key Infrastructure. Configuring PKI is mandatory to activate a secure IPsec or TLS connection. ThingPark embeds a native PKI in its core network architecture, through the Key Installer and EJBCA certificate authority components, which provide each base station with its X.509 certificate (for IPSec or TLS modes) alongside other deployment-specific configuration parameters.
To learn more about base station's security, see About base station's security. To learn more about how to configure the Key Installer details on your base station, see Configuring PKI.
Configuring core network endpoints applies whatever the level of security configured on the base station (TLS, IPSec, or no security). See Configuring core network endpoints for more details.
Using a secure connection between the base station and the core network is a mandatory requirement for ThingPark SaaS. This is also recommended for ThingPark self-hosted when the connection is not established over a private network.
The default ThingPark Enterprise base station images are already configured to use secure connections to the core network:
- BS images using LRR versions 2.6.x use IPsec by default.
- BS images using LRR versions 2.8.x onwards use TLS by default.
Consider the following steps to connect a base station over TLS or IPSEC:
For self-hosted deployments, to connect a base station without any security framework, you only need to Configure the core network endpoints.
Activating a secure connection via IPSec or TLS
For a given base station, IPsec and TLS are two mutually exclusive options to secure the base station's connection to the ThingPark core network.
LRR versions >= 2.8.30
For LRR versions >= 2.8.30, you can activate IPSec or TLS through SUPLOG, by applying the following steps. The same steps can be used to switch from IPsec to TLS or vice versa:
-
Go back to the System configuration menu, then Backhaul. A screen similar to the following example will display:

-
Use Tab key to navigate and Space key to either activate IPSec or TLS. An active configuration is marked with
(*). -
On this same screen, if you activate IPSec, you may also activate SFTP option to secure the file downloads/uploads between your base station and the core network. If you activate TLS, the use of SFTP is enforced.
-
Once you are done with your changes in this menu, click Confirm to save your configuration. At this stage, the configuration is only saved by the system, but it has not yet been applied to the base station. To learn more, see Apply/commit/rollback mechanism.
tipBefore leaving this screen, you can directly check that LRC, SFTP/FTP download/upload and Reverse SSH endpoints are correctly configured as described in Configuring core network endpoints.
LRR versions < 2.8.30
For LRR versions < 2.8.30, you can activate IPSec through SUPLOG, by applying the following steps:
-
From SUPLOG's root menu, choose System configuration, then PKI, then Configure PKI. A screen similar to the following example will display:
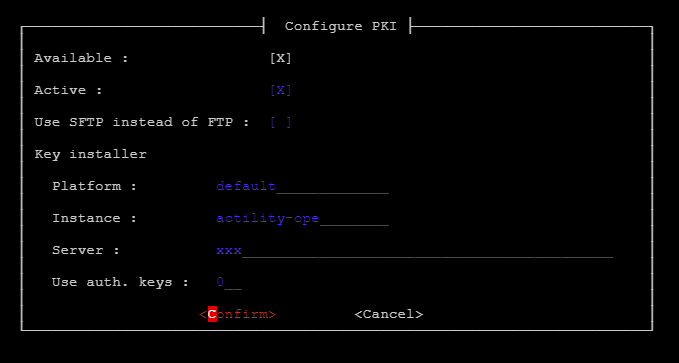
-
Use Tab key to navigate and Space key to activate IPSec if it is not already active. An active IPSec configuration is marked with [X].
-
On this same screen, you may also activate SFTP option to secure the file downloads/uploads between your base station and the core network.
-
Once you are done with your changes in this menu, click Confirm to save your configuration. At this stage, the configuration is only saved by the system, but it has not yet been applied to the base station. To learn more, see Apply/commit/rollback mechanism.
tipBefore leaving this screen, you can directly check that the Key Installer fields are correctly configured as described in Configuring PKI.
noteYou cannot activate TLS through SUPLOG for LRR versions earlier than 2.8.30. To activate TLS on earlier versions, either you use a custom base station image or you rely on ThingPark's Infrastructure Commissioning Service (ICS). Contact your ThingPark support team for further assistance.
Configuring PKI
Configuring PKI is mandatory to activate a secure IPsec or TLS connection.
Follow these steps to edit your current PKI configuration, you may also need to do this task if you want to move your base station from one ThingPark platform to another.
- From SUPLOG's root menu, choose System configuration, then PKI, then Configure PKI.
-
Set the Key Installer details as follows:
Key installer platform Key installer instance Key installer servers (1) Use auth. Keys (enable/disable public key Authentication) TPE SaaS EU-PROD prod-eu actility-tpe-ope slrc1.eu.thingpark.com / slrc2.eu.thingpark.com 1 TPE SaaS AU-PROD actility-au1 actility-tpe-ope slrc1-au1.thingpark.com / slrc2-au1.thingpark.com 1 TPE SaaS US-PROD prod-us actility-tpe-ope slrc1-us.thingpark.com / slrc2-us.thingpark.com 1 ThingPark Community aws-eu-eco actility-tpe-ope slrc1-poc.thingpark.com / slrc2-poc.thingpark.com 1 Self-hosted TPE default actility-ope Use the public IP address (Network Server IP) configured in Cockpit (2) 0 (1) For LRR versions < 2.8.30, only set SLRC1 endpoint. Setting both SLRC1 and SLR2 endpoints is only possible from LRR version 2.8.30 onwards.
(2) For self-hosted TPE case, set the Key Installer server's IP address according to the addressing plan used for the deployment of your ThingPark Enterprise instance. The Key installer server IP should correspond to the network server IP address that you specified in Cockpit during TPE host installation.
- Once you are done with your changes in this menu, click Confirm to save your configuration. At this stage, the configuration is only saved by the system, but it has not yet been applied to the base station. To learn more, see Apply/commit/rollback mechanism.
Configuring core network endpoints
This task allows you to configure the endpoints of the ThingPark core network on your base station. In ThingPark terminology, the LoRaWAN® network server is called LRC (Long Range Controller).
Follow these steps to edit your backhaul configuration, you may also need to do this task if you want to move your base station from one ThingPark platform to another.
- From SUPLOG's root menu, choose System configuration, then Backhaul.
-
Use the tables below to fill this form according to your deployment model. If you use TLS to secure the Connection of your base station to the ThingPark core network, the LRC and SFTP download/upload endpoints are automatically set by the LRR, therefore they are not configurable in SUPLOG.
noteReverse SSH server is a system component included in ThingPark core network architecture. It acts as a jump server, allowing remote access to the base station through reverse SSH.
- Once you are done with your changes in this menu, click Confirm to save your configuration. At this stage, the configuration is only saved by the system, but it has not yet been applied to the base station. To learn more, see Apply/commit/rollback mechanism.
Network endpoints for a SaaS deployment
According to your platform, use the following configuration:
| LRC0 address / LRC1 address (1) | FTP download 0 / FTP download 1 (1) | FTP upload 0 / FTP upload 1 (1) | Reverse SSH 0 / Reverse SSH 1 | |
|---|---|---|---|---|
| TPE SaaS EU-PROD | 10.112.12.10 / 10.112.22.10 | 10.112.12.10 / 10.112.22.10 | 10.112.12.25 / 10.112.22.25 | a-support1-eu.thingpark.com / b-support1-eu.thingpark.com |
| TPE SaaS AU-PROD | 10.122.12.10 / 10.122.22.10 | 10.122.12.10 / 10.122.22.10 | 10.122.12.25 / 10.122.22.25 | a-support1-au1.thingpark.com /b-support1-au1.thingpark.com |
| TPE SaaS US-PROD | 10.102.12.10 / 10.102.22.10 | 10.102.12.10 / 10.102.22.10 | 10.102.12.25 / 10.102.22.25 | support1-us.thingpark.com / support2-us.thingpark.com |
| ThingPark Community | 10.152.12.10 / 10.152.22.10 | 10.152.12.10 / 10.152.22.10 | 10.152.12.25 / 10.152.22.25 | support1-poc.thingpark.com / support2-poc.thingpark.com |
(1) Not relevant for TLS mode.
Network endpoints for a self-hosted deployments
When the base station is IPSec or TLS, use the following configuration:
| LRC0 address / LRC1 address (1) | FTP download 0 / FTP download 1 (1) | FTP upload 0 / FTP upload 1 (1) | Reverse SSH 0 / Reverse SSH 1 | |
|---|---|---|---|---|
| Default subnets | 192.168.0.140 / 192.168.0.2 | 192.168.0.142 / 192.168.0.3 | 192.168.0.142 / 192.168.0.3 | Use the public IP address(es) (Network Server IP) configured in Cockpit. |
| Custom subnets | x.y.z.140 / x.y.z.2 (2) | x.y.z.142 / x.y.z.3 (2) | x.y.z.142 / x.y.z.3 (2) | Use the public IP address(es) (Network Server IP) configured in Cockpit. |
(1) Not relevant for TLS mode.
(2) x.y.z refers to the custom subnet configured on the self-hosted ThingPark Enterprise deployment. For example, if the configured custom subnet is 10.5.16.0/24, LRC0 / LRC1 addresses are 10.5.16.140 / 10.5.16.2.
If your self-hosted TPE is deployed in standalone mode, only information elements for node #0 (LRC 0, FTP download/upload 0 and Reverse SSH 0) are relevant. Remove information for node #1 if already pre-filled.
If your self-hosted TPE is deployed in High Availability (HA), both node#0 and node#1 information are relevant and must be filled.
When the base station does not use any security framework (only applicable to self-hosted deployments):
- Use the public IP address (Network Server IP) configured in Cockpit to set the IP address of LRC/FTP/Reverse SSH core endpoints according to your addressing plan.
- For self-hosted TPE High Availability mode, use both IP addresses set in Cockpit for primary LRC (set it for nodes #0) and secondary LRC (set it for nodes #1).