Configuring network interfaces
Depending on the network interfaces supported by your base station, you may configure one or more of the following interfaces:
- Ethernet interface, referenced by "eth0".
- Cellular interface, referenced by "ppp0" or "wwan0". To learn more, see Configuring cellular interface.
- WiFi interface, referenced by "wlan0". To learn more, see Configuring WiFi interface.
By default, the base station image is configured with DHCP activated, so the IP address is automatically allocated by the DHCP server of your network. If you want to switch from DHCP to static IP address, see Changing IP address allocation strategy.
If your base station model supports several network interfaces, ThingPark allows you to configure one interface as primary and another as a secondary one. Thanks to the automatic failover/failback mechanisms between primary and secondary interfaces, the primary network interface shall be privileged by the LRR software if it is up and running; otherwise, the secondary interface shall be used if up/ready. To learn more about interface failover configuration, see IP failover.
When you are done with all your System Configuration, do not forget to apply your new configuration to your base station. To learn more, see Apply/commit/rollback mechanism.
Changing IP address allocation strategy
The base station image uses DHCP mode by default. Follow these steps to configure a fixed IP address instead of DHCP:
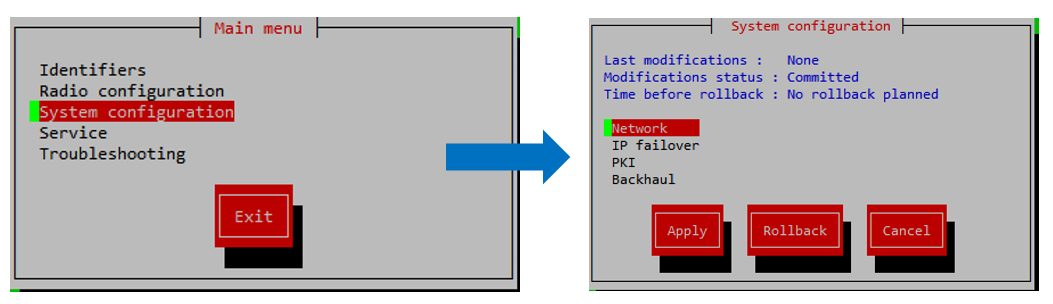
- From SUPLOG's root menu, choose System configuration, then
Network, then Network interfaces.
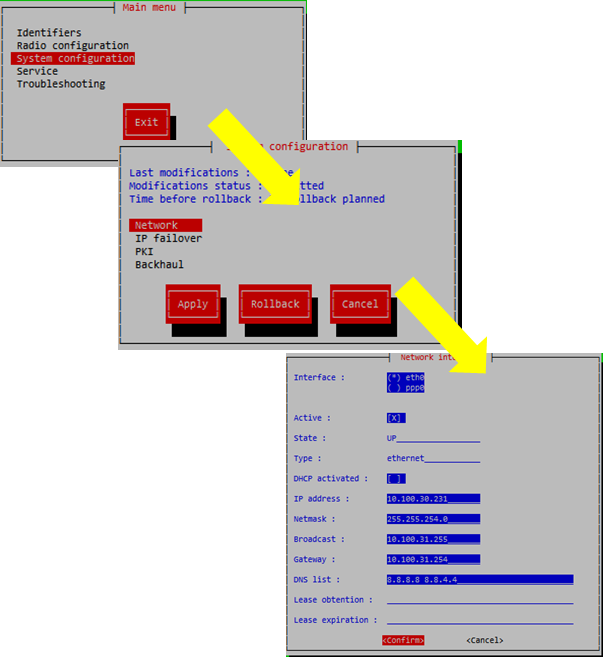
- Select the network interface that you want to configure.
note
The interface details are displayed for the interface shown with (*). To display another interface, use the arrows to go to this interface then press the Space bar to select it.
- To toggle the activation state of this interface, go to "Active"
(use the ⇥ Tab key to navigate through the fields) and
press the Space bar to change the current value. An active interface
should have an
[X]. - To move from DHCP to fixed IP:
- Go to "DHCP activated" and use the Space bar to disable it. The
field should look like:
[ ] - Configure IP address, Netmask, Broadcast, Gateway, DNS list fields.
- Go to "DHCP activated" and use the Space bar to disable it. The
field should look like:
- Repeat steps 2 to 4 above for each network interface that you want to switch to static IP instead of DHCP.
- Once you are done with your changes in this menu, click Confirm to save your configuration. At this stage, the configuration is only saved by the system, but it has not yet been applied to the base station. To learn more, see Apply/commit/rollback mechanism.
Configuring cellular interface
Follow these steps to configure cellular network interface:
- From SUPLOG's root menu, choose System configuration, then
Network, then Cellular:
- Configure your cellular settings (use ⇥ Tab key to navigate
between fields):
- Available, should have an
[X]. - Autoconf is not supported in this release.
- Fill the APN, PIN, user and password, and press ⏎ Enter to validate your choice.
- Available, should have an
- Once you are done with your changes in this menu, click Confirm to save your configuration. At this stage, the configuration is only saved by the system, but it has not yet been applied to the base station. To learn more, see Apply/commit/rollback mechanism.
To activate the cellular backhaul, you must configure the cellular 3G/4G modem as your primary or secondary interface, as described in IP failover.
Configuring WiFi interface
Some base station models support WiFi backhaul option. Follow these steps to configure WiFi network interface:
- From SUPLOG's root menu, choose System configuration, then
Network, then Wifi:

- Configure your WiFi settings (use ⇥ Tab key to navigate between
fields):

- Available, should have an
[X]. - Fill the SSID, Security protocol and security Key and press ⏎ Enter to validate your choice.
- Once you are done with your changes in this menu, click Confirm to save your configuration. At this stage, the configuration is only saved by the system, but it has not yet been applied to the base station. To learn more, see Apply/commit/rollback mechanism.
To activate the WiFi backhaul, you must configure WiFi as your primary or secondary interface, as described in IP failover.
IP failover
Once you are done configuring each individual interface, as explained in the previous sections, you should now configure how those interfaces are used by your base station; that is to say, determine which interface is primary and which one is secondary.
To do this:
-
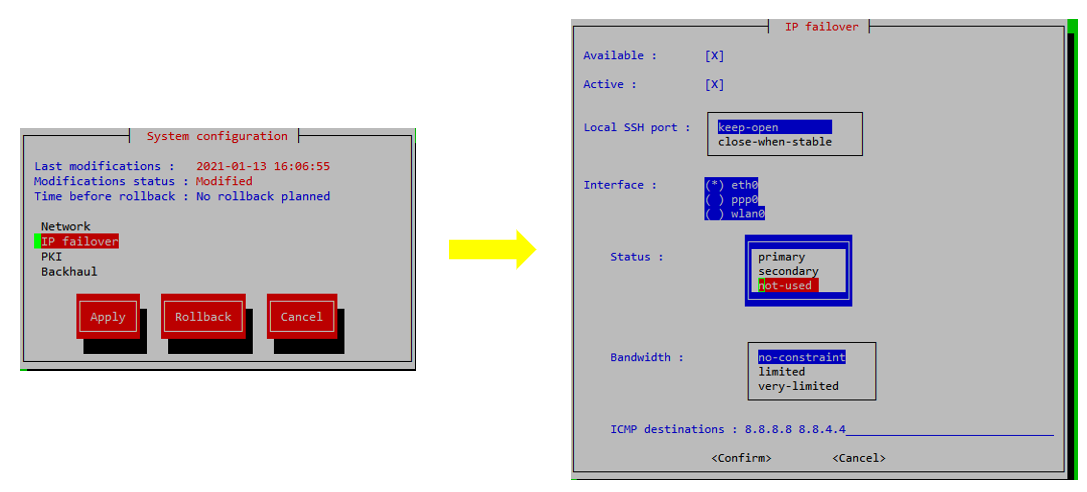
From SUPLOG's root menu, choose System configuration, then IP failover:
-
Go to Interface (through the ⇥ Tab key) then select the interface you want to configure.
note"Status" and "Bandwidth" fields are displayed for the interface shown with (*). To display another interface, use the arrows to go to this interface then press the Space bar to select it.
- To make an interface the primary one, choose this interface (should be displayed with (*)) then go to Status (via ⇥ Tab key) and select "primary" then press ⏎ Enter key.
- Likewise, to configure an interface as a secondary one, choose this interface, then select "secondary" from the Status field.
- To completely deactivate a network interface, select it and set the status to "not-used".
For each interface, you may also set the Bandwidth constraint to allow ThingPark LRR to control the backhaul overhead accordingly, by adapting the ICMP ping periodicity. A typical configuration would be:
- "no-constraint" for ethernet and WiFi
- "limited" for cellular 3G/4G interfaces
- "very limited" for satellite type of backhaul.
In this same IP Failover menu, you can configure the direct SSH access strategy to your base station:
- If you want your base station to be accessible through SSH at any time, from any remote client (whether it is located in the same LAN or not), then set Local SSH port = keep-open.
- Otherwise, if you want your base station to open a local SSH port - accessible by any remote client – only to debug backhaul connection issues when the base station loses connection with ThingPark core network, then set Local SSH port = close-when-stable. Note that with this configuration, the base station remains accessible with SSH at any time, but only to remote clients located in the same LAN as the base station (for clients having a private IP address).
Note Whatever the configuration you select here, your base station's SUPLOG shall remain remotely accessible from the ThingPark GUI, through reverse SSH.
-
Once you are done with your changes in this menu, click Confirm to save your configuration. At this stage, the configuration is only saved by the system, but it has not yet been applied to the base station. To learn more, see Apply/commit/rollback mechanism.
Depending on your local network, the local IP of your base station may get changed. In this case, you should open a new local SSH connection to continue your setup.
To properly handle the interface failover/failback decisions, the LRR uses the ICMP protocol to periodically ping specific destinations via each network interface. This mechanism allows the LRR to track the health state of each interface.
By default, the ICMP destinations are automatically set by the LRR, but they may be customized from LRR version 2.8.34 onwards.
If you want to customize the ICMP destinations, for instance because of ping restrictions imposed by your deployment environment, apply the steps described in Customzing ICMP destinations.
Customizing the ICMP destinations
ICMP protocol is used to validate the health state of each network interface. By default, ICMP destinations are automatically set as follows:
- If PKI is active (meaning backhaul connection is secured either by IPSec or TLS): ICMP pings the ThingPark core network component that terminates the IPSec/TLS connection (also known as SLRC).
- Otherwise, ICMP pings the ThingPark Network Server (also known as LRC).
To customize the ICMP destinations, apply the following steps:
- Go to System configuration, then Network, then Network monitoring.

- Set the network monitoring mode to manual.
- Fill the ICMP destinations by custom destinations that remain reachable by the LRR in your deployment environment.
- Click Confirm. At this stage, the configuration is only saved by the system, but it has not yet been applied to the base station. To learn more, see Apply/commit/rollback mechanism.
This feature is only available from LRR 2.8.34 onwards.