Adding a destination to a LoRaWAN® AS routing profile
Once created, the LoRaWAN® AS routing profile requires one or more destinations that are the following application servers:
-
ThingPark X destinations
-
Supplier application servers: LoRaWAN® HTTP application servers or Kafka clusters
-
Local applications servers: LoRaWAN® HTTP application servers or Kafka clusters
For more information, see AS routing profiles and application servers mapping.
Important The maximum number of destinations, summing up all types of application servers you can add in a LoRaWAN® AS routing profile, is defined in the connectivity plan associated with the device. For more information, see the Maximum allowed Application Servers parameter in LoRaWAN® unicast connectivity plan details.
If you want to use a local application server, it must have a route and be active to work properly. For more information, see Adding a route to a local application server and Deactivating a local application server. When added to the AS routing profile, a destination displays its status.
Before you begin
-
You must have read-write access to Device Manager. For more information, see Opening a panel and checking your read-write access.
-
The LoRaWAN® AS routing profile must be opened in edit mode.
-
In the Destinations frame of the AS routing profile panel, click Add.

-
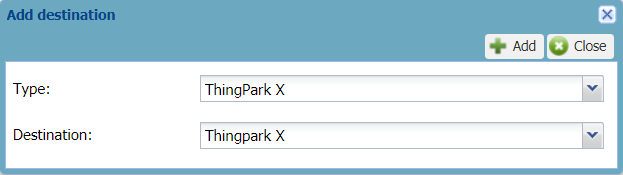
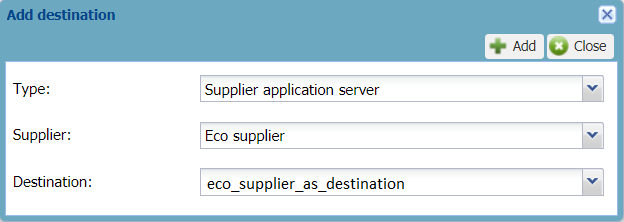
In the Add destination dialog box that appears, do one of the following:
-
If required by your operator to use a ThingPark X destination:
-
In the Type list: select ThingPark X.
-
In the Destination list: select the ThingPark X destination your operator gave you. If <No cloud configured> is displayed, contact your operator.
-
-
If you want to use a shared application server defined at supplier level:
-
In the Type list: select Supplier application server.
-
In the Supplier list: select the shared supplier you want to use the application server.
-
-
If you want to use an HTTP application server or a Kafka cluster you have created earlier:

-
In the Type list: select Local application server.
-
In the Destination list: select the HTTP application server or the Kafka cluster you want to use as a destination for the AS routing profile.
-
In the Destination list: select the supplier application server destination. It can be a LoRaWAN® HTTP application server or a Kafka cluster created by the shared supplier. If is displayed, contact your operator.
-
-
-
Click Add.
-> The application server appears in the Destinations frame displaying its status.
-
If you want to add another destination, click Add, and repeat from step 2.
Repeat as necessary. Note If you add more destinations that the number allowed in the connectivity plan you want to associate with the device, you will not be able to create or edit the device using this AS routing profile. -
Click Save in the AS routing profile panel.
-> The Status frame is updated with your last modifications.
-> The LoRaWAN® AS routing profile is ready to be allocated to a LoRaWAN® device:
-
Either when creating the device.
For more information, see Creating devices.
-
Or after you have created the device.
For more information, see Managing the AS routing profile of a device or Changing the AS routing profile.
-