Checking the device settings and activity
Viewing general information, activity summary and location of a device
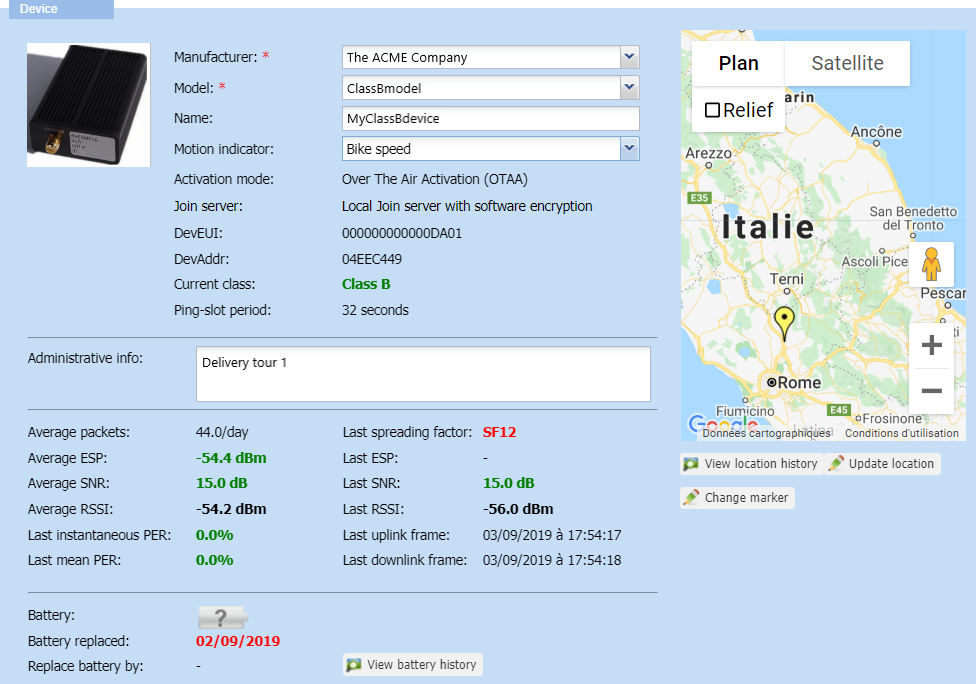
In the Device panel, you can see the general information, activity summary and location of a:
- LoRaWAN® class A, B, or C device
- Cellular device.
-
In the navigation panel, click Devices to display the Devices panel, then click the List or the Map tab.
-
Select a device.
-
Click View or Edit to enter the Device panel.
-
For LoRaWAN® class A and C devices:
-
The Device frame displays the basic information of the device such as the Manufacturer, Model, Name, Activation mode (OTAA or ABP), Join server mode (only for OTAA devices), DevEUI (similar to a MAC address), DevAddr (similar to a network address).
-
Current class: This is the class of the device model associated with the device. It is always displayed in green.
-
-
For LoRaWAN® class B devices:
-
Current class: When not working in class B, the device displays its current class in black. When switching to class B, the device reports its Ping-slot period and displays its current class in green.
-
-
If a manufactured-class B device displays its current class in black for too long, it might also mean:
-
Either the device cannot switch to class B. If you want to check the device packets, see Wireless Logger User Guide.
-
Or when creating the device, it has been associated with:
-
A model that does not support class B. If you want to change it, see Changing the device model.
-
A connectivity plan that does not allow class B. If you want to change it, see Changing the connectivity plan.
- In the map, click the marker to display the manual or network coordinates of the device location. For more information, see Network location: viewing the device location history (LoRaWAN® only) and Manual location: locating a device or editing its location.
In view mode, the Update location and Change marker buttons are not available in the Device frame.
Monitoring the activity of a LoRaWAN® device
In the view or edit mode of the Device frame of a LoRaWAN® device, you can switch from one tab to the other to display charts showing statistics to monitor the activity of the device for a given time. This information is read-only.
Monitoring the activity of a cellular device
In the view or edit mode of the Device frame of a cellular device, you can switch from one tab to the other to display charts showing statistics to monitor the activity of the device for a given time. This information is read-only.
These statistics are displayed according to the cellular mode enabled in the connectivity plan associated with the device. If no connectivity plan is associated, all corresponding tabs are displayed. For more information about cellular modes, see About AS routing profiles types and cellular modes.
Tips
-
Hovering your mouse over an item of the chart displays additional traffic information.
-
Clicking an item of the caption makes it disappear/appear in the chart and adjusts the scale.
-
In the navigation panel, click Devices to display the Devices panel, then click the List or the Map tab.
-
Select a device and click View or Edit to enter the Device panel.
-
Scroll down the Device panel to display the Message mode packets, Message mode payloads, and Direct IP mode bytes tabs with the charts.
-
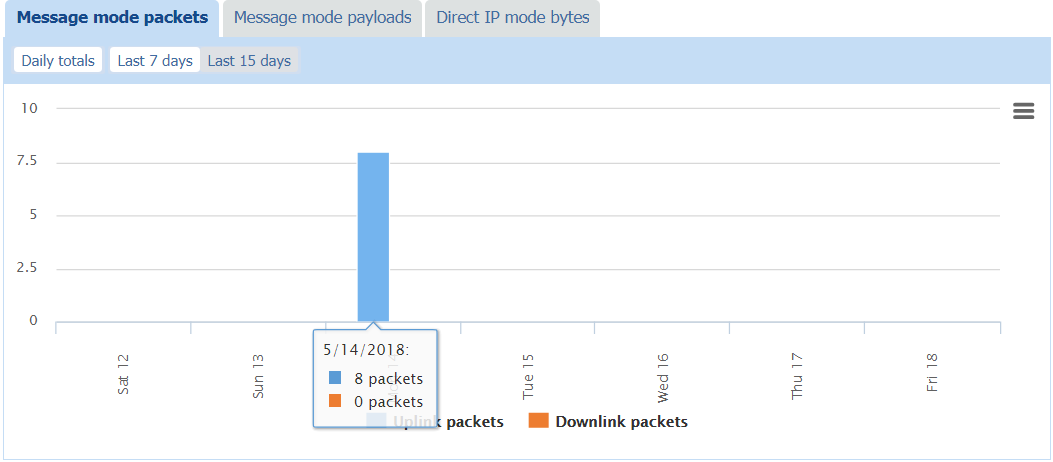
Click the Message mode packets tab, then:
-
Click Daily totals and Last 7 days, or Last 15 days, to view:
-
The total number of Uplink packets and the total number of Downlink packets sent in message mode over the selected period.
Tip Hover your mouse over an item of the chart to read the exact number of packets with their distribution per day.
-
-
-
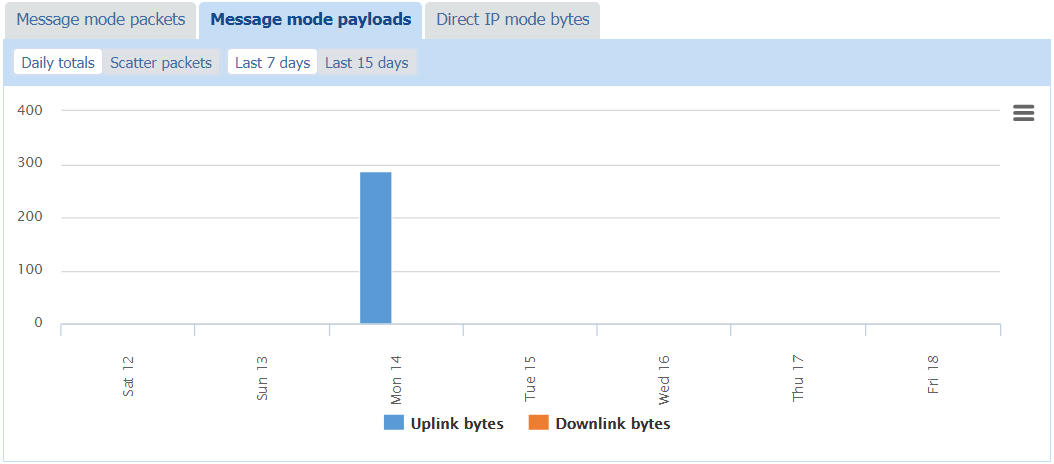
Click the Message mode payloads tab and:
-
Click Daily totals and Last 7 days, or Last 15 days, to view:
-
The total size of Uplink bytes and the total size of Downlink bytes sent in message mode over the selected period.
Tip Hover your mouse over an item of the chart to read the total size of bytes used with their distribution per day.
-
-
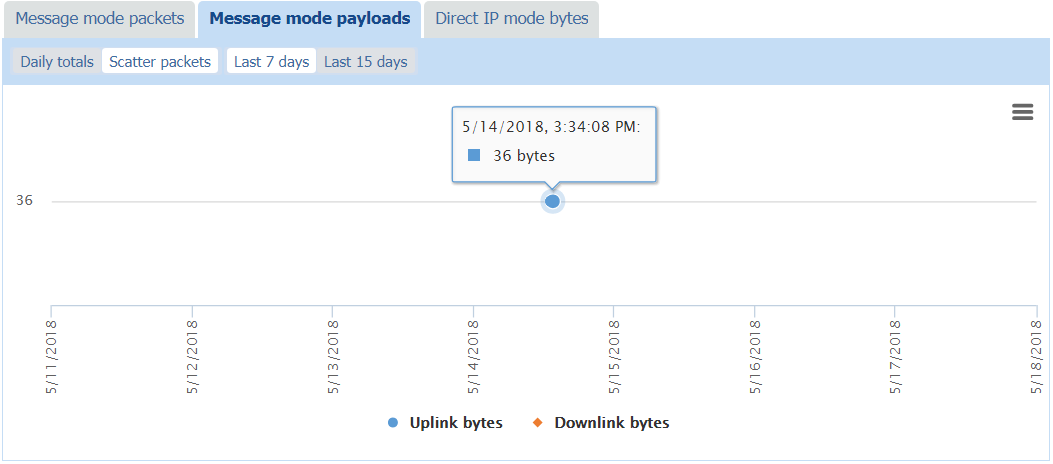
Click Scatter packets and Last 7 days, or Last 15 days, to view the scattering of packets per day of:
-
Uplink bytes and Downlink bytes payloads sent in message mode with their timestamp, uplink, and downlink sizes over the selected period.
Tip Hover your mouse over a packet in the chart to see its timestamp and size in bytes.
-
-
-
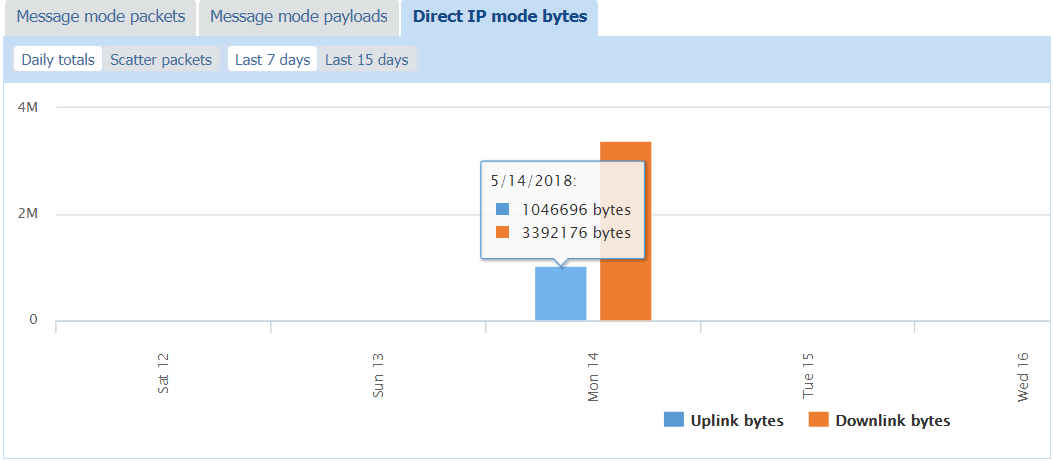
Click the Direct IP mode bytes tab and:
-
Click Daily totals and Last 7 days, or Last 15 days, to view:
-
The total size of Uplink bytes and the total size of Downlink bytes of Direct IP microflow reports sent over the selected period.
Tip Hover your mouse over an item in the chart to read the total size of bytes used with their distribution per day.
-
-
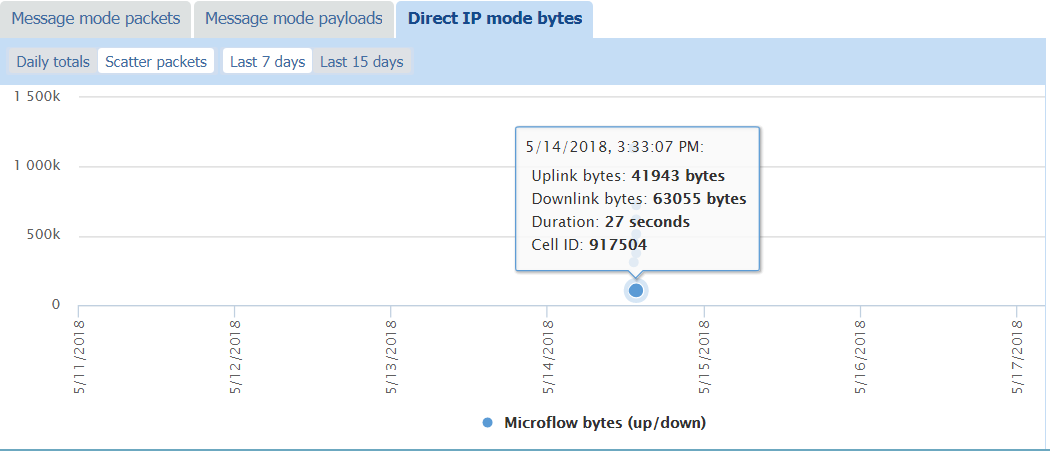
Click Scatter packets and Last 7 days, or Last 15 days, to view the scattering of packets per day of:
-
Microflow bytes (up/down) sent per microflow report over the selected period.
Tip Hover your mouse over an item in the chart to see its timestamp, uplink and downlink sizes in bytes, duration, and cell ID.
-
-
-
If you want to remove some information from the chart, click the corresponding item in the chart caption. It also adjusts the scale according to the information displayed.
-
If you want to print or download this chart, see Printing or downloading a chart.
Printing or downloading a chart
You can print a chart or download its image in the format you want (PNG, JPEG, PDF, SVG). This task is also available for read-only end-users.
-
Display the chart you want as explained in:
-
If you want to print the chart:
-
Click the Chart context menu

and click Print. In the Print window, set the printing options as you want and click Print.
-
-
If you want to download an image of the chart:
-
Click the Chart context menu
and according to the format you want, click:
-
Download PNG image
-
Download JPEG image
-
Download PDF document
-
Download SVG vector image.
-
-
Follow your browser instructions to download the image.
-