Creating a cellular device
You must have read-write access to Device Manager. For more information, see Opening a panel and checking your read-write access.
To connect successfully a cellular device to the cellular network, the EPC Connector and ThingPark Wireless, the following information is required:
| Required information | ||
|---|---|---|
| IMEI | Identifier of the device that is printed on it | |
| Manufacturer | Identifier of the manufacturer | |
| Model | Identifier of the model | |
| IMSI | Identifier present inside the SIM card | Only required if your operator configuration is set to provision device HSS data. |
| Ki | Device secret key present inside the SIM card. If not pre-provisioned by your operator, you can enter it in clear text or RSA encrypted. |
Note The connectivity plan and the AS routing profile are necessary to make the device work. You can associate them by editing the device later.
-
In the navigation panel, click Devices to open the Devices panel.
-
In the Add Devices frame, click Create.
-
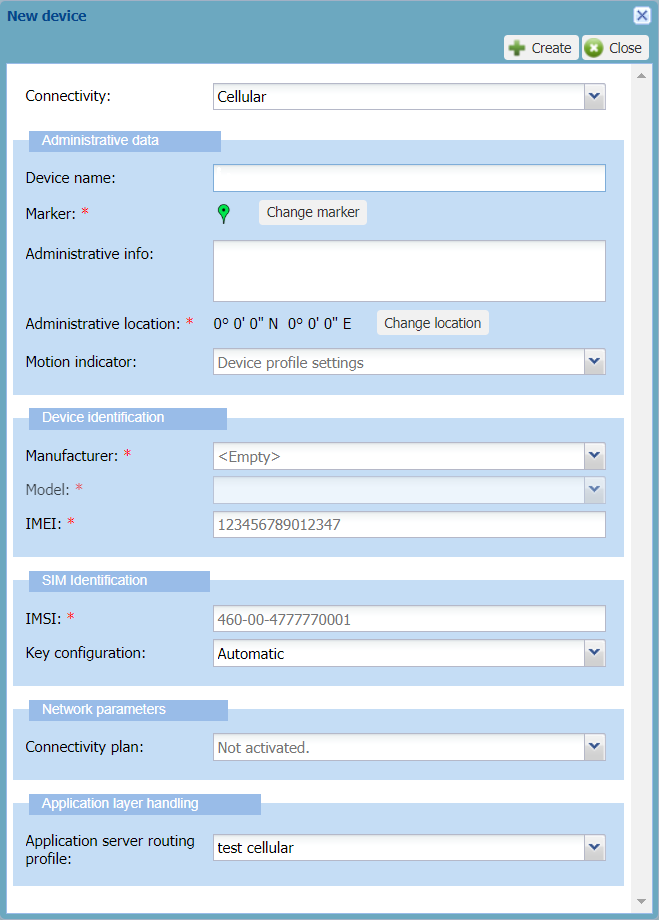
In the New device dialog box that appears, select Cellular from the Connectivity list.
-> The dialog box is updated with cellular parameters.
Tips
-
Only the fields marked with an asterisk are required to create the device in Device Manager.
-
A tooltip appears when hovering your mouse over a field.
-
An example is given that disappears when entering your data.
-
To help you, type slowly in the box until a blue frame appears. If the frame is red, your data is not correct.
-
In the Administrative data frame, enter the following information:
-
Device name: Enter a name that helps you identify easily the device on your IoT network.
-
Marker: If you want to change the default device marker, click Change the marker, and apply Changing the device marker from step 3.
-
Administrative info: Enter any useful information related to the device. Such information is displayed in alarm notification emails. For more information, see Setting alarm notification emails.
-
Administrative location: By default, the device location is not set. If you want to locate the device, click Change location. For more information, see Manual location: locating a device or editing its location from step 3.
-
Motion indicator: To allow the network server to use the best base station to send downlinks, replace Device profile settings by the motion indicator that best applies to your device during operation. Note If your device is always static, select Near static. If your device can change location during operation, do not select Near static.
-
-
In the Device identification frame:
-
In the Manufacturer list: Select the manufacturer of the device. If it is not in the list, contact your operator.
-
In the Model list: Select the model of the device. If the model is not in the list, contact your operator. If your operator modifies a model, all existing associated devices and their behavior are modified accordingly.
-
In the IMEI box: Enter the 15-digit IMEI of the cellular device to check that the IMEI uniquely identifies it. If not, enter a 14-digit IMEI. The optional 15^th^ digit is a Luhn checksum that verifies that the IMEI is correct.
-
-
In the SIM Identification frame:
-
In the IMSI box: Enter the IMSI identifying the SIM card of the device (10 to 15 digits with or without separating dashes).
-> If your operator or its connectivity supplier pre-provisions and manages SIM cards, the Ki associated with the IMSI you have entered will be recognized to identify an unallocated SIM card (Automatic must be selected in the Key configuration list).
-
-
If your operator or its connectivity supplier does not pre-provision SIM cards, you must enter the Ki of the SIM card associated with the device as described in the following two steps.
-
If you want to enter a Ki in clear text:
-
In the Key configuration list, select Manual (clear text).
-
In the Ki box that appears, enter the 32-hexadecimal digits Ki with or without separating dashes that has been assigned by the operator during the personalization process and authenticates the SIM card on the cellular network.
-
-
If you want to enter an RSA encrypted Ki:
-
Select **Manual (RSA encrypted)**from the Key configuration list.
-> The RSA encrypted Kibox appears.
-
Click Download RSA Public Key to download it in X.509 SubjectPublicKeyInfo /OpenSSL PEM format.
-
Using for instance an OpenSSL command in a shell terminal, encrypts the Ki with the RSA public key (PKCS#1 v1.5 padding) as follows:
openssl rsautl –encrypt –in ki.bin –inkey TWK1.pem –pubin –pkcs –out encryptedKi.binWhere:
-
ki.binis the Ki in binary format. For example, you can setki.binby executing the following commands:-
echo
{MY_KI_IN_HEXA}>ki.hex -
cat
ki.hex| xxd --r --p >ki.bin
-
-
TWK1.pemis the RSA Public Key in X.509 SubjectPublicKeyInfo/OpenSSL PEM format -
encryptedKi.binis the RSA encrypted Ki in binary format.
-
-
Do one of the following:
-
If you want to enter the RSA encrypted Ki uploading the binary file resulting from the encryption:
-
Save
encryptedKi.binon your workstation. -
Click Browse... next to the RSA encrypted Ki box.
-
-
Otherwise, if you want to enter the RSA encrypted Ki as a base64 string:
-
Using for instance a Linux command in a shell terminal, encode
encryptedKi.binin base64 as follows:cat encryptedKi.bin | base64 -
Copy-paste the result in the RSA encrypted AppKey box.
-
-
-
-
In the Network parameters frame:
- Select a Connectivity plan from the list that only contains
cellular connectivity plans.
The number in parenthesis indicates the remaining connectivity plans available. For more information about connectivity plans, see Viewing connectivity plans.
- Select a Connectivity plan from the list that only contains
cellular connectivity plans.
-
In the Application layer handling frame:
-
In the Application server routing profile list, select an AS routing profile to route the cellular device packets towards one or more applications servers.
-
ImportantYou can only use an AS routing profile that does not contain more destinations, summing up all types of application servers in it, than defined in the connectivity plan associated with the device. For more information, see Maximum allowed Application Servers in Cellular IoT connectivity plan details.
-
If there is no AS routing profile in the list, you will associate it later by opening the device's Network panel after you have created a cellular AS routing profile. For more information, see Managing AS routing profiles and Managing the AS routing profile of a device.
-
-
-
Click Create.
-> If the process takes time, a message tells you that you will receive an email when finished.
-> The device is displayed in the device list.