Manual provisioning of OTAA and ABP devices
The same procedure applies to the provisioning of devices by ABP or OTAA. Only the form differs from one activation mode to the other. Thus, you will need to enter specific parameters according to the activation of your choice.
Ensure that you have all parameters ready to be set prior to selecting your device provisioning form. To learn more, click Devices' parameters.
After provisioning your device, you can update your device location. To learn more, click Modifying the location of the device.
There are two device location modes that you can use:
-
Manual mode: this mode is compatible with stationary devices. In this case, you need to manually configure the device position.
-
Network geolocation mode: this mode is suitable for moving devices but can also be used for stationary devices if the device's exact location is not known by the user. It allows you to configure the device to be within a range of at least three base stations. To learn more about your subscription license, contact your System Integrator.
If you are entitled to an Administrator role or to a Devices and Connection Manager role, then you can commission a device. Otherwise, you cannot perform the following procedure.
-
Case 1 - Manual provisioning of OTAA devices using a local Join Server. To learn more, see Activation modes.
-
Case 2 - Manual provisioning of OTAA devices using an external Join Server. To learn more, see Activation modes.
-
Case 3 - Manual provisioning of ABP devices. To learn more, see Activation modes.
Case 1 - OTAA device activation with a local Join Server
-
Select Devices, and click ADD DEVICE on the Devices page. Alternatively, from Dashboard, click
 in the DEVICE widget.
 -
In the Selecting the manufacturer section, select one of the Device Manufacturers displayed on your screen.
-
If your device manufacturer is not displayed, click View More Manufacturers and select the manufacturer you want.
Note When selected, the manufacturer displays a description that differentiates its IoT activities from other manufacturers.
-
If the manufacturer or model is not listed, but you are familiar with LoRaWAN® protocol and know the LoRaWAN® profile supported by your device, select Generic.
-
-
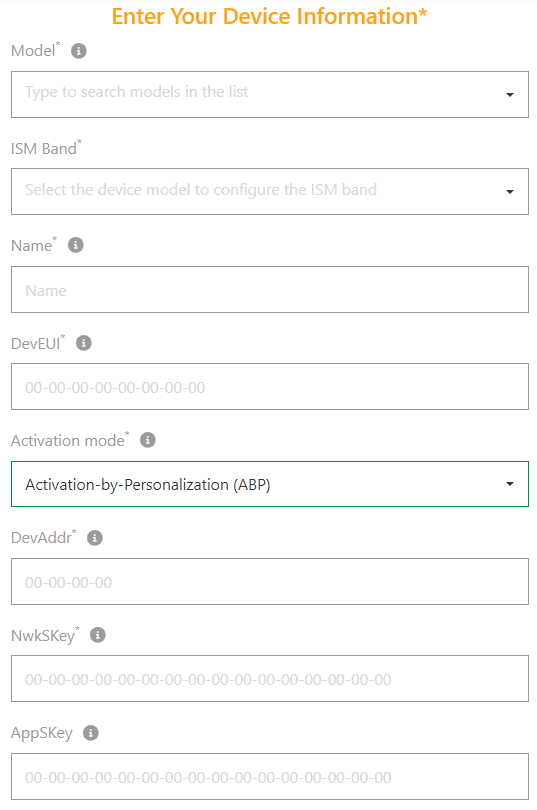
Enter the following mandatory information:

-
Model
-
ISM Band: If the selected model supports several ISM bands (also known as LoRaWAN regional profiles), select the ISM band you want to use.
-
Name
-
DevEUI
-
Activation mode: Select Over-the-Air (OTAA) with local Join Server.
-
JoinEUI (AppEUI)
-
AppKey
-
-
Go to the next step in Suite of devices' activation tasks using the device provisioning form.
Case 2 - OTAA device activation with an external Join Server
-
Select Devices, and click ADD DEVICE on the Devices page. Alternatively, from Dashboard, click
in the DEVICE widget. -
In the Selecting the manufacturer section, select one of the Device Manufacturers displayed on your screen.
-
If your device manufacturer is not displayed, click View More Manufacturers and select the manufacturer you want.
Note When selected, the manufacturer displays a description that differentiates its IoT activities from other manufacturers.
-
If the manufacturer or model is not listed, but you are familiar with LoRaWAN® protocol and know the LoRaWAN® profile supported by your device, select Generic.
-
-
Enter the following information:

-
Model
-
ISM Band: If the selected model supports several ISM bands (also known as LoRaWAN regional profiles), select the ISM band you want to use.
-
Name
-
DevEUI
-
Activation mode: Select Over-the-Air (OTAA) with external Join Server.
-
JoinEUI (AppEUI)
-
(Optional) Owner token: If you provide it, the claim procedure will be automatically triggered towards ThingPark Activation, once the device is provisioned. Otherwise, the claim procedure must be done on the Join Server.
importantIf the claim procedure fails for any reason (for instance, the device has not been pre-commissioned on ThingPark Activation, the device is already claimed, owner token is invalid...), the device provisioning in ThingPark Enterprise will fail.
-
-
Go to the next step in Suite of devices' activation tasks using the device provisioning form.
Case 3 - ABP device activation
-
Select Devices, and click ADD DEVICE on the Devices page. Alternatively, from Dashboard, click
in the DEVICE widget. -
In the Selecting the manufacturer section, select one of the Device Manufacturers displayed on your screen.
-
If your Device Manufacturer is not displayed, click View More Manufacturers and select the manufacturer you want.
Note When selected, the manufacturer displays a description that differentiates its IoT activities from other manufacturers.
-
If the manufacturer or model is not listed, but you are familiar with LoRaWAN® protocol and know the LoRaWAN® profile supported by your device, select Generic.
-
-
Enter the following mandatory information:
-
Model
-
ISM Band: If the selected model supports several ISM bands (also known as LoRaWAN regional profiles), select the ISM band you want to use.
-
Name
-
DevEUI
-
Activation mode: Select Activation-by-Personalization (ABP).
-
DevAddr
-
NwkSKey
-
AppSKey
-
-
Go to the next step in Suite of devices' activation tasks using the device provisioning form.
Suite of devices' activation tasks using the device provisioning form
-
If the permission segregation based on domains has been enabled by an administrator user, associate your device with domains. If your user account has domain restrictions, the associated domains must match your domain restrictions without any domain prefix (only full domains can be assigned to resources). See About domains for more details.

-
Select the Motion indicator that corresponds to the movement of your device. The default value depends on the device model.

Note: The motion indicator is used to enhance the network geolocation accuracy and impacts the choice of the base station used to send a downlink to the device.
-
If the Choose Your Connectivity Plan section is displayed, select from Connectivity plan the connectivity plan you want to use with the device. To see all the connectivity plans of your account, along with their supported features, see Listing connectivity plans.
-
In Associate Your Device With Your Connection, select from Connections an existing connection that you want to associate with your device. A device can be associated with several connections.
-
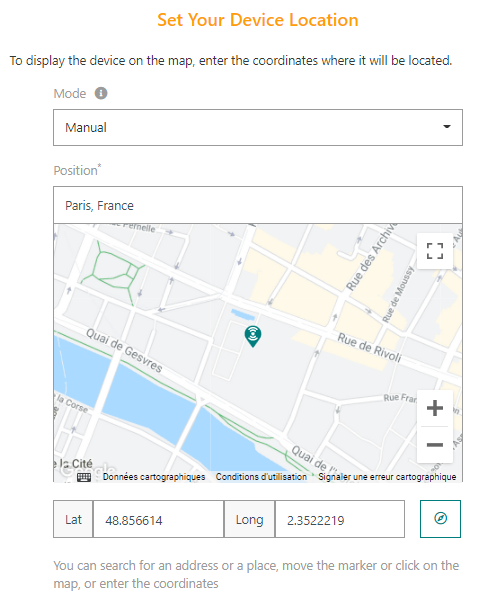
In Set Your Device Location, do one of the following:
-
If you do not want the device to be located, select No location if available in the list.
-
If you want the network to estimate the location of your device, select the Network geolocation mode. The device must be within the range of at least three base stations to be located.
importantOnly applies if the Choose Your Connectivity Plan section is displayed. If you have selected a connectivity plan in order to use network geolocation and Network geolocation is not on the Mode list, ensure that you have selected a connectivity plan supporting the Network Geolocation feature.
-
If you want to manually configure the static position of your device, select the Manual mode.
-
Set the location of the manual mode like this:
-
Either use the Search box on the top of the map using the geocoding service.
-
Or place the marker on the map.
-
Or set the latitude and longitude in text input above the map. The compass button allows the switch between decimal and degree minute second format.
-
Note The marker position and latitude/longitude inputs are synchronized by the GUI, that is, if you move the marker, the latitude/longitude is automatically updated.
Note You may use Google Maps, other supported maps or GPS geographical coordinates. If the location using Google Maps does not display, it means that the Google Maps API key has not been installed on the platform. In this case, only the latitude/longitude input is displayed.
-
-
-
If the Configure Roaming section is displayed, enable the roaming if you want your device to roam away seamlessly from home and use base stations of the visited network to reach its home network.
Note The roaming functionality is optional on self-hosted ThingPark Enterprise. It may be activated via Cockpit. For activation-deactivation through Cockpit, contact your Channel Partner.

-
If you want to provision another device with the same model, activation mode, connections, additional information, JoinEUI, location mode, and position, check the Add another box.
-
Click ADD to finish the provisioning process of the device.
-> If you have checked Add another in step 5, you are redirected to the device provisioning page. Otherwise, your device has been successfully provisioned.