Analyzing device alarms
About device alarms
An alarm is raised when a malfunction is detected on a specific device. Each active alarm is associated with a severity that defines the importance of the service impact:
- CRITICAL (red): The service is affected. An immediate corrective action is required.
- MAJOR (orange): The service is partly affected. An urgent action is required.
- MINOR (yellow): A fault that does not affect the service should be corrected to prevent the problem from aggravating further.
- WARNING (blue): A potential or impending fault affecting the service should be diagnosed and corrected, if necessary.
- INDETERMINATE (purple): The severity cannot be determined.
An alarm is automatically CLEARED (green) when the resolution of the associated malfunction is detected. A CLEARED alarm remains in this state until the malfunction is detected again: in this case the alarm is raised again and moves to the associated severity.
To learn more about possible device alarms and how to troubleshoot them, see Device alarms.
Viewing the distribution of device alarms per severity
The distribution of device alarms per severity provides an overview of the malfunctions currently detected on your fleet of devices. Alarms acknowledged by administrators are not taken into account in this distribution. See Viewing the list of device alarms for more information on alarm acknowledgement.
-
In the left panel, select Alarms.
-
In DEVICE ALARMS, a pie chart displays the distribution of device alarms per severity.

Viewing the list of device alarms
The list of device alarms provides a complete view of the malfunctions currently detected on your fleet of devices in order to take the appropriate corrective actions.
-
In the left panel, select Alarms.
-
In ALARMS DETAILS, clicking the Devices tab displays the list of device alarms.
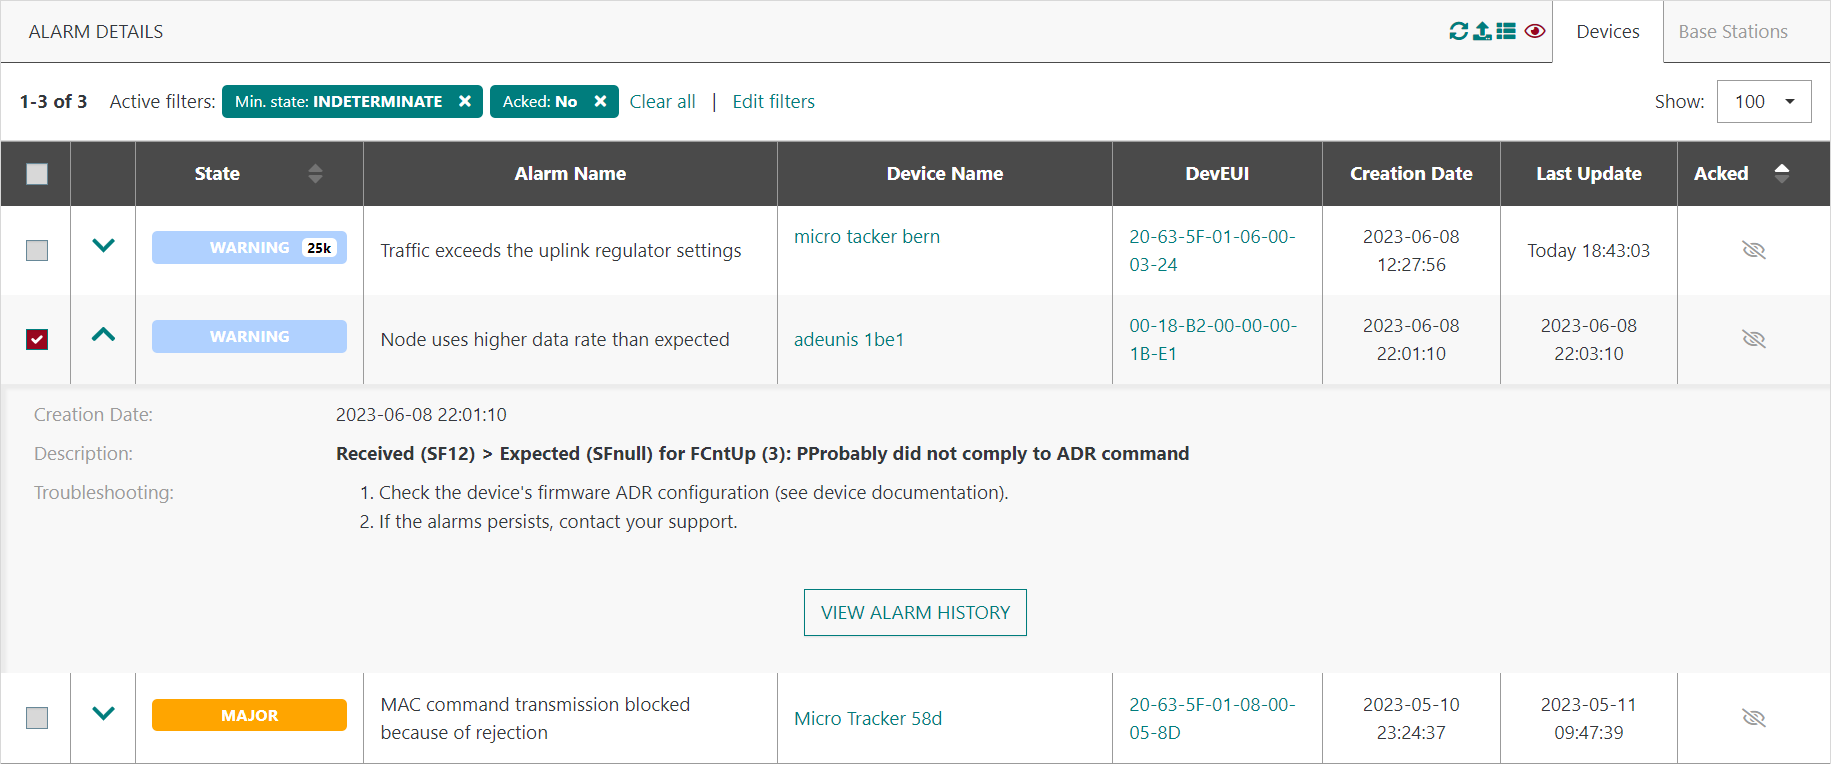
- By default, alarms that are either cleared or acknowledged are hidden because they don't require any corrective action, and last updated alarms are displayed first. The default filtering and sorting options can be customized, see Filtering device alarms for more details.
- The State column either contains the severity of active alarms, or displays CLEARED for already cleared alarms. An occurrence number may be displayed on the alarm state. To learn more about the meaning of the occurrence number for each type of alarm, see Device alarms.
- The Device Name and DevEUI columns contain the identifiers of the device for which the alarm is raised. Clicking on the name or the DevEUI allows to navigate to the dashboard of the device.
- Expanding an alarm, as shown in the preceding screen, displays the alarm's details and the troubleshooting actions to solve the associated malfunction. The VIEW ALARM HISTORY button displays the list of the past instances of the same alarm in the last 15 days. The displayed severity in this list is the last severity reached by the alarm before clearance.
- If you are entitled to a Devices, multicast groups and connections manager
role, you can acknowledge selected alarms by clicking
 .
Acknowledging an alarm is useful if you consider it as being not important
and you do not want to see it in the list of active alarms.
note
.
Acknowledging an alarm is useful if you consider it as being not important
and you do not want to see it in the list of active alarms.
noteThe acknowledgment will be automatically reversed if the severity of the alarm increases. While an alarm is acknowledged, no email notification is sent for that alarm.
- The Domains column is only available if the permission segregation based on domains has been enabled by an Administrator user. In this case, if the alarm has been triggered on a device associated with a domain, the domain is displayed. For more information, see About domains.
Filtering device alarms
By default, alarms that are either cleared or acknowledged are hidden because they don't require any corrective action. You can change the default filters to extend or restrict the list of device alarms. If you change filters, your selection is saved and will apply by default for next sessions on the same computer.
-
In the left panel, select Alarms.
-
In ALARM DETAILS, select the Devices tab.
-
If Active filters is displayed:
-
To clear all active values of a same filter, click the filter cross.
-
To delete all active filters, click Clear all.
-
To edit the active filters, click Edit filters.
-
-
If no filter is active, click Add filter.
-
In the Filter devices alarms dialog box that opens, restrict your search using the filters you want.

Filter Description DevEUI Retrieves alarms raised on a specific device by providing its DevEUI. Tips You can copy and paste a DevEUI you get from the traffic shown by Wireless Logger application to investigate further a device. Domains Retrieves alarms triggered on devices associated with one of the specified domains. This filter is only available if the permission segregation based on domains has been enabled by an Administrator user. For more information, see About domains. Created after Retrieves alarms created after the specified date. Updated before Retrieves alarms updated before the specified date. Alarm name Retrieves a specific alarm by selecting its name in the list. For more information about device alarms and their meaning, see Device alarms. Clearance status Filters alarms based on their state: only Active alarms (with a state different than CLEARED), only Cleared alarms (with a state equal to CLEARED), or All alarms. Minimum severity Retrieves active alarms having a severity equal to the selected severity or higher. This filter is only applicable when the Clearance status filter is set to Active. Ack status Filters alarms based on their acknowledgement status: only Not acknowledged alarms, only Acknowledged alarms, or All alarms. -
Click Apply.
Sorting device alarms
You can sort the list of device alarms to prioritize corrective actions. If you change the sort, your selection is saved and will apply by default for next sessions on the same computer.
-
In the left panel, select Alarms.
-
In ALARM DETAILS, select the Devices tab.
-
You can sort alarms by clicking the arrow of the following column headers:
- State: Sorts alarms by state in ascending or decreasing order. Alarms sharing the same state are then sorted by last update in decreasing order.
- Acked: Sorts alarms by acknowledgement status in ascending or decreasing order. Alarms sharing the same acknowledgement status are then sorted by last update in decreasing order.
Configuring the "No uplink activity" alarm
If you are entitled to a Devices, multicast groups and connections manager role, you can define an inactivity alarm per device and set one or two thresholds to trigger this alarm. For example, triggering the alarm with WARNING severity after 2 days of inactivity, and increasing the severity to MAJOR after 7 days of inactivity. For more details on the "No uplink activity" alarm, see No uplink activity.
-
In the left panel, select Devices.
-
On the List tab, click the name of the device for which you want to define the "No uplink activity" alarm.
-
Go to ALARMS SETTINGS.
-
In Low Uplink Activity Alarm Thresholds, check the Threshold 1, select an inactivity period in the Condition and configure the Severity. Optionally, you can also check the Threshold 2 and configure it the same way.

-> A confirmation notification displays on your screen.
Managing notifications for device alarms
Email notifications
You can subscribe to email notifications for device alarms in your user profile. For more information, see Editing your user profile.
If you are entitled to an Administrator role, you can manage the subscription of all user accounts by editing their user profiles. For more details, see Viewing and modifying a user account.
If you are entitled to an Administrator role, you can also create notifications to any email address.
-
In the left panel, select Administration > Settings, and go to CONFIGURATION.
-> In Device Alarm Notification > Email Recipients, each email recipient is displayed as a badge containing the email address and the minimum severity:

-
Click in Email Recipients then click
 to add a new one.
 -
In Email address, type the recipient email address.
-
In Minimum severity, choose the minimum severity for which you want the email recipient to be notified.
-
You can also edit an existing email recipient by clicking on badge content or remove an existing email recipient by clicking on the badge cross.
-
Confirm your changes.
-> A confirmation notification displays on your screen.
- An email notification will be sent to each configured email address in the
following situations:
- A device alarm is triggered and its severity is equal to the selected minimum severity or higher.
- The severity of a device alarm increases and the new severity is equal to the selected minimum severity or higher.
- The severity of a non-acknowledged device alarm decreases and the previous severity was equal to the selected minimum severity or higher.
- A non-acknowledged device alarm is cleared and its severity before clearance was equal to the selected minimum severity or higher.
- An email notification will be sent to each configured email address in the
following situations:
Notifications via connections
If you are entitled to a Devices, multicast groups and connections manager role, you can enable the notification of device alarms on a connection.
-
In the left panel, select Connections.
-
Click the name of the connection for which you want to enable the notification of device alarms.
warningThe notification of device alarms is not supported via Basic HTTPS connections.
-
Go to ALARM NOTIFICATION and switch on the Device Alarms.

-
A notification will be sent to the connection in the following situations:
- An alarm is triggered for an associated device.
- The severity of an alarm increases or decreases for an associated device.
- An alarm is cleared for an associated device.
-
Here's an example of device alarm notification JSON document:
{
  "DevEUI_alarm": {
    "ID": 4,
    "State": 1,
    "CreationTime": "2020-09-09T18:14:56.49+02:00",
    "LastUpdateTime": "2020-09-09T18:25:24.49+02:00",
    "Occurrence": 1,
    "Acked": 0,
    "AddInfo1": "69",
    "DevEUI": "0018B20000001156",
    "CustomerID": "199983788",
    "CustomerData": {
      "loc": {
        "lat": "43.58081",
        "lon": "1.4421667"
      },
      "tags": [
        "tag1",
        "tag2"
      ],
      "doms": [
        {
          "n": "France/Paris",
          "g": "Site"
        },
        {
          "n": "Location",
          "g": "Vertical"
        }
      ],
      "name": "My device 1"
    }
  }
}
-
SNMP notifications
SNMP notifications are available only on self-hosted ThingPark Enterprise. To use this feature, a platform configuration is required.
See:
- Device and base station alarm notification for Appliance/VM deployments
- Device and base station alarm notification for Kubernetes deployments.
SNMP allows to be notified of device alarms by receiving SNMP traps on a SNMP server. Notifications of alarms via SNMP are added to the notifications of alarms via email.
SNMP traps are defined in the following MIBs: