Actility LNS
The Actility platform is a LoRaWAN Network Server (LNS) provided by ThingPark that can be used as source by Acklio IPCore to send and receive packets.
Actility is one of the recommended LNS to run the Demo examples.
Open the Community Edition
We use the Community Edition for the Demo, but the configuration remains the same if you use Actility Enterprise Edition.
Open Actility Community Edition here and log in. The landing page is the Dashboard with a view to the base stations and the devices.
If you do not already have a user account, register then go through the brief learning steps. Finally, choose "Access ThingPark / ThingPark Admin Console" from the top menu. This opens the login page.
Configure the Source on Acklio Side
Now open Acklio IPCore and create the source.
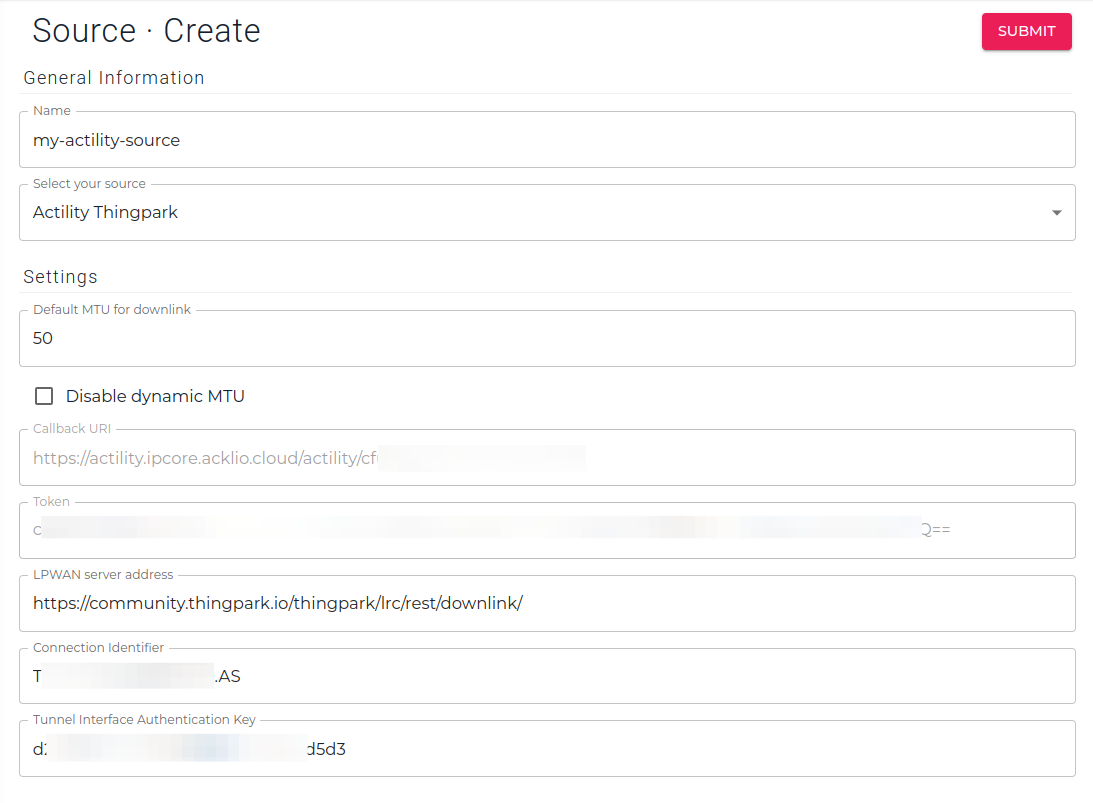
- Give a name to the source, for example
my-actility-source. - Select the connector type
Actility Thingparkin the Select your source drop-down list. - Specify a size for the default downlink MTU.
- Enter the URL of the Community Edition in the LPWAN server address field, i.e.
https://community.thingpark.io/thingpark/lrc/rest/downlink/. If you have an Enterprise account for Actility, enter the URL of the Enterprise Edition i.e.https://thingparkenterprise.eu.actility.com/thingpark/dx/core/latest/api/. - Set the Connection Identifier and Tunnel Interface Authentication key field with some dummy values. They will be updated in the next step with the values generated
The callback URI and the token generated by the backend are specified automatically.
Configure the Source on Actility Side
Return to the Actility Dashboard to configure the connection on Actility side.
Create an HTTPS-Based Connection
Expand the Connections sub-menu and click Create.
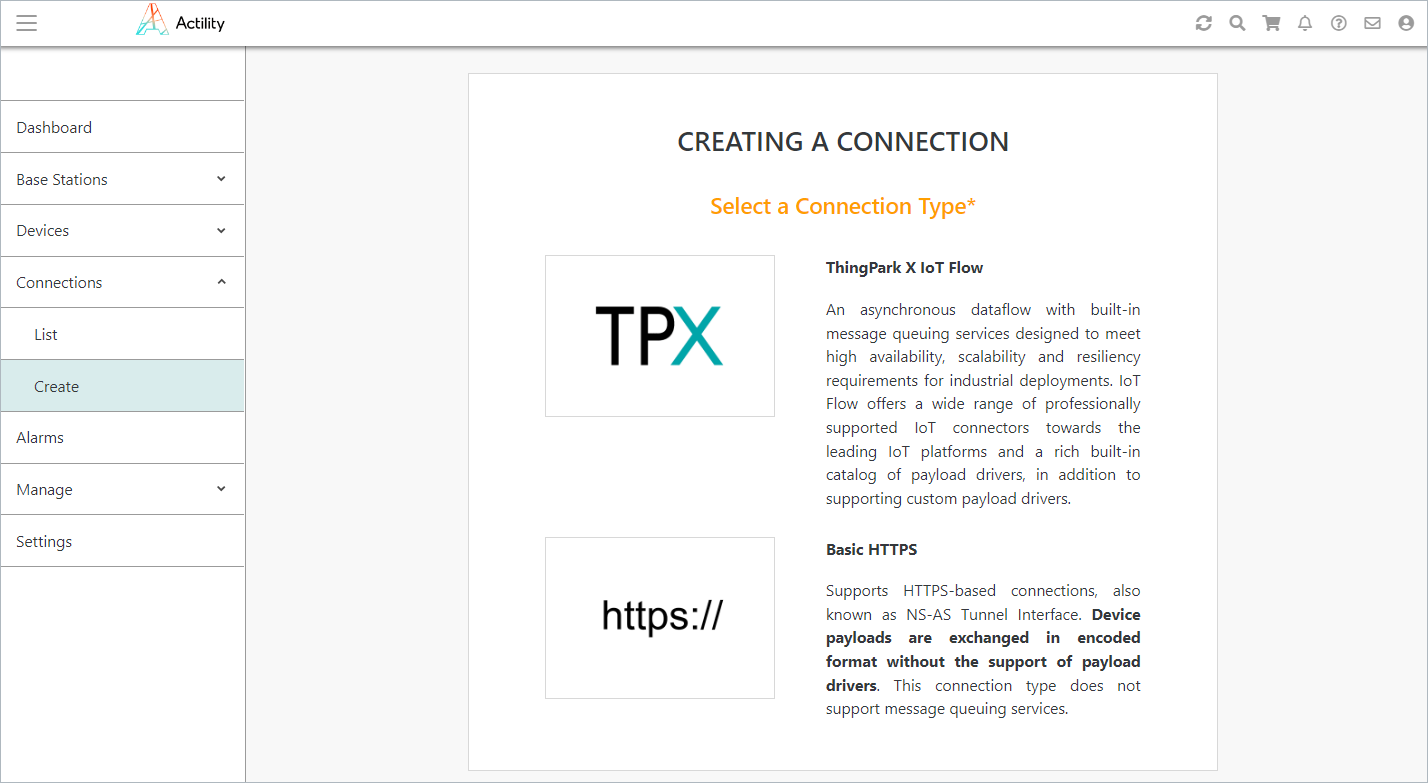
Choose a basic HTTPS-based connection, since the connector is designed to receive the packets via HTTPS on Acklio IPCore side.
Then, specify the connection as follows with the information generated when creating the source on Acklio IPCore side.
Then, specify the device as follows. The fields followed by an asterisk are mandatory.
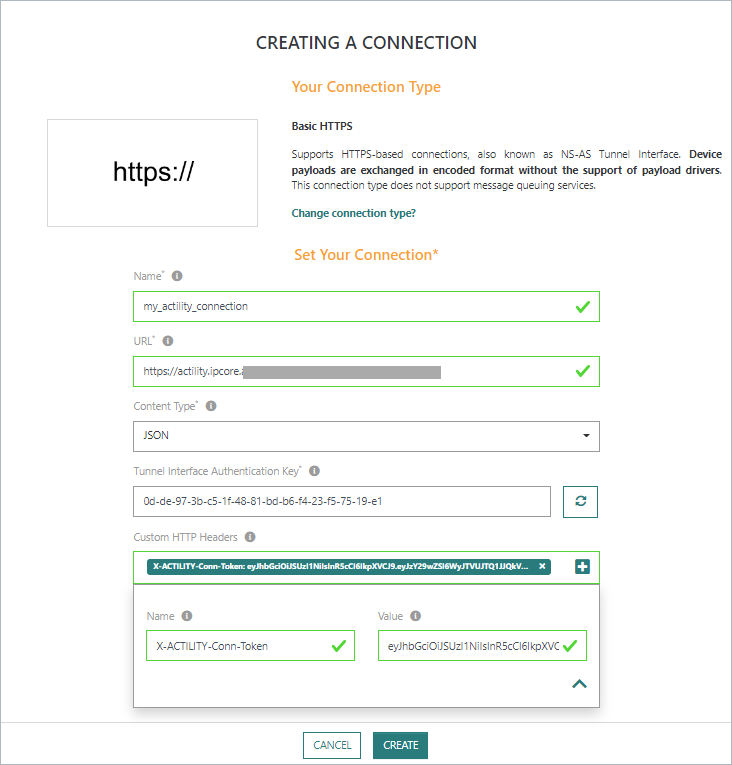
- Name: Specify a name for the connection. It can be identical or similar to the name of the source in Acklio IPCore.
- URL: Paste the callback URI generated when creating the source in Acklio IPCore.
- Content type: Keep JSON.
- Tunnel Interface Authentication Key: Keep the default key that is generated automatically, or refresh the token by clicking the
 button on the right. Use value (without the
 -), to fill up the Tunnel Interface Authentication Key field in the Acklio IPCore source page. - Custom HTTP Headers: The HTTP requests from the Actility platform are validated with the help of the token that is generated in Acklio IPCore (see the Token field on the illustration above).
Click the button on the right to specify the headers.
- Name: Enter
X-ACTILITY-Conn-Tokento specify the name of the key. - Value: Enter the token to specify the value.
- Name: Enter
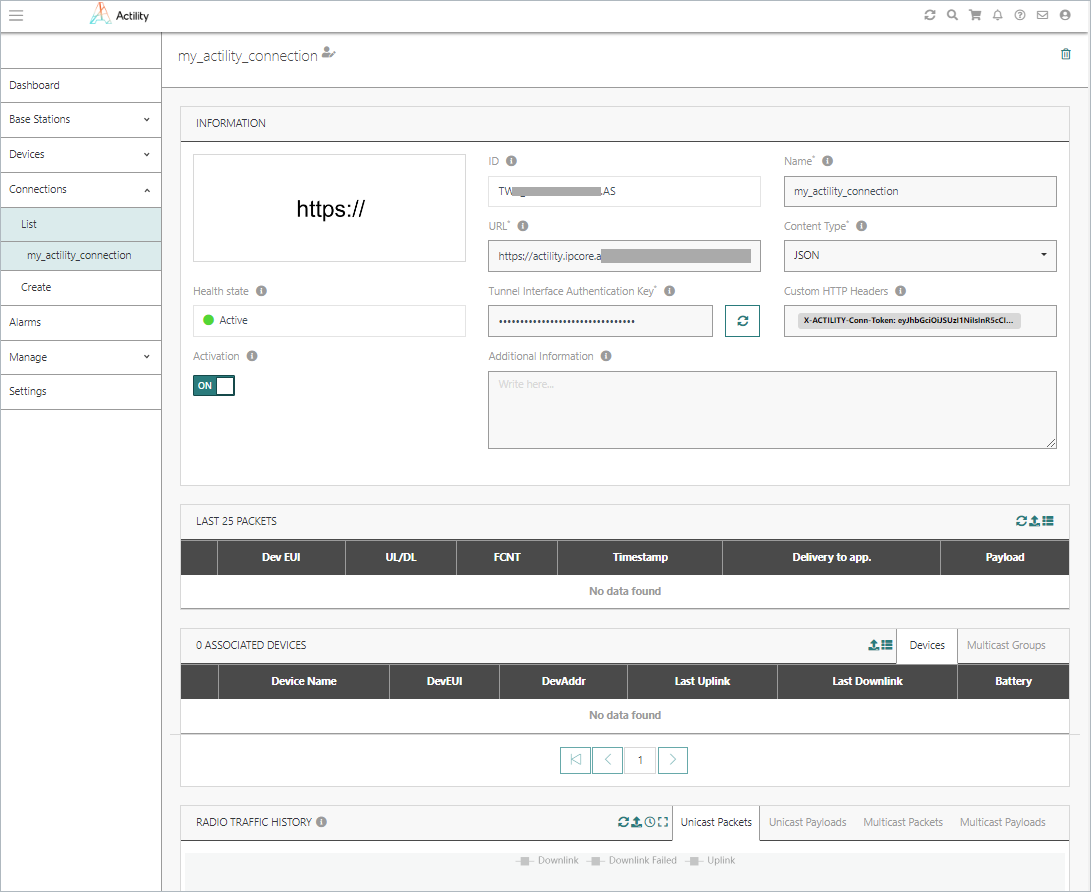
Click Create to validate. A confirmation window appears: click View the connection to add the connection to the list of available connections and view its details.
The Health state shows that the connection is active, with a green circle to identify a good health state.
After creation, an AS_ID will be given (ID field) , use this value to fill up the Connection Identifier field in the Acklio IPCore source page.
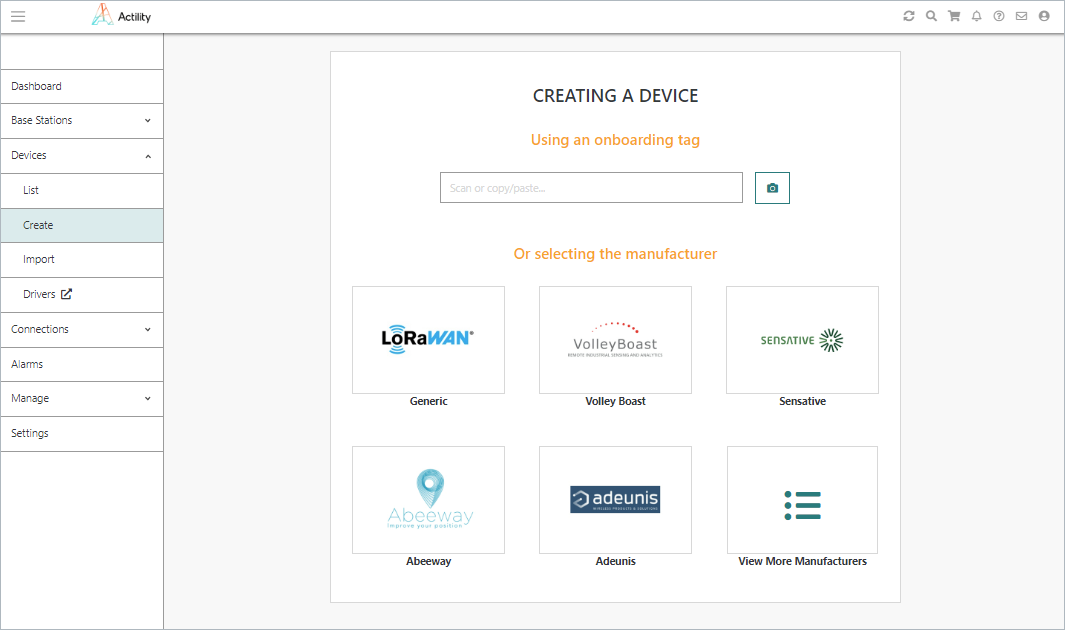
Provision a Device
On the Actility Dashboard, expand the Devices sub-menu and click Create.
Select a LoRaWAN Generic device among the possible manufacturers.
Enter the Device Information
Then, specify the device as follows. The fields followed by an asterisk are mandatory.
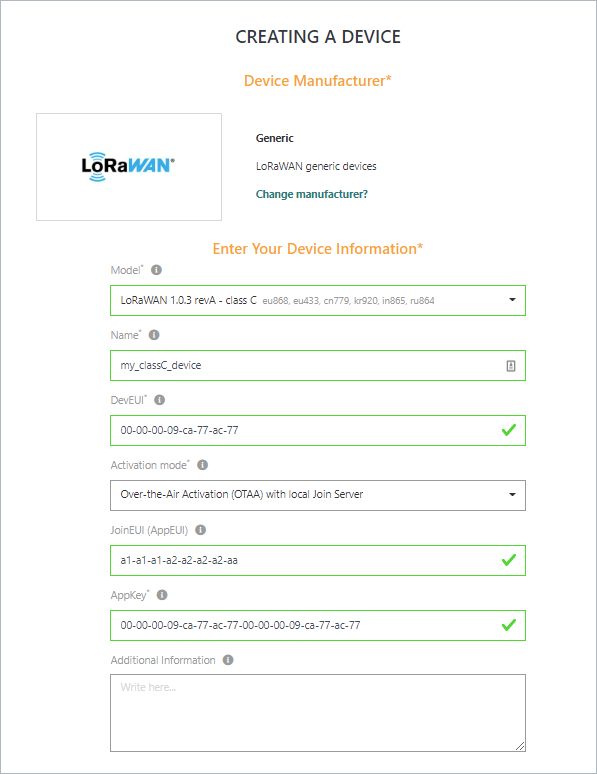
- Model: Choose the model corresponding to your device in the drop-down list.
- Name: Enter a name for your device.
- DevEUI: Enter a Device Identifier by specifying the digits and letters only, since separator dashes are already present.
Note that this value will have to be specified on Acklio IPCore side when provisioning the device. - Activation mode: Choose the OTAA mode with local join server in the drop-down list.
- JoinEUI(AppEUI): Specify the unique identifier of the join server.
- AppKey: Specify an encryption key.
Associate the Device with the Connection
Finalize the configuration by associating the device with the connection you have previously created (see above).
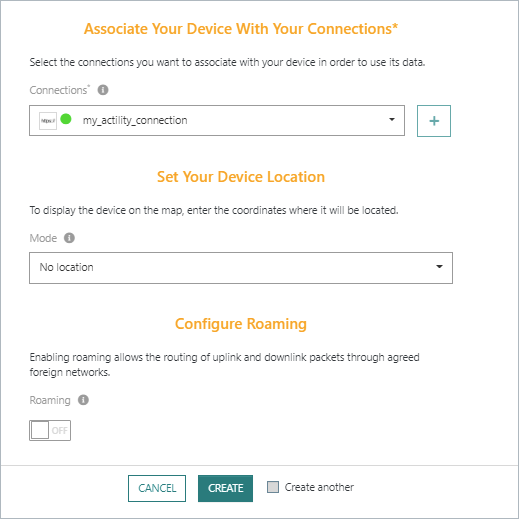
The connection is automatically listed among the available connections, with both its name and health state.
Additionnal settings are available, that are enabling the location of the device and configuring the roaming. Since they are not necessary for the Demo, leave them blank.
Click Create to validate. Two confirmation messages are displayed and the device is now listed among the available devices.
Check the Settings and Status
The device is available from the list of devices on the left menu.
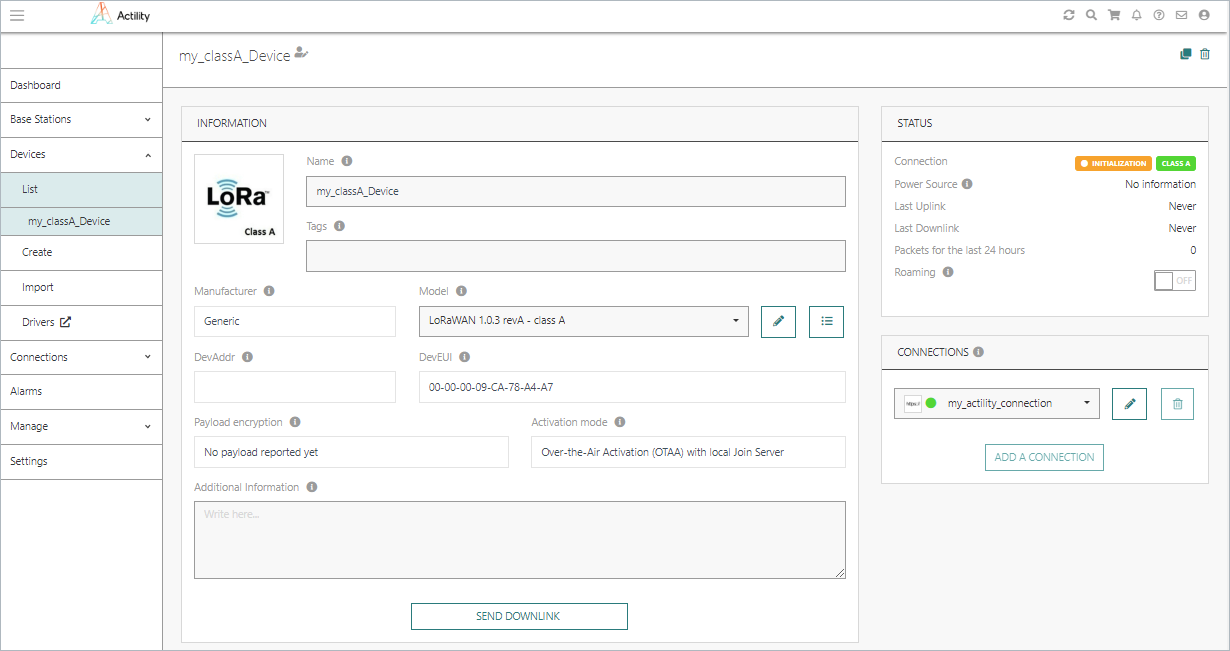
The Information area summarizes the device settings and the Status area delivers key information on the communication with the network server.
The Connections area displays the name and the status color of the connection.