Monitoring alarms
To monitor your fleet of devices, you can:
-
View all not acknowledged alarms of your fleet of devices
-
View all alarms of a device you want to check
-
Filter active, cleared and acknowledged alarms
-
Get the information returned by an active and a cleared alarm
-
Check if a cleared alarm has already been triggered during the last fifteen days
-
Get the last status with the associated information before clearance
-
Check that an alarm you have troubleshot is cleared
-
Detect a situation where the device is instable.
The following tasks give an example of scenario to deal with the alarms of your devices.
By default, the display of alarms is set to show not acknowledged alarms, except in the Alarm history panel of the device.
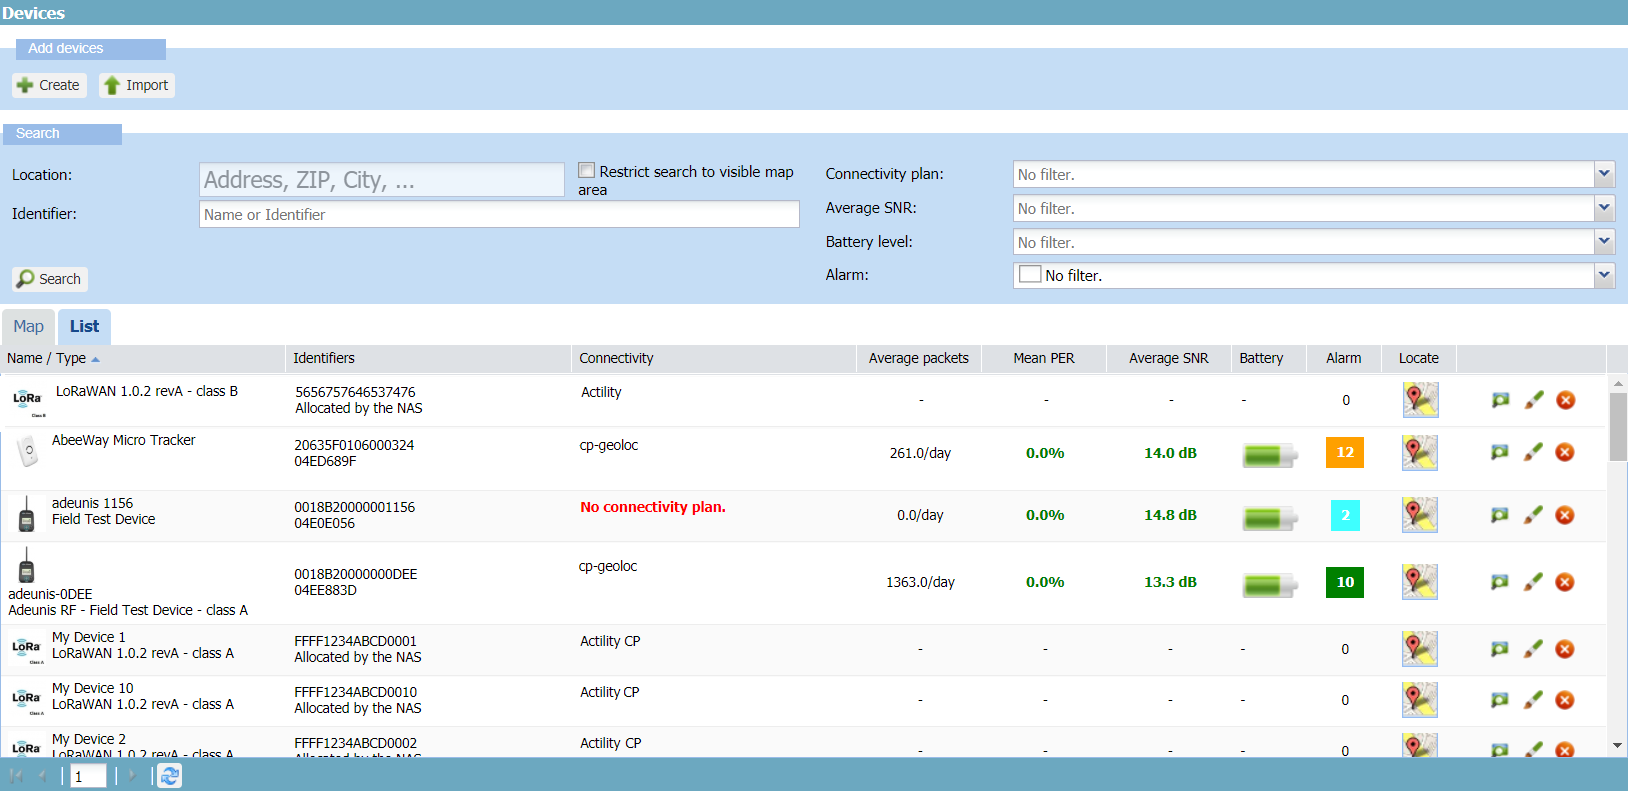
Viewing not acknowledged alarms of your network
You can have a global view of all the not acknowledged alarms of your fleet of devices in the Devices panel. The alarms can be active or cleared. It allows you to detect devices to investigate.
If you prefer being notified when alarms are triggered and change states on your device fleet, see Setting alarm notification emails.
-
In the navigation panel, click Devices.
-
In the Devices panel, click the List tab.
-> In the Alarm column, a color displays the number of alarms that have not been acknowledged, whether active or cleared, with the highest state of them. Green is for cleared alarm, that is considered as a final state. For more information about alarm states, see Alarm states.
Filtering devices with greatest number of not acknowledged alarms
This task shows you how to filter devices with greatest number of not acknowledged alarms in the Devices panel. It allows you to prioritize devices to investigate.
You can optionally use the Not cleared filter to restrict your search to active and not acknowledged alarms. For more information about alarms filters, see More about searching alarms.
-
In the navigation panel, click Devices.
-
In the Devices panel, click the List tab.
-
In the List tab, click Sort Descending in the Alarm column.
-> All devices with greatest number of not acknowledged alarms of your fleet of devices are displayed. Devices with greatest number of devices are displayed first. Note The sorting only applies to the current page of the list.
-
If necessary, scroll down the page to see more devices. If available, click Next page and click Sort Descending again in the Alarm column.
-
(Optional) In the Search frame, select Not cleared from the Alarm list.
-> All devices with active and not acknowledged alarms are displayed.
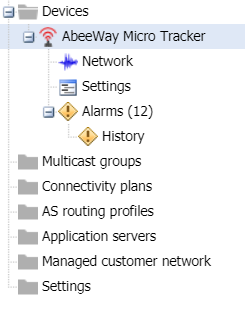
Viewing not acknowledged alarms of a device with their current status
When you have detected in the Devices panel a device having issues, you can view all its not acknowledged alarms, whether active or cleared, with information on their current status in the Active alarms panel of the device.
It quickly gives you the current state of the device to start investigating.
Notes
-
The current status of a cleared alarm appears in the Active alarm panel. For more information, see Viewing current status of cleared alarms of a device.
-
By default, the Active alarm panel is set to filter not acknowledged alarms. If you want to see all alarms of the device, see More about searching alarms.
-
In the navigation panel, click Devices.
-
In the Devices panel, click the List tab.
-
In the device list, select a device, and click View, or Edit if you have read-write access.
-> In the navigation panel, the device appears displaying its number of alarms that have not been acknowledged, whether active or cleared. This is the same number as the one displayed with a state color in the Alarm column of the device list. For more information, see Viewing not acknowledged alarms of your network.
-
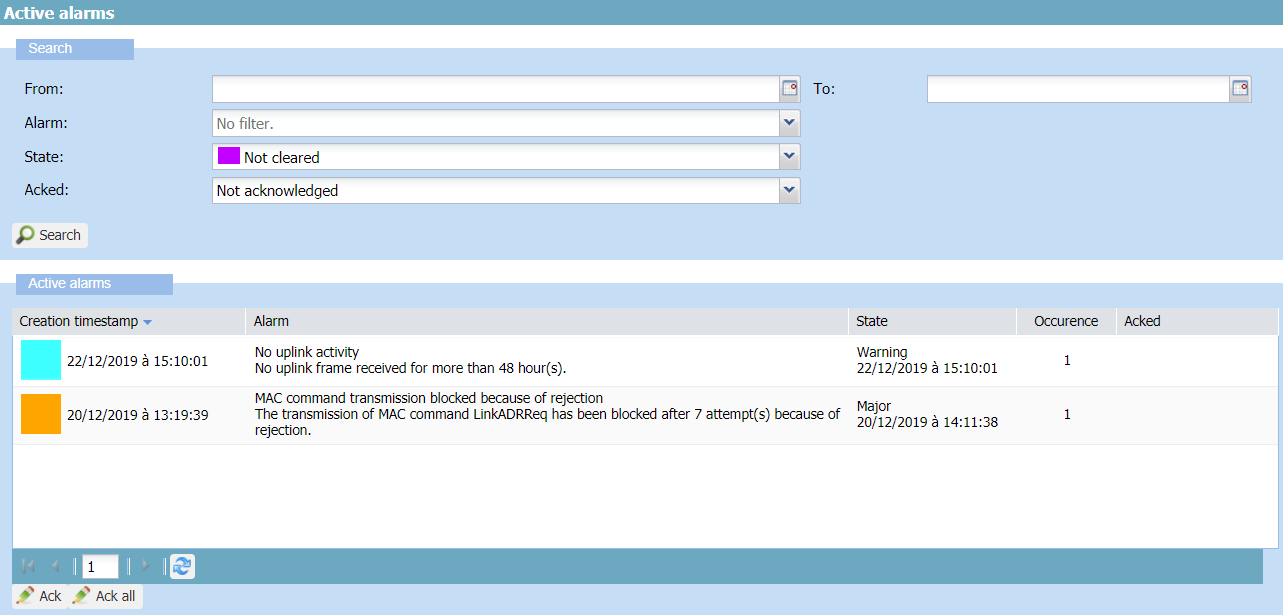
In the navigation panel, click Alarms.
-> The Active alarms panel opens displaying active and cleared alarms, all being not acknowledged.
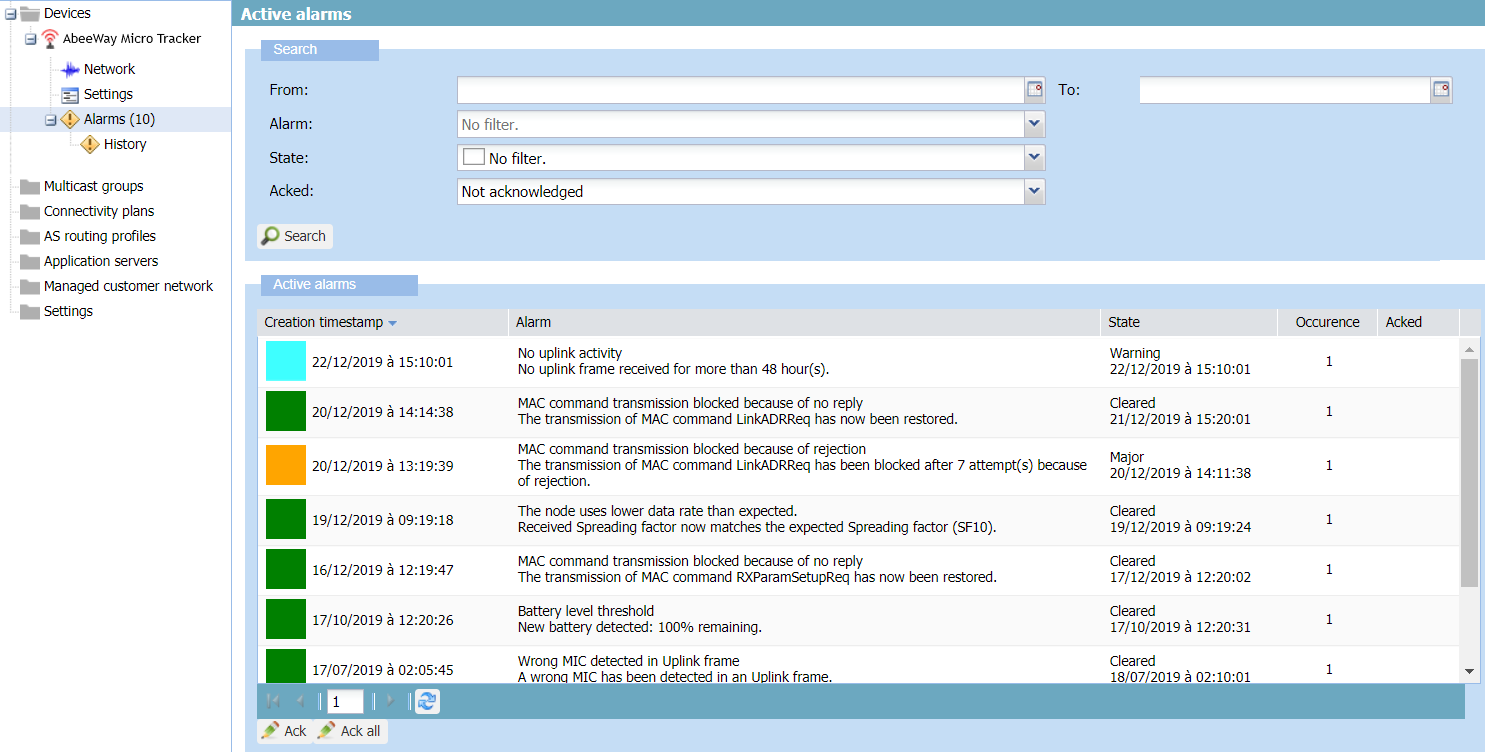
-> The Active alarms frame displays:
-
Only one row per alarm because it keeps updating according to state changes, except for alarms 012 and 013 related to MAC command transmission that display separated rows. Latest created alarms are displayed first.
-
Cleared alarms appear in green. All other alarms are active.
-
It gives the following information:
| Column | Description |
|---|---|
| Color | Indicates the state of the alarm. If the alarm is not cleared, the color gives the severity state of the alarm. For more information, see Alarm states. |
| Creation timestamps | Creation timestamp of the alarm. |
| Alarm | Alarm name. Information, values or conditions that have triggered or cleared the alarm. Can be used for troubleshooting the device. |
| State | Latest state of the alarm with timestamp update. For more information, see Alarm states. |
| Occurrence | Incremented each time an event-driven alarm is triggered once again. Always set to 1 for state-driven alarms. For more information, see Alarm occurrence management. |
| Acked | If the alarm has been acknowledged, who did it and when. This column is empty with the default Not acknowledged filter setting. |
-
(Optional) If you want to see if any alarms have been acknowledged, select No Filter or Acknowledged from the Acked list, then click Search.
-> A check mark and who acknowledged it and when are displayed on acknowledged alarms.
Dealing with active alarms of a device
This task shows you how to filter active alarms of a device, then how to deal with them.
Active alarms are alarms that are not cleared, regardless of their acknowledgment status and severity state. You can search them in the Active alarms panel of the device. By default, this panel is set to filter not acknowledged alarms.
-
In the navigation panel, click Devices.
-
In the Devices panel, click the List tab.
-
In the device list, select a device, and click View, or Edit if you have read-write access.
-
In the navigation panel, click Alarms to open the Active alarms panel of the device.
-
In the Search frame, select Not cleared from the State list, and click Search.
-
In the State column, click Sort Descending to display first the highest states of alarms.
-
Deal with the alarms starting from the highest to the lowest state of them:
-
Get the alarm name and associated information.
-
Follow the corresponding guidelines in Troubleshooting devices.
-
If you consider the alarm as being not important and do not want to see it anymore in the default display, click Ack. For more information, see Acknowledging alarms.
-
-
Repeat until all active alarms disappear.
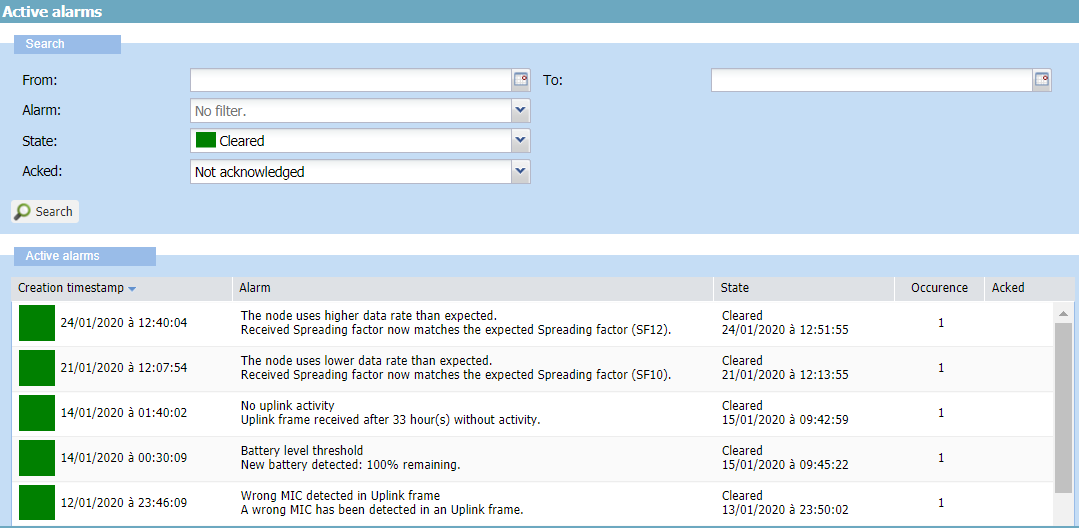
Viewing current status of cleared alarms of a device
After you have troubleshot all the active alarms, you can check that they appear as cleared in the Active alarm panel of the device. You can also filter cleared alarms whenever you want.
Notes
-
The current status of a cleared alarm appears in the Active alarm panel.
-
Its status before clearance appears in the Alarm history panel. For more information, see Investigating a cleared alarm in the alarms history of the device.
-
In the navigation panel, click Devices.
-
In the Devices panel, click the List tab.
-
In the device list, select a device, and click View, or Edit if you have read-write access.
-
In the navigation panel, click Alarms to open the Active alarms panel of the device.
-
In the Search frame, select Cleared from the State list to filter cleared alarms, and click Search.
-> The Active alarm frame shows the cleared alarms of the device at the time they have been cleared. Clearance timestamp is displayed in the State column. Clearing conditions are displayed in the Alarm column.
-> Latest created alarms are displayed first.
-
Do one of the following:
-
If you want to know more about the alarm, see Investigating a cleared alarm in the alarms history of the device.
-
If you consider the alarm as being not important and do not want to see it anymore in the default display, click it, and click Ack. For more information, see Acknowledging alarms.
-
Investigating a cleared alarm in the alarms history of the device
If you want to know more about a cleared alarm, you can investigate its last status before clearance in the Alarm history panel of the device. It gives you the last level of severity the alarm had before clearance with the information that triggered it. For more information about alarm states, see Alarm states.
The Alarm history panel displays the last status before clearance of alarms that have been cleared during the past 15 days regarding the device. By default, this panel is set with no filter.
Notes
-
The current status of a cleared alarm appears in the Active alarm panel. For more information, see Viewing current status of cleared alarms of a device.
-
Its status before clearance appears in the Alarm history panel.
This task makes you go from the Active alarm panel to the Alarm history panel of the device. It also shows you how to detect an instable situation of the device where an alarm keeps triggering and clearing.
-
In the navigation panel, click Devices.
-
In the Devices panel, click the List tab.
-
In the device list, select a device, and click View, or Edit if you have read-write access.
-
In the navigation panel, click Alarms to open the Active alarms panel of the device.
-
In the Search frame, select Cleared from the State list and click Search to filter cleared alarms.
-
In the Active alarms panel, take note of the alarm name, clearance and creation timestamps of the cleared alarm you want to investigate, and click History in the navigation panel.
-> The Alarms history panel opens with a Search frame set by default with no filter. For more information, see More about searching alarms.
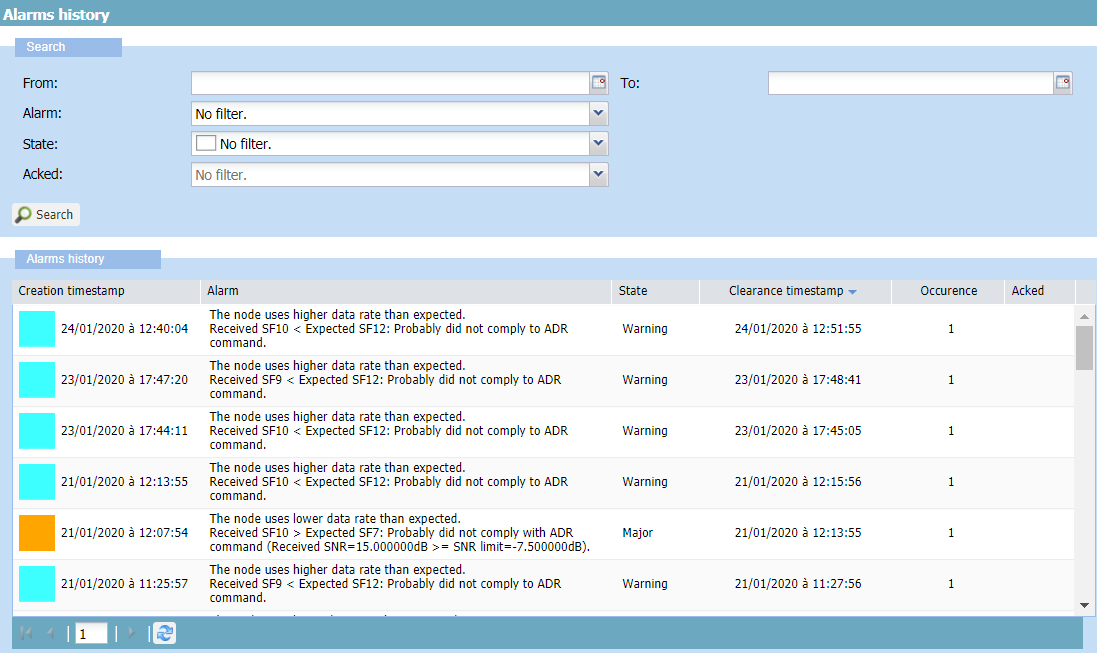
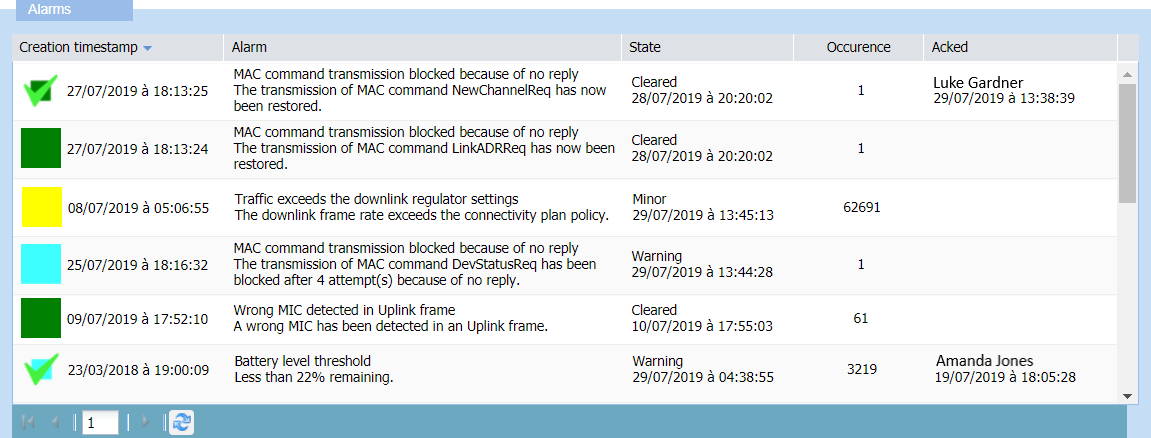
-> In the Alarms history frame:
-
Each row represents an alarm that have been cleared. It shows the status it had before clearance. Only the last status per alarm is shown.
-
If a same alarm has been cleared several times, several rows per alarm are displayed.
-
Latest cleared alarms are displayed first.
-
-
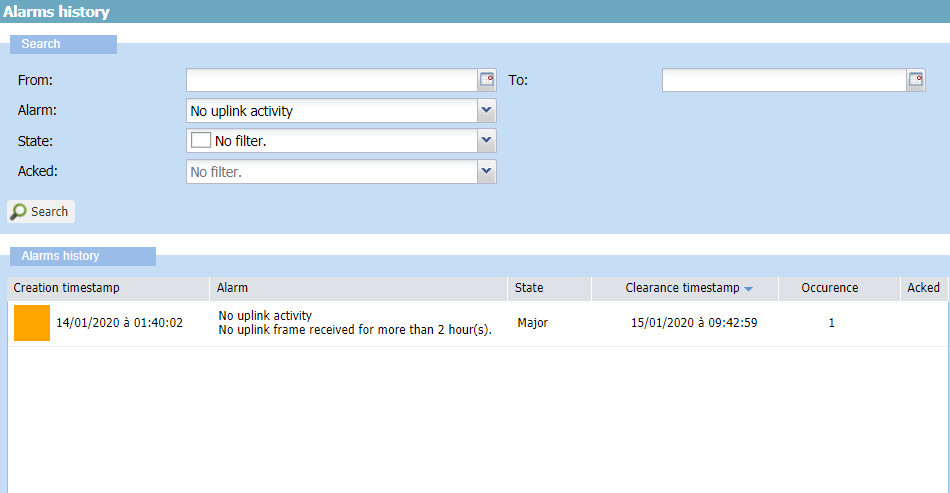
In the Search frame of the Alarms history frame, select from the Alarm list the name of the cleared alarm you want to investigate, and click Search.
-> The last status before clearance of this alarm appears. The information to check is:
Column Description Clearance timestamps Date and time when the state has changed and the alarm has been cleared Creation timestamps To deduce the time duration of the alarm. Alarm The information associated with the issue that triggered the alarm or changed its state. State The last state before clearance with its severity level. For more information, see Alarm states. Occurrence Relevant if more than one occurrences. Only apply to state-driven alarms. For more information, see Alarm occurrence management. Acked Indicates if the alarm has been acknowledged before clearance by who and when. No Filter or Acknowledged filters must be set. -
If only one state before clearance is displayed for the alarm:
-
The issue has happened only once during the last 15 days. It is ended.
-
(Optional) If you consider the alarm as being not important and do not want to see it anymore in the default display, click Alarms in the navigation panel to enter the Active alarm panel. Select the alarm name from the Alarm list, click Search, then click the alarm, and click Ack. For more information, see Acknowledging alarms.
-
-
Repeat steps 6 and 7 to investigate another cleared alarm. -> If more than one state before clearance are displayed for the alarm, it means that the alarm keeps triggering and clearing. The device is instable.

-
Get the information returned by the alarm, in particular the creation and clearance timestamps to estimate the time frequency at which the alarm has been triggered and cleared.
-
Follow the guidelines corresponding to the alarm in Troubleshooting devices.
-
(Optional) If you want to acknowledge the alarm, repeat step 8.b.
-
-
Repeat steps 6 and 7 to investigate another cleared alarm.
-
In the Alarm list of the Search frame, select another alarm to investigate, and click Search.
-> If no state appears, it means that the alarm has been cleared for more than 15 days and no information is available.
-
(Optional) If you want to acknowledge the alarm, repeat step 8.b.
-
More about searching alarms
In the Active alarms panel and the Alarms history panel, the Search frames allow to filter alarms to be able to deal with them with the right priority level.
-
In the navigation panel, click Devices to display the Devices panel, then click the List tab.
-
In the device list, select a device, and click View, or Edit if you have read-write access, to open the Device panel.
-
In the navigation panel, do one of the following:
-
Click Alarms to open the Active alarms panel, and view the current status of active and cleared alarms of the device.
-
Click History to open the Alarms history panel, and view the last status before clearance of all the alarms of the device that have been cleared during the past 15 days.
-
-
Restrict your search using the following filters as you want.
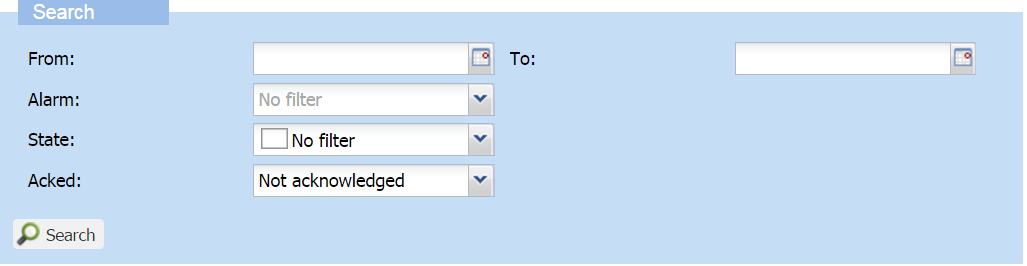
-
From and To: Click the calendar to select a date or enter an ISO 8601 timestamp format. Example: 2020-01-20T14:16:20+01:00. These filters can be used independently.
-
From: Returns alarms created after the date and time you have entered.
-
To:
-
In the Active alarms panel: Returns alarms created, updated and cleared before the date and time you have entered.
-
In the Alarms history panel: Only returns alarms cleared before the date and time you have entered.
-
-
-
Alarm: Returns alarms according to the alarm name you have selected. For more information, see Alarms list with troubleshooting guidelines.
-
State: Returns alarms with the following states:
Filter Returned alarm states Critical (Red) Critical Major (Orange) Major, and critical Minor (Yellow) Minor, major, and critical Warning (Blue) Warning, minor, major, critical Not cleared (Purple) Indeterminate, warning, minor, major, and critical (all active alarms) Cleared (Green) Cleared For more information about associated alarm states, see Alarm states.
-
Acked: Acknowledged alarms or not. By default, this filter is set to:
-
Not acknowledged in the Active alarms panel
-
No filter in the Alarms history panel.
-
-
-
-
Click Search.