Creating a multicast group associated with a base station group
You must have read-write access to Device Manager. For more information, see Opening a panel and checking your read-/write access.
You must perform this task in two main steps.
Creating a multicast group
You must have read-write access to Device Manager.
You can create a class B or C multicast group to send simultaneously a same downlink payload to many target multicast devices in your LoRaWAN® network. The LoRaWAN® version and the class of the multicast group must be the same as the LoRaWAN® version and the class of the target multicast devices working with it.
The following information must be pre-shared with the multicast devices:
-
For a LoRaWAN® 1.0 multicast group: DevAddr, NwkSKey, and optional AppSKey
-
For a LoRaWAN® 1.1 multicast group: DevAddr, FNwkSIntKey, SNwkSIntKey, NwkSEncKey, and optional AppSKey.
You must have the following information ready to be used:
| Required information (LoRaWAN® 1.0) | Required information (LoRaWAN® 1.1) | Optional information | |
|---|---|---|---|
| Class B | Ping-slot period, DevEUI, DevAddr, NwkSKey. | Ping-slot period, DevEUI, DevAddr, FNwkSIntKey, SNwkSIntKey, NwkSEncKey. | AppSKey (1), Verification code (2), Downlink frequency (MHz), Downlink data rate. |
| Class C | DevEUI, DevAddr, NwkSKey. | DevEUI, DevAddr, FNwkSIntKey, SNwkSIntKey, NwkSEncKey. | AppSKey (1), Verification code (2), Downlink frequency (MHz), Downlink data rate. |
(1) For more information, see More about the AppSKey for ABP devices.
(2) If you have subscribed to the Address Manager.
In additional the the multicast group must be associated with:
- Multicast connectivity plan,
- AS routing profile associated with an application server doing multicast.
Important When created, a multicast group is not associated with any base station group and not ready to work. You will have to add it a base station tag.
-
In the navigation panel, click Multicast groups.
-
In the Multicast Groups panel that appears, click Create.
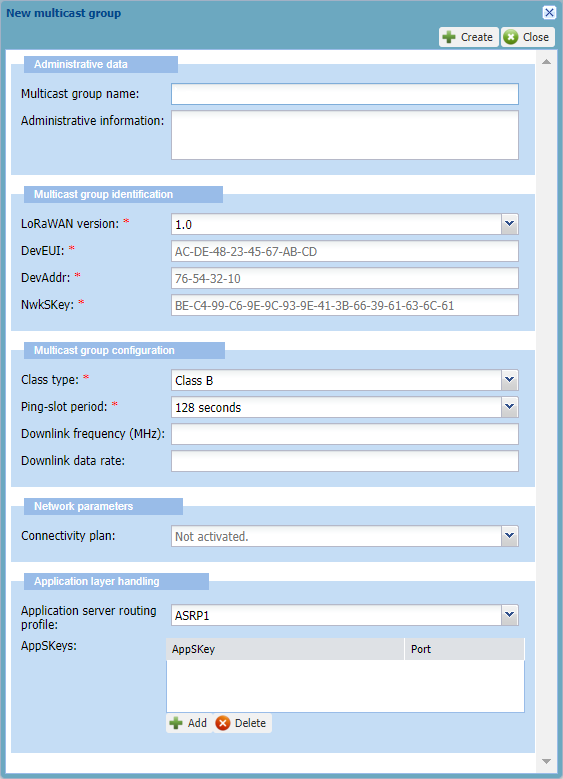
-> By default, the New multicast group dialog box appears with LoRaWAN® 1.0 and class B configuration.
-
In the Administration data frame, enter the following information:
-
Multicast group name: Enter a name that helps you identify easily the multicast group on your IoT network.
-
Administrative information: Enter any useful information related to the multicast group.
-
-
In the Multicast group identification frame, enter or select the following information:
-
LoRaWAN® version: Select the LoRaWAN® version of the target multicast devices that will work with the multicast group.
-> If 1.1 is selected, the New multicast group dialog box is refreshed with LoRaWAN® 1.1 parameters.
-
Device EUI: Enter the globally unique identifier of the multicast group.
Composed of 16 hexadecimal digits (0 to 9, and A to F), it allows the application server that sends the downlink payload to identify the target multicast group. It is not shared with the multicast devices. -
DevAddr: Enter the multicast group address on the network. Composed of 8 hexadecimal digits (0 to 9, and A to F), it identifies the multicast group on the current network.
-
-
According to the selected LoRaWAN® version, enter in the displayed boxes the following information that allows the multicast group to identify the target multicast devices working with it:
-
NwkSKey: Applies to LoRaWAN® 1.0. Enter the Network Session Key of the multicast group. It is an AES 128-bit hexadecimal key, composed of 32 hexadecimal digits (0 to 9, and A to F).
-
FNwkSIntKey: Applies to LoRaWAN® 1.1. Enter the Forwarding Network Session Integrity Key of the multicast group. It is composed of 32 hexadecimal digits (0 to 9, and A to F).
-
SNwkSIntKey: Applies to LoRaWAN® 1.1. Enter the Serving Network Session Integrity Key of the multicast group. It is composed of 32 hexadecimal digits (0 to 9, and A to F).
-
NwkSEncKey: Applies to LoRaWAN® 1.1. Enter the Network Session Encryption Key of the multicast group. It is composed of 32 hexadecimal digits (0 to 9, and A to F).
-
Verification code: Only displayed if you have subscribed to the Address Manager. Enter the verification code associated with the DevAddr/DevEUI pair and provided by your operator.
-
-
In the Multicast group configuration frame, enter or select the following information:
-
According to the class of the target multicast devices, do one of the following:
-
To create a class B multicast group:
-
In the Class type list: select Class B.
-
In the Ping-slot period list: select a duration that is used to compute the periodicity in which all devices working with the multicast group open ping-slots between two beacons to receive downlinks.
Examples If every 128 s is defined, all devices wake up and listen every 128 seconds. If every 4 s is defined, all devices wake up and listen every 4 seconds. If every 1 s is defined, all devices wake up and listen every 1 second.
-
-
To create a class C multicast group:
-
In the Class type list: select Class C.
The same RX2 window as the unicast specifications of the target devices is used to receive downlinks.
-
-
Downlink frequency (MHz): Downlink frequency of the target devices used by the multicast group to send multicast downlinks. Do one of the following:
-
If you know the downlink frequency of the target devices you can use in the RF region, enter it (from 433 to 928 MHz and up to 4 decimal digits).
-
If you do not know it, ask your operator:
-
If your operator has defined a class B or class C downlink frequency in the RF region associated with the base stations working with your multicast group, your class B or class C multicast group will use it respectively. You do not need to enter anything.
-
Otherwise or if your target devices are not compliant with this value or if your operator has defined more than one RX2 or pingslot channels within the same RF region, enter the frequency given by your operator.
-
-
-
Downlink data rate: Data rate of the target devices used by the multicast group to send multicast downlinks. Do one of the following:
-
If you know the data rate corresponding to the usage of your target devices, enter a data rate (from 0 to 15).
-
If you do not know it, ask your operator:
-
If your operator has defined a data rate in the class B or class C channel plan configuration of the RF region associated with the base stations working with your multicast group, your class B or class C multicast group will use it respectively. You do not need to enter anything.
-
Otherwise for class C multicast group only, if defined in the multicast connectivity plan, or failing that, in the unicast connectivity plans of the target devices, your class C multicast group will use the value of the Force RX2 Data Rate parameter. For more information, see LoRaWAN® multicast connectivity plan details and LoRaWAN® unicast connectivity plan details. You do not need to enter anything.
-
Otherwise or if your target devices are not compliant with this value or if your operator has defined more than one RX2 or pingslot channels within the same RF region, enter the downlink data rate given by your operator.
-
-
-
-
In the Network parameters frame:
-
Select a connectivity plan from the Connectivity plan list.
-
All connectivity plans in the list are multicast connectivity plans.
-
The number in parenthesis indicates the remaining multicast devices available in the multicast connectivity plan. If there is no connectivity plan available, you can add it later by editing the multicast group.
-
For more information about connectivity plans, see LoRaWAN® multicast connectivity plan details.
-
-
-
In the Application layer handling frame:
-
In the Application server routing profile list, select an AS routing profile associated with one or more application servers that will send multicast downlinks. If there is no AS routing profile available, you can add it later by editing the multicast group.
-
If you want the downlink payloads to be encrypted, you can enter one distinct AppSKey for each LoRaWAN® ports used. You can also use a unique AppSKey for a range of ports or all LoRaWAN® ports. In the AppSKeys area:
-
Click Add.
-
Click the row that appears, then delete the mask to enter the AppSKey (128-bit hexadecimal key, 32 hexadecimal digits from 1 to 9 and A to F).
-
Enter a Port number, a range of ports (example: 1-20), or all ports using*.
-
Repeat as necessary to add more AppSkeys.
-
-
-
Click Create.
-> If the process takes time, a message tells you that you will receive an email when finished.
-> The multicast group is displayed in the Search frame of the Multicast Groups panel.
-> If you want to make the multicast group ready to work, see Adding a base station tag to a multicast group.
Adding a base station tag to a multicast group
You must have read-write access to Device Manager. For more information, see Opening a panel and checking your read-/write access.
Adding a base station tag to a multicast group is mandatory to make it work.
A base station tag identifies a group of base stations within the reach of the target multicast devices. When added, it associates the multicast group with a group of base stations that will transmit the multicast downlinks to the multicast devices.
Usually a base station tag corresponds to a geographic area. You must know which tag corresponds to the area where your multicast devices are or will be located, or ask your operator for the tags you can use:
-
All base stations having the same tag belong to the same base station group.
-
A base station group can contain one or more base stations.
-
A multicast group can have one or more base station tags.
Tags are created and added to base stations by operators, or network partners if base stations tagging is delegated. For more information, see Operator user guide and Network Manager user guide.
For more information about base station tags, see Viewing, managing and removing base station tags in a multicast group.
-
In the navigation panel, click Multicast groups.
-
In the Search frame of the Multicast Groups panel, select the multicast group you want to associate to a base station group, and click Edit.
-
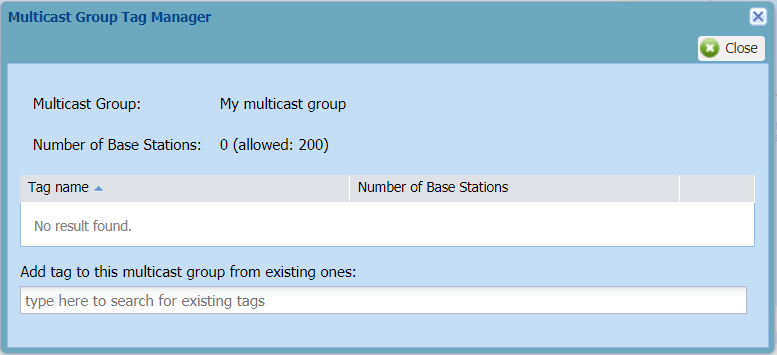
In the Tags area of the Multicast group that opens, click Tags Management.
-> The Multicast Group Tag Manager opens.
-
In the Add tag to this multicast group from existing ones box:
-
Type the first character of the tag name you want to add until a suggestion list appears.
-
If the list is too long, type more characters to restrict your search.
-
In the suggestion list, select the tag you want.
-
-
Click Add tag.
-> In the Multicast Group Tag Manager:
-
The tag is added to the tag list.
-
The number of base stations in the multicast group is updated.
-
-
Click Close.
-> Base stations of the added multicast group that have a known location appears on the map of the Multicast Group panel.