Expansion Package for STM32
STM32Cube Expansion Packages for LoRa connectivity deliver additional embedded software components to enable specific applicative use cases. It is used in our FreeRTOS demo example.
Prerequisites
- Ubuntu 20.04 (at least 18.04) ⬇️
- If using an STM32L476 board:
- If using an STM32WL55 board:
- A terminal emulation program must be installed to display trace messages. This can be miniterm (provided by the python3-serial package) or minicom.
Configure LoRaWAN
Before building the device application, you have to configure LoRaWAN identity and security information to:
- Ensure that the default LoRaWAN configuration (region, class, data rate) suits your needs.
- Set the IPv6 device prefix.
LoRaWAN Identity and Security
The LoRaWAN 1.0 device identity and security information is defined in the se-identity.h file that is located in the "App" folder.
Check the following settings:
STATIC_DEVICE_EUIis set to 1LORAWAN_DEVICE_EUIis defined according to your needsLORAWAN_JOIN_EUIis defined according to your needs since it is required byLORAWAN_APP_EUILORAWAN_NWK_KEYis defined according to your needs since it is required byLORAWAN_APP_KEY
LoRaWAN Device Configuration
LoRaWAN device configuration is defined in the fullsdkl2a.c file that is located in the "src" subfolder of FullSDK.
Check the following settings:
ACTIVE_REGIONis defined with your regionLORAWAN_DEFAULT_CLASSis defined with the class of your deviceLORAWAN_ADR_STATEis defined with the appropriate adaptative data rateLORAWAN_DEFAULT_DATA_RATEis defined with the default data rate
Device IPv6 Prefix
Additionally, the IPv6 prefix of the device must be set in the task_sdk.c file in the same "src" subfolder of Core.
Initialize DEVICE_PREFIX with the IPv6 prefix value specified in the IP Network on Acklio IPCore.
Defining the device IPv6 prefix ensures that the synchronization messages used to configure the SDK will fit in the smallest LoRaWAN frames.
Acklio FullSDK runtime library for a ST-NUCLEO-L476RG board is located in this folder.
Acklio FullSDK runtime library for a ST-NUCLEO-WL55JC1 board is located in this folder
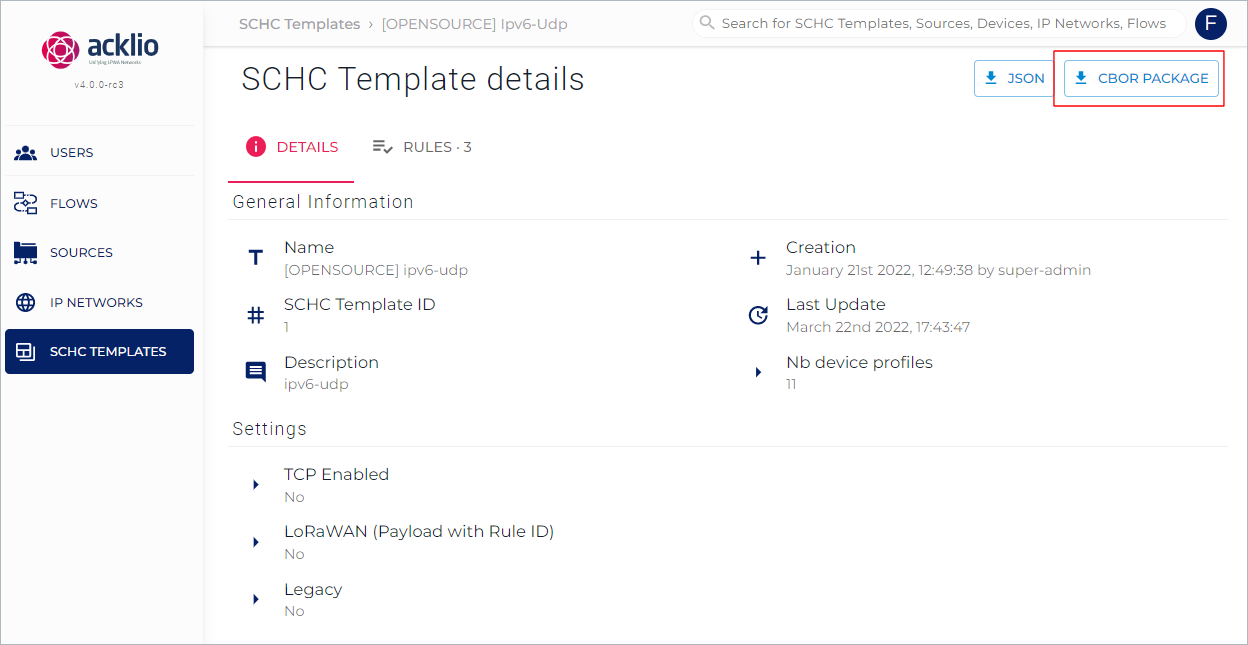
This library is configured for dynamic rules templates. The right template must be provisioned with a binary array provided by the CBOR package that can be downloaded from Acklio IPCore SCHC template, as illustrated below. The IPv6 device prefix must be set.
For the Demo purpose, the task named task_sdk provisions the CBOR package as a binary array called BINARY_RULES.
You can use L2 AT commands to set the IPv6 device prefix and the SCHC template.
Build the Device Application
The build steps are performed in STM32 Cube IDE when using an STM32L476RG board or in STM32 Cube WL when using an STM32WL55JC board.
Using ST Nucleo L476RG
Proceed as follows if you are using a ST-NUCLEO-L476RG microcontroller board.
- Start STM32CubeIDE.
- Go to "File > Open projects from File System...".
- Go to the "Import Source" directory.
- Choose
Projects/NUCLEO-L476RG/Applications/LoRaWAN/FreeRTOS_IPv6UDP/STM32CubeIDE/sx1276mb1mas. - Select the configuration you need between the default build configuration named "Release" (which is optimized for size) and another named "Debug" (which is optimized for debugging).
- Select the "Project Explorer" view, right-click the project then select "Build Project".
A warning message and a note message are displayed when compiling
uip.c. This is an expected behavior.
The resulting binary file can be found here either in the "Release" or in the "Debug" subfolders, depending on the active build configuration.
Using ST Nucleo WL55JC1
Proceed as follows if you are using an "ST NUCLEO-WL55JC1" microcontroller board.
- Start STM32CubeWL.
- Go to "File > Open projects from File System..."?
- Go to the "Import Source" directory.
- Choose
Projects/NUCLEO-WL55JC1/Applications/LoRaWAN/ATModem/STM32CubeIDE/. The default build configuration is named "Release". - Select the configuration you need between the default build configuration named "Release" (which is optimized for size) and another named "Debug" (which is optimized for debug).
- Select the "Project Explorer" view, right-click the project then select "Build Project".
The resulting binary file can be found here either in the "Release" or in the "Debug" subfolders, depending on the active build configuration.
Flash the device
The flash steps are performed in STM32 Cube IDE.
Check that the board is connected to the development computer. Select the "Project Explorer" view then drag and drop the binary file to the mass storage device that is associated to the board.
Or proceed as follows:
- Select the Release build configuration as the active one.
- Go to "Run > Run Configurations..." to create the Run configuration from it, then click the "Run" button.
If the binary file is not found by the Run configuration, do the following:
- Close the run configuration window.
- Right-click the project in the "Project Explorer" view and select "Refresh".
- Start again.