Getting Started
About Release v4
Release & Documentation:
Acklio Software suite version 4.0 is no longer actively maintained, but its Documentation is still available from the Release menu if you would like to refer to it.
When using the Demo Examples, make sure that you are in the right repository on Acklio's GitLab!
About the Demo Examples
The Demo examples to deploy on the device (i.e. the board) as well as Acklio IPCore and Acklio VPN Agent run in a Linux environment (Ubuntu 20.04).
Our Demo examples aim to demonstrate how Acklio Software help the communication between heterogeneous protocols and create a bridge between IoT and IP worlds for fluid data exchange.
With these examples, you will be able to demonstrate locally (possibly on the same computer running Linux) how Acklio FullSDK empowers the device to communicate with Cloud applications.
- Use cases 1 and 3 use AT Modem binary application integrating Acklio FullSDK library.
- Use case 2 is a reference design for integrating Acklio FullSDK library in an STMicroelectronics environment using FreeRTOS.
Start by reading the Demo Purpose page of each example to get:
- Context on the use case, each example illustrating a different LoRa stack;
- A diagram to visualize the data exchange;
- Recommendations on hardware and software requirements;
- And a detailed view to the functioning of the Demo.
Prerequisites
As the Demo examples are running over LoRa, a LoRa Network Server (LNS) must be configured first.
Acklio IPcore supports many LNS:
- For the Demo purpose, we suggest to use The Things Stack and follow the configuration steps here.
- You can also use Actility LNS and get help for the configuration here
- If you are very familiar with Linux, you can configure a Chirpstack LNS.
Quick View on the Demo Steps
Below is the general process you should follow to use the Demo examples, from repository to logs.
For a detailed process for each Demo, see:
- Configuration Steps for the AT Modem UDP Client example.
- Configuration Steps for the FreeRTOS UDP Client Server example.
- Configuration Steps for the AT Modem DLMS using Gurux example.
1️⃣ Generic Steps
Start with the configuration of the flow in Acklio IPCore.
| Step | Action |
|---|---|
| A | Create the destination of the flow: configure the IP network, then download and set up Acklio VPN agent. |
| B | Select your LNS connector and bind it to your LNS to create the source of the flow. |
| C | Activate SCHC at both sides of the flow: select a SCHC template, then configure the device profile. |
| D | Provision the device, then check and save to finalize the configuration of the flow. |
2️⃣ Specific Step: Build & Flash
The "build & flash" step depends on the use case.
| Use Case | Process | Additional |
|---|---|---|
| UDP Client | Read the AT Modem Firmware page | Read the AT Commands page |
| FreeRTOS Client Server | Read the Expansion Package for STM32 page | — |
| DLMS using Gurux | Read the AT Modem Firmware page | Read the AT Commands page |
3️⃣ Other Specific Steps
Now go through the last specific steps. They are performed on the device, simulated by a board.
| Step | Action |
|---|---|
| E | Add the IP address of the application to the interface and enables IPv6 forwarding. |
| F | a. Run the Demo example. b. Observe and test the way device and Cloud are addressed. c. Observe the device synchronization and the end-to-end exchange of packets between the device and the destination application. |
How to Clone the Project Repositories
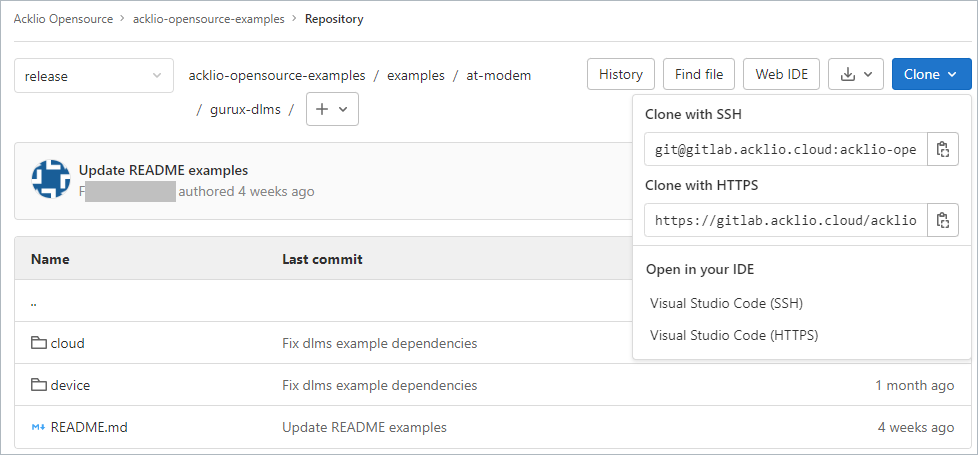
Recover the project locally by cloning it from GitLab. There are two ways to clone a repository, as detailed hereinafter.
Go to the root of the repository and select a project. The illustration below shows the project for Use Case 3 "DLMS using Gurux".

This table lists the three available Demo use cases and the corresponding repositories on Acklio's GitLab.
| Use Case | Project on GitLab |
|---|---|
| UDP Client | Open the repository 🔗 |
| FreeRTOS UDP Client Server | Open the repository 🔗 |
| DLMS using Gurux | Open the repository 🔗 |
Clone with HTTPS (Recommended)
Open the email received from Acklio which contains your credentials.
Credit: docs.gitlab
Clone with HTTPS when you want to authenticate each time you perform an operation between your computer and GitLab.
- Go to your project’s landing page and select Clone. Copy the URL for Clone with HTTPS.
- Open a terminal and go to the directory where you want to clone the files.
- Run the following command. Git automatically creates a folder with the repository name and downloads the files there.
git clone https://gitlab.com/gitlab-tests/sample-project.git
- GitLab requests your username and password:
- If you have 2FA enabled for your account, you must use a Personal Access Token with read_repository or write_repository permissions instead of your account’s password.
- If you don’t have 2FA enabled, use your account’s password.
- To view the files, go to the new directory:
cd sample-project
Clone with SSH
Credit: docs.gitlab
Clone with SSH when you want to authenticate only one time. This requires a dedicated SSH key.
- Authenticate with GitLab by following the instructions in the SSH documentation.
- Go to your project’s landing page and select Clone. Copy the URL for Clone with SSH.
- Open a terminal and go to the directory where you want to clone the files. Git automatically creates a folder with the repository name and downloads the files there.
- Run this command:
git clone git@gitlab.com:gitlab-tests/sample-project.git
- To view the files, go to the new directory:
cd sample-project