Deploying your trackers
Turning on your trackers
Switching on/off your micro tracker or smart badge
If your tracker's button does not blink when pressed, either the tracker is switched off or its battery is out-of-charge. When not in testing, switch off the tracker to save battery.
- The micro tracker and smart badge must not be left with a low or completely discharged battery for more than a month. We recommend to periodically charge the tracker at least once a month. The warranty is void if the battery of the tracker has not been charged for a prolonged period.
- The button sequences below are for MCU/Application firmware 2.3+. For more details on Micro Tracker button sequences for other firmware versions, click here
- The button sequences below are for MCU/Application firmware 2.3+. For more details on Smart Badge button sequences for other firmware versions here
-
If necessary, plug in the USB charging cable.
-
Switch on the tracker:
- Press the button once (between 1 and 4 seconds). The button must be released to generate the event. The tracker will play the melody to indicate the starting of the tracker. The tracker starts in motion tracking mode that is the default configuration.
- Press the button once (between 1 and 4 seconds). The button must be released to generate the event. The tracker will play the melody to indicate the starting of the tracker. The tracker starts in motion tracking mode that is the default configuration.
-
When you have finished testing, switch off the tracker like this:
- Long Press the button once (between 5 and 7 seconds). The button must be released to generate the event.
- Long Press the button once (between 5 and 7 seconds). The button must be released to generate the event.
Changing your compact tracker's state
Unlike the industrial tracker which is shipped from the warehouse in JOIN state, the compact tracker is sent in shipping state to avoid draining the battery.
You must change the state of your compact tracker before and after using it.
-
You will need to use to the magnet to activate the compact tracker. For more details on compact tracker activation, click here
-
If the compact tracker does not JOIN the network, repeat the previous step again.
Changing your industrial or compact tracker's mode
You must change the mode of your industrial or compact tracker before and after using it:
-
Once the industrial or compact tracker has joined the network, it is in standby mode to avoid unnecessary battery drain. In this mode, the tracker is only sending LoRaWAN® heartbeat messages periodically.
-
Before starting the tracking, the testing or the integration with the industrial or compact tracker, you must change the mode to motion tracking, and change it back to standby mode when finished.
-
Log in to Abeeway Device Manager on the community platform using this URL:here. The URLs for other ThingPark X Location Engine platforms are here
-
In the Select Devices column, select the tracker you want to change the mode, and click Select.
You can select up to ten trackers to be shown at the same time.
![]()
-
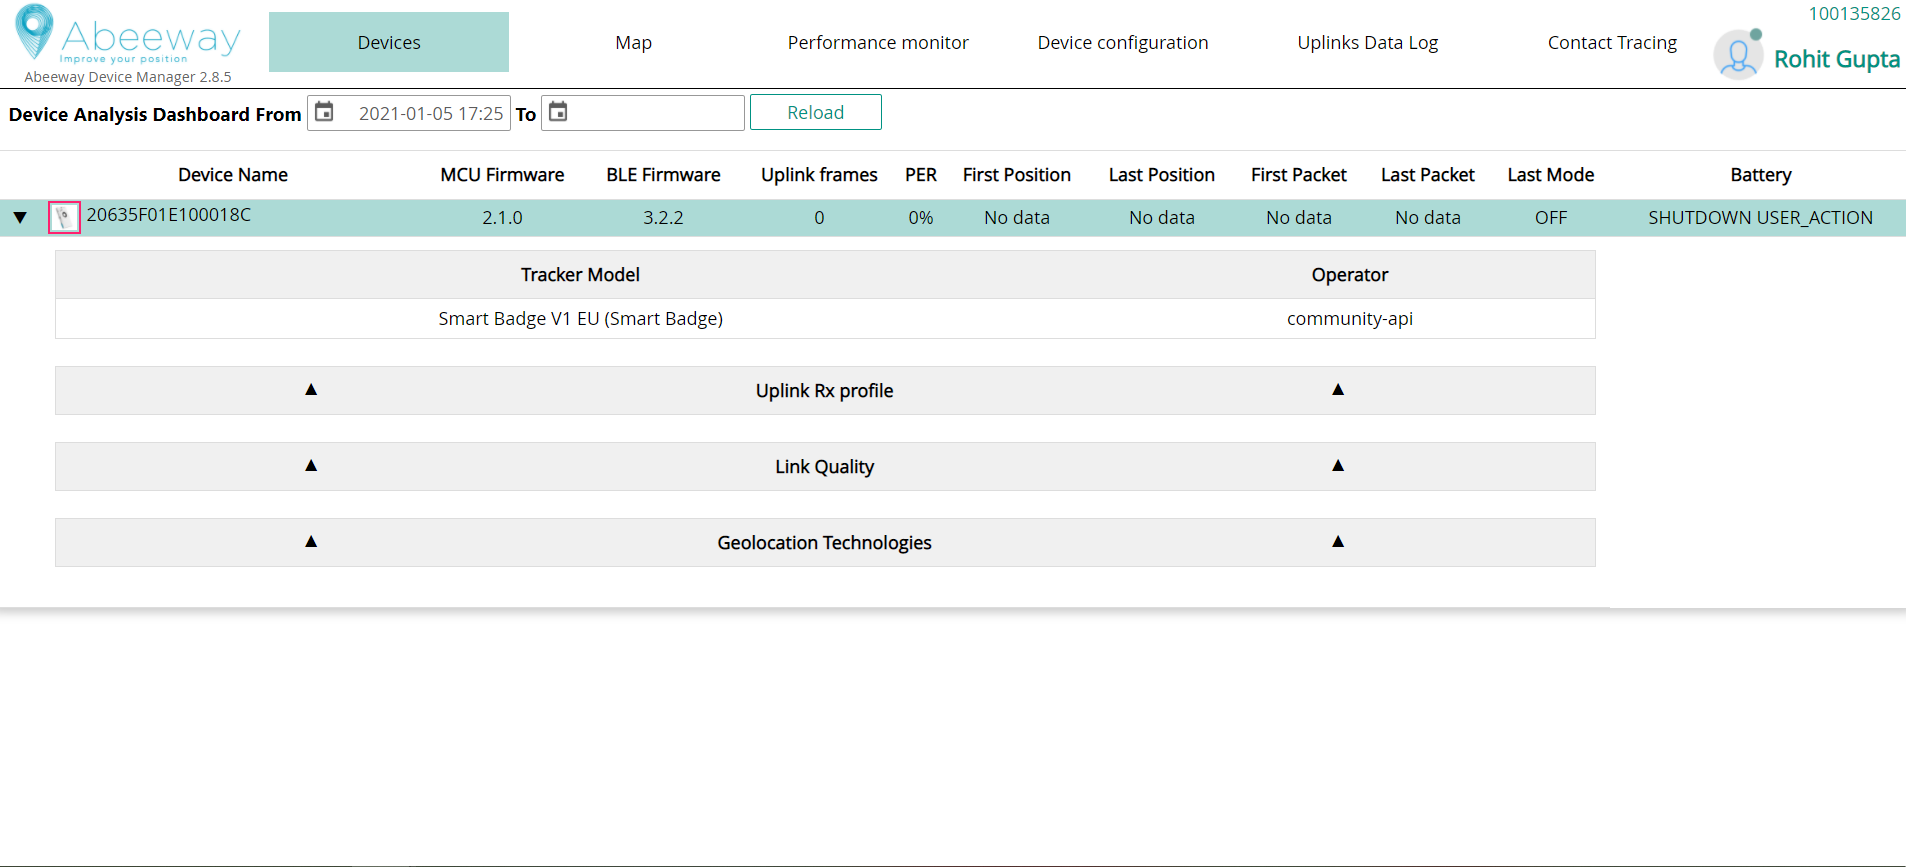
In the Device Analysis Dashboard that opens, the tracker you have selected displays its status details and statistics. Click the arrow to expand the tracker information. The information relevant to notice is:
- MCU Firmware: It gives the tracker MCU firmware version. Please refer to the Asset Tracker Firmware Reference Guide to know the supported features. Please ensure to follow only the reference guide version matching the firmware version running on the tracker.
- First Position and Last Position : When in standby mode, the tracker sends LoRaWAN® heartbeat messages periodically which can be used to get battery information, mode, firmware version, and so on.
- Last Mode : Current mode of the tracker.
- Battery : Percentage of battery left.
 5. Click the Device configuration tab:
-
Select the tracker for which you want to change the profile.
-
Select the DEFAULT profile, and click Update at the bottom of the page.
Depending on the connectivity with the LoRaWAN® network and the periodic LoRaWAN® hearbeat messages, it can take some time for the mode to be changed. The mode change can take at least the periodicity of the LoRaWAN® heartbeat messages defined by the LoRa_Live parameter. However it will take more time if there are network connectivity issues. :::
- After few minutes, refresh the Device configuration tab to check the mode has changed to Motion tracking.
Do not proceed further until the new mode is displayed.
![]()
Trackers best placement
The trackers are resistant to water but must never be placed either fully/partially submerged in water or under the influence of high pressure water spray jets for significantly long periods of time. The warranty of the tracker is avoid if used incorrectly.
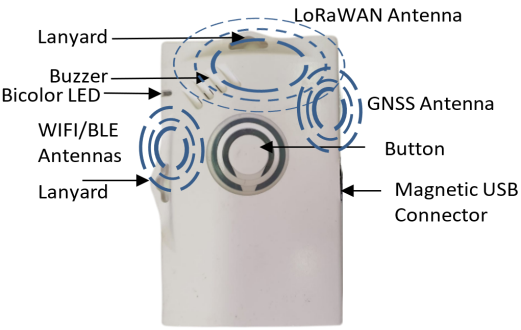
Micro tracker best placement
To get optimum radio performance and accuracy of your micro tracker, apply these rules when using it:
- Orient the LoRa/GPS antenna to the sky to be in reach of LoRaWAN® base stations and GPS satellites.
![]()
-
Avoid contact of fewer than five centimeters with skin, magnetic and metallic objects.
-
Avoid strong radio interferences with a cellular phone, unless using BLE where a cellular phone must be in reach.
Smart badge best placement
To get optimum radio performance and accuracy of your smart badge, apply these rules when using it:
-
Orient the LoRa/GPS antenna to the sky to be in reach of LoRaWAN® base stations and GPS satellites.
-
Avoid contact of fewer than five centimeters with skin, magnetic and metallic objects.
-
Avoid strong radio interferences with a cellular phone, unless using BLE where a cellular phone must be in reach.
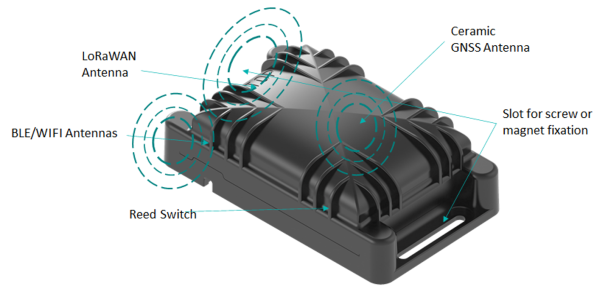
Compact tracker best placement
To get optimum radio performance and accuracy of your compact tracker, apply these rules when using it:
-
Always lay the compact tracker flat as shown below:
-
You can fix your compact tracker on an asset with a magnet, screws or a double-sided tape.
-
Avoid contact of fewer than five centimeters with skin, magnetic and metallic objects.
-
Avoid strong radio interferences with a cellular phone, unless using BLE where a cellular phone must be in reach.
-
To avoid water entering in the casing, the tracker must not be placed upside down.
Industrial tracker best placement
To get optimum radio performance and accuracy of your industrial tracker, apply these rules when using it:
-
Always lay the industrial tracker flat as shown below:

-
You can fix your industrial tracker on an asset with a magnet, screws or a double-sided tape.
-
Avoid contact of fewer than five centimeters with skin, magnetic and metallic objects.
-
Avoid strong radio interferences with a cellular phone, unless using BLE where a cellular phone must be in reach.
-
To avoid water entering in the casing, the tracker must not be placed upside down.
Trackers default configuration
At this stage of the process, your trackers are ready to report position and help you track your assets.
By default, we have configured your trackers to optimize your experience during your first steps with ThingPark Location favoring continuous indoor/outdoor positioning, tracker responsiveness, and positioning accuracy.
Trackers mode
Your trackers are currently in Motion Tracking mode:
-
They will report position when a movement is detected by the trackers' accelerometer.
-
The reporting period on motion detection is limited to one position per two minutes.
Geolocation strategy
Your trackers are configured to report positions based on GPS or WiFi technology, ensuring continuous indoor/outdoor positioning.
WiFi is prioritized over GPS to optimize power consumption.
Periodic position reporting
In case your trackers do not move, they will report position periodically every four hours.
LoRaWAN® uplink period
On top of position reports, your tracker will send periodically LoRaWAN® uplinks. These uplinks are used to report other types of information such as battery level. Most importantly, uplinks are also used to open downlink communication slots with the trackers such as configuration change and on-demand position request.
To maximize responsiveness of the tracker, this LoRaWAN® uplink period is set to five minutes.
Adjusting tracker's configuration to your needs
As mentioned previously, default tracker's configuration is made to optimize your experience while discovering our solution.
Although you will enjoy this at the beginning, you might need to adapt trackers behavior to better suit your use case requirements, or optimize power consumption.
Abeeway trackers support a wide variety of modes and configuration parameters to help you with that. Please refer to Abeeway Device Manager User Guide to learn how to change tracker configuration.