Cisco IOx PIM
Les modèles de passerelle Cisco IOx PIM supportés sont :
-
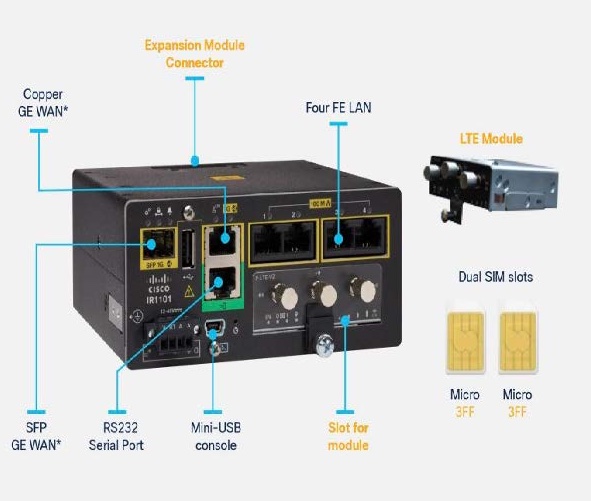
IR1101
-
IR1800
La procédure d'installation LRR est générique pour tous les modèles intégrant un module PIM.
Prérequis logiciels et matrice de compatibilité
| Modèle de Passerelle | Version LRR | Version du Firmware |
|---|---|---|
| IR1101 | 2.8.49 | 17.14 |
| IR1800 | 2.8.49 | 17.14 |
Choix de la plateforme
Choix de Plateforme : IR1101 vs IR1800
Consultez la documentation de la plateforme pour les spécifications matérielles et techniques afin de voir quel capteur répond à vos besoins.
Choix PIM : module 915 PIM vs 815 PIM
Actuellement, Cisco supporte deux modules d'interface pluggable différents
-
P-LPWA-900 pour 915 MHz
-
P-LPWA-800 pour 868 MHz
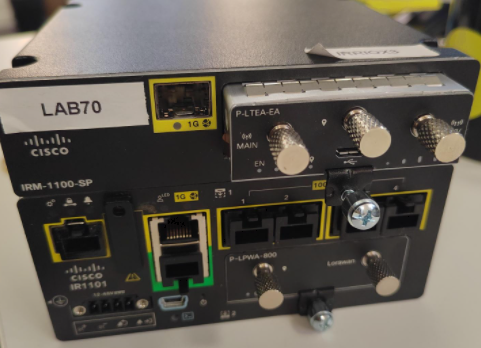
Choix de l'emplacement PIM : module LoRa PIM dans l'emplacement Base vs emplacement d'expansion sur l'IR1101
Pour l'IR1101 et les déploiements existants où l'emplacement Base PIM est utilisé pour le cellulaire, nous recommandons d'utiliser un emplacement d'expansion pour LoRa PIM. Pour l'IR1800, nous recommandons d'utiliser l'emplacement PIM disponible.
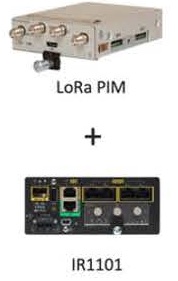
IR1101 :
IR1101 + LoRa PIM dans l'emplacement Base :
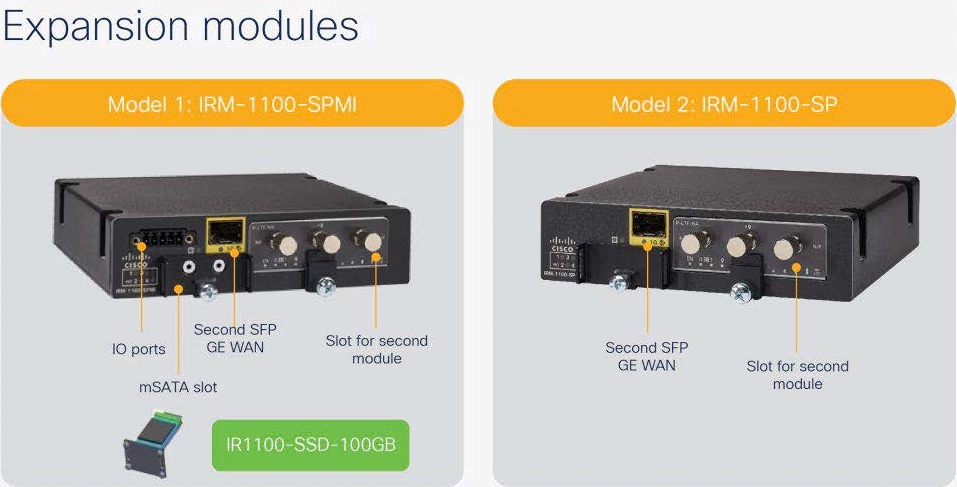
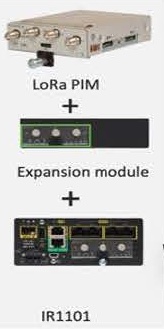
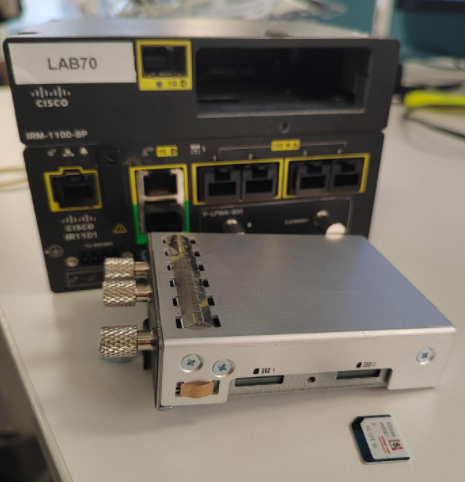
Modules d'expansion :
IR1101 + LoRa PIM dans l'emplacement du module d'extension :
Installation Cellulaire
Accès à la console de l'hôte
Utilisez l'émulateur terminal avec les configurations suivantes :
| Baud | 9600 |
| DATA | 8-bit |
| Parité | Aucun |
| Stop | 1 bit |
| Contrôle de flux | aucun |
Remarque : si vous ne maîtrisez pas l'interface CLI de Cisco, vous pouvez vous référer à la documentation Cisco :
Installation du firmware Cisco IOx PIM
Copiez le nouveau firmware vers la passerelle :
copy scp: bootflash:
<remote IP where the .bin is located, eg: 10.100.84.1>
<user, eg: actility>
<location of .bin file, eg: /Users/actility/ciscoiox_pim/ir1101-universalk9.17.14.01prd18.SPA.bin>
<password, eg: password>
Obtenez la "variable BOOT" en utilisant la commande suivante :
show bootvar
Définissez le nouveau firmware comme firmware de démarrage :
show version
configure terminal
boot system bootflash:ir1101-universalk9.17.14.01a.SPA.bin
no boot system <BOOT variable>
exit
copy running-config startup-config
reload
Installation et configuration de l'hôte
Si vous ne maîtrisez pas l'interface CLI de Cisco, voici un guide étape par étape pour configurer la passerelle :
# Enable and enter the password (for example here it's actility)
enable
actility

# Deactivate service config
config terminal
no service config
exit

# Configure IP domain name
configure terminal
ip domain name <domain_name>
exit

# AAA authorization
aaa new-model
aaa authentication login default local
aaa authorization exec default local none
aaa authorization network default local

# Add user:password
configure terminal
username admin privilege 15 password 0 cisco
username actility privilege 15 password 0 actilityPassword
exit

# VirtualPortGroup to access Host from Container via SSH
configure terminal
interface VirtualPortGroup0
ip address 192.168.42.1 255.255.255.0
ip nat inside
no mop enabled
no mop sysid
exit
exit

# Ethernet
configure terminal
interface GigabitEthernet0/0/0
ip address dhcp
ip nat outside
media-type rj45
exit
exit

# http
configure terminal
iox
ip forward-protocol nd
ip http server
ip http auth-retry 3 time-window 1
ip http authentication local
ip http secure-server
ip http client source-interface GigabitEthernet0/0/0
exit

# ssh
configure terminal
ip ssh bulk-mode 131072
ip ssh time-out 20
ip ssh authentication-retries 5
ip ssh server algorithm publickey ecdsa-sha2-nistp256 ssh-rsa
ip scp server enable
ip ssh rsa keypair-name <hostname>.<domain_name>
exit

# access-list
configure terminal
ip access-list standard 1
10 permit 192.168.42.0 0.0.0.255
20 permit any
exit
ip access-list standard NAT_ACL_Gig
10 permit 192.168.42.0 0.0.0.255
exit
ip access-list standard NAT_ACL_Cell
10 permit 192.168.42.0 0.0.0.255
exit
exit

# NAT Ethernet inside container
configure terminal
ip nat inside source list NAT_ACL_Gig interface GigabitEthernet0/0/0 overload
no ip nat inside source list NAT_ACL_Cell interface Cellular0/3/0 overload
exit

# ipsec (optional)
configure terminal
crypto ikev2 fragmentation
crypto ikev2 dpd 30 3 periodic
exit

# If m2minternet SIM SFR
cellular 0/3/0 lte profile create 1 m2minternet none ipv4v6
y
y

# Attach created profile to Cellular
configure terminal
controller Cellular 0/3/0
lte sim data-profile 1 attach-profile 1 slot 0
exit
exit

# Configure cellular interface
configure terminal
interface Cellular0/3/0
ip address negotiated
ip nat outside
ip tcp adjust-mss 1460
dialer in-band
dialer idle-timeout 0
dialer-group 1
pulse-time 1
shutdown
exit
exit

# To activate cellular
configure terminal
dialer-list 1 protocol ip permit
# To FORCE activate cellular, uncomment the following line
#ip route 0.0.0.0 0.0.0.0 Cellular0/3/0
exit

# Set ip routes
configure terminal
ip route 0.0.0.0 0.0.0.0 GigabitEthernet0/0/0 dhcp
ip route 8.8.8.8 255.255.255.255 GigabitEthernet0/0/0 dhcp
no ip route 0.0.0.0 0.0.0.0 Cellular0/3/0
exit
Installation LRR
Après avoir téléchargé l'image de la passerelle comme mentionné dans la section Récupération de l'image de la passerelle, suivez les étapes ci-dessous pour flasher votre passerelle avec la nouvelle image.
Préambule
Flags Docker
Notre application utilise différents drapeaux pour simplifier l'expérience utilisateur :
Utilisation des variables d'environnement Docker
[MANDATORY]
# LoRaWan Radio
If LoRa PIM on Base slot:
--device /dev/lorawan_tty1:/dev/lorawan_tty1
or if LoRa PIM in Expansion Module slot:
--device /dev/lorawan_tty3:/dev/lorawan_tty3

# LoRaWan GPS (depending on which slot the LoRa PIM is installed)
If LoRa PIM on Base slot:
--device /dev/lorawan_gps1:/dev/lorawan_gps1
or if LoRa PIM in Expansion Module slot:
--device /dev/lorawan_gps3:/dev/lorawan_gps3

# user:password
--env HOST_USER=actility
--env HOST_SETUP_PASSWORD=actilityPassword
--env HOST_IP_ADDR=192.168.42.1

[OPTIONAL]
# Copy ThingPark key to Host
--env THINGPARK_AUTOCREATE_KEY=true

# IPSEC or TLS or NONE (TLS by default)
--env THINGPARK_SECURITY=TLS

# For an automatic IPSec configuration, it is mandatory to have an ip nat with NAT_ACL_Gig or NAT_ACL_Cell:
# ip nat inside source list NAT_ACL_Gig interface GigabitEthernet0/0/0 overload
# ip nat inside source list NAT_ACL_Cell interface Cellular0/3/0 overload
# ip nat inside source list NAT_ACL_Cell interface Cellular0/1/0 overload
--env HOST_AUTO_CONFIGURE_IPSEC=true

# Loglevel
--env LRRINI_TRACE_LEVEL=4
--env CHECKPKIINI_TRACE_TRACE=1

## Only when using OCP (image TP_Enterprise_BS_Image_CISCO_IR1101.1_any_2.8.XX_v1.0.tar.gz) and not community/TPCP
--env LRRINI_SUPPORT0_ADDR=92.221.221.221
--env LRRINI_SUPPORT1_ADDR=92.221.221.222
--env VPNCFG_SRV=tpe-ex-example.mycompany.com
Utilisation de package_config.ini (Cisco Cloud)
Si un fichier "package_config.ini" est ajouté via ioxclient (lors de la création du package) ou via le Cisco Cloud, il sera utilisé au démarrage. Cela signifie que chaque variable d'environnement ci-dessus peut être définie dans ce fichier.
Remarque : |Ces drapeaux seront remplacés par les drapeaux d'env Docker.
# package_config.ini
[a_mainconfig]
HOST_USER=actility
HOST_SETUP_PASSWORD=actilityPassword
HOST_IP_ADDR=192.168.42.1
THINGPARK_AUTOCREATE_KEY=true
THINGPARK_SECURITY=TLS
HOST_AUTO_CONFIGURE_IPSEC=false
HOST_SD_WAN=false

[b_traces]
LRRINI_TRACE_LEVEL=0
CHECKPKIINI_TRACE_TRACE=0

[c_ocp]
LRRINI_SUPPORT0_ADDR=
LRRINI_SUPPORT1_ADDR=
VPNCFG_SRV=

[d_ocp_optional]
LRRINI_DOWNLOAD0_USE_SFTP=
LRRINI_DOWNLOAD1_USE_SFTP=
LRRINI_LAPLRC0_ADDR=
LRRINI_LAPLRC1_ADDR=
LRRINI_NETITF0_PINGADDR=
LRRINI_NETITF1_PINGADDR=
LRRINI_SUPPORT0_USE_SFTP=
LRRINI_SUPPORT1_USE_SFTP=

[e_more]
LRRINI_DOWNLOAD0_FTPADDR=
LRRINI_DOWNLOAD0_FTPPASS=
LRRINI_DOWNLOAD0_FTPPORT=
LRRINI_DOWNLOAD0_FTPUSER=
LRRINI_DOWNLOAD1_FTPADDR=
LRRINI_DOWNLOAD1_FTPPASS=
LRRINI_DOWNLOAD1_FTPPORT=
LRRINI_DOWNLOAD1_FTPUSER=
LRRINI_SUPPORT0_FTPADDR=
LRRINI_SUPPORT0_FTPPASS=
LRRINI_SUPPORT0_FTPPORT=
LRRINI_SUPPORT0_FTPUSER=
LRRINI_SUPPORT0_PASS=
LRRINI_SUPPORT0_PORT=
LRRINI_SUPPORT0_USER=
LRRINI_SUPPORT1_FTPADDR=
LRRINI_SUPPORT1_FTPPASS=
LRRINI_SUPPORT1_FTPPORT=
LRRINI_SUPPORT1_FTPUSER=
LRRINI_SUPPORT1_PASS=
LRRINI_SUPPORT1_PORT=
LRRINI_SUPPORT1_USER=
Installation de l'image
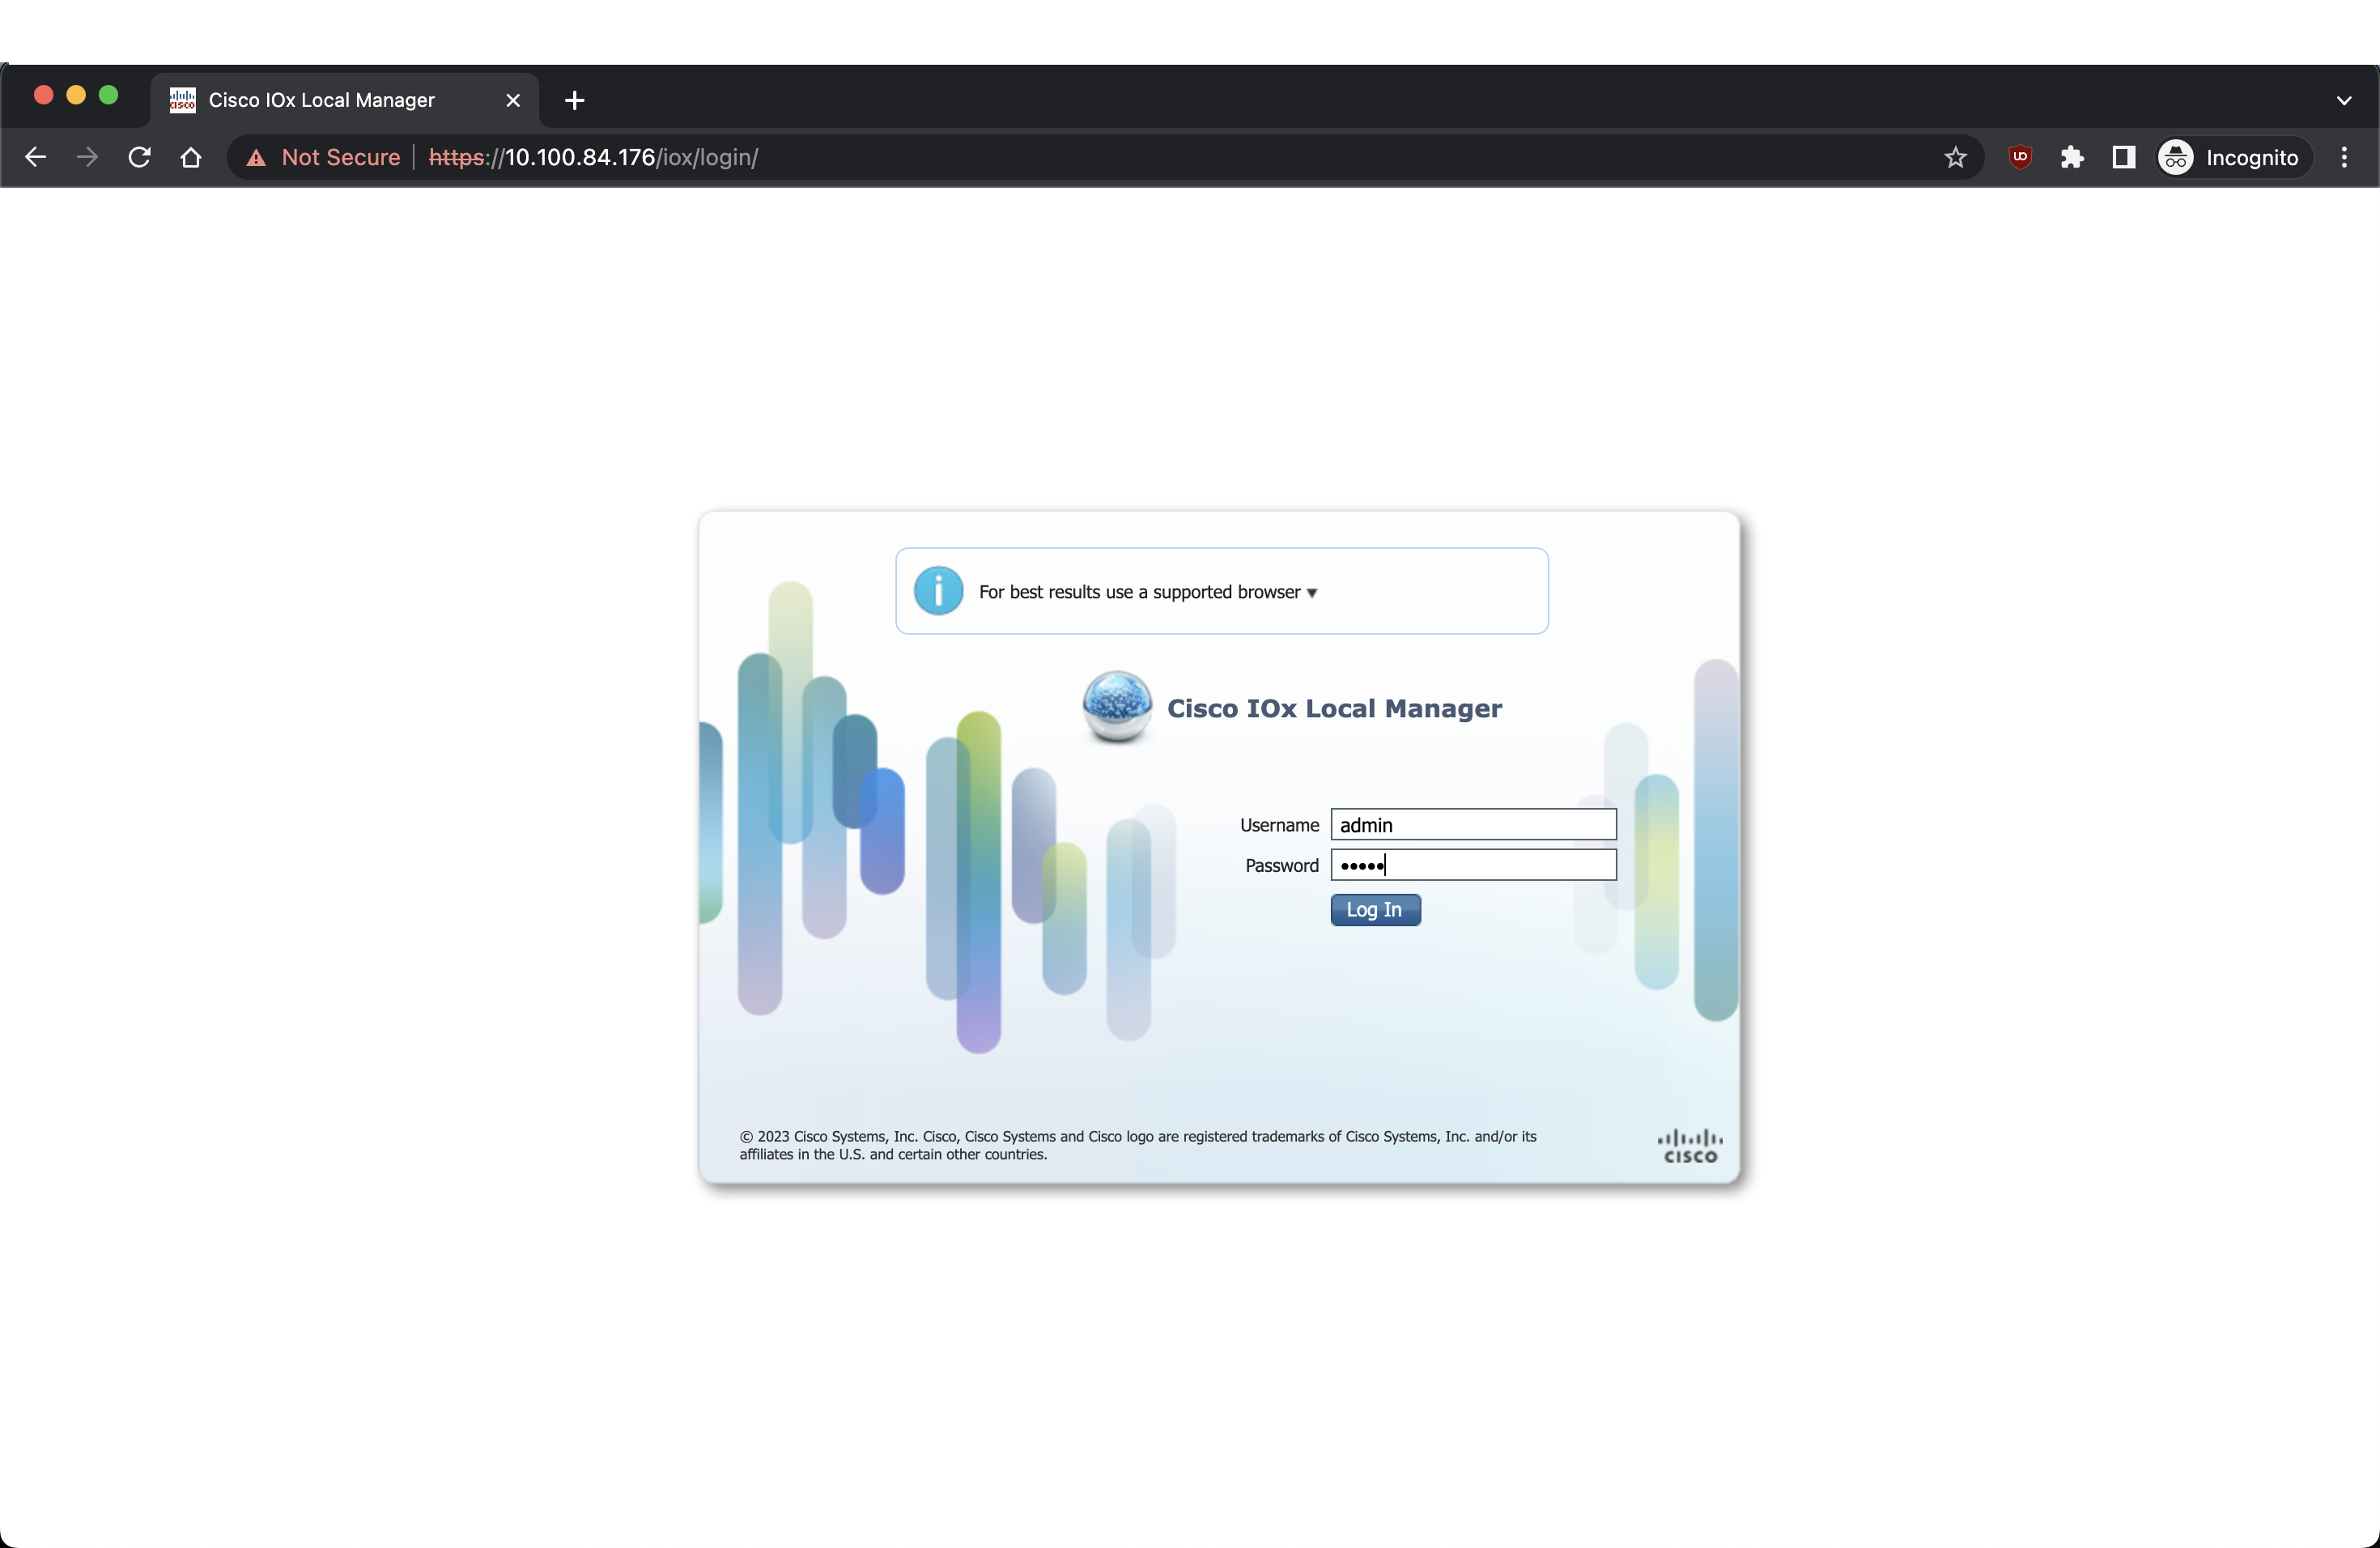
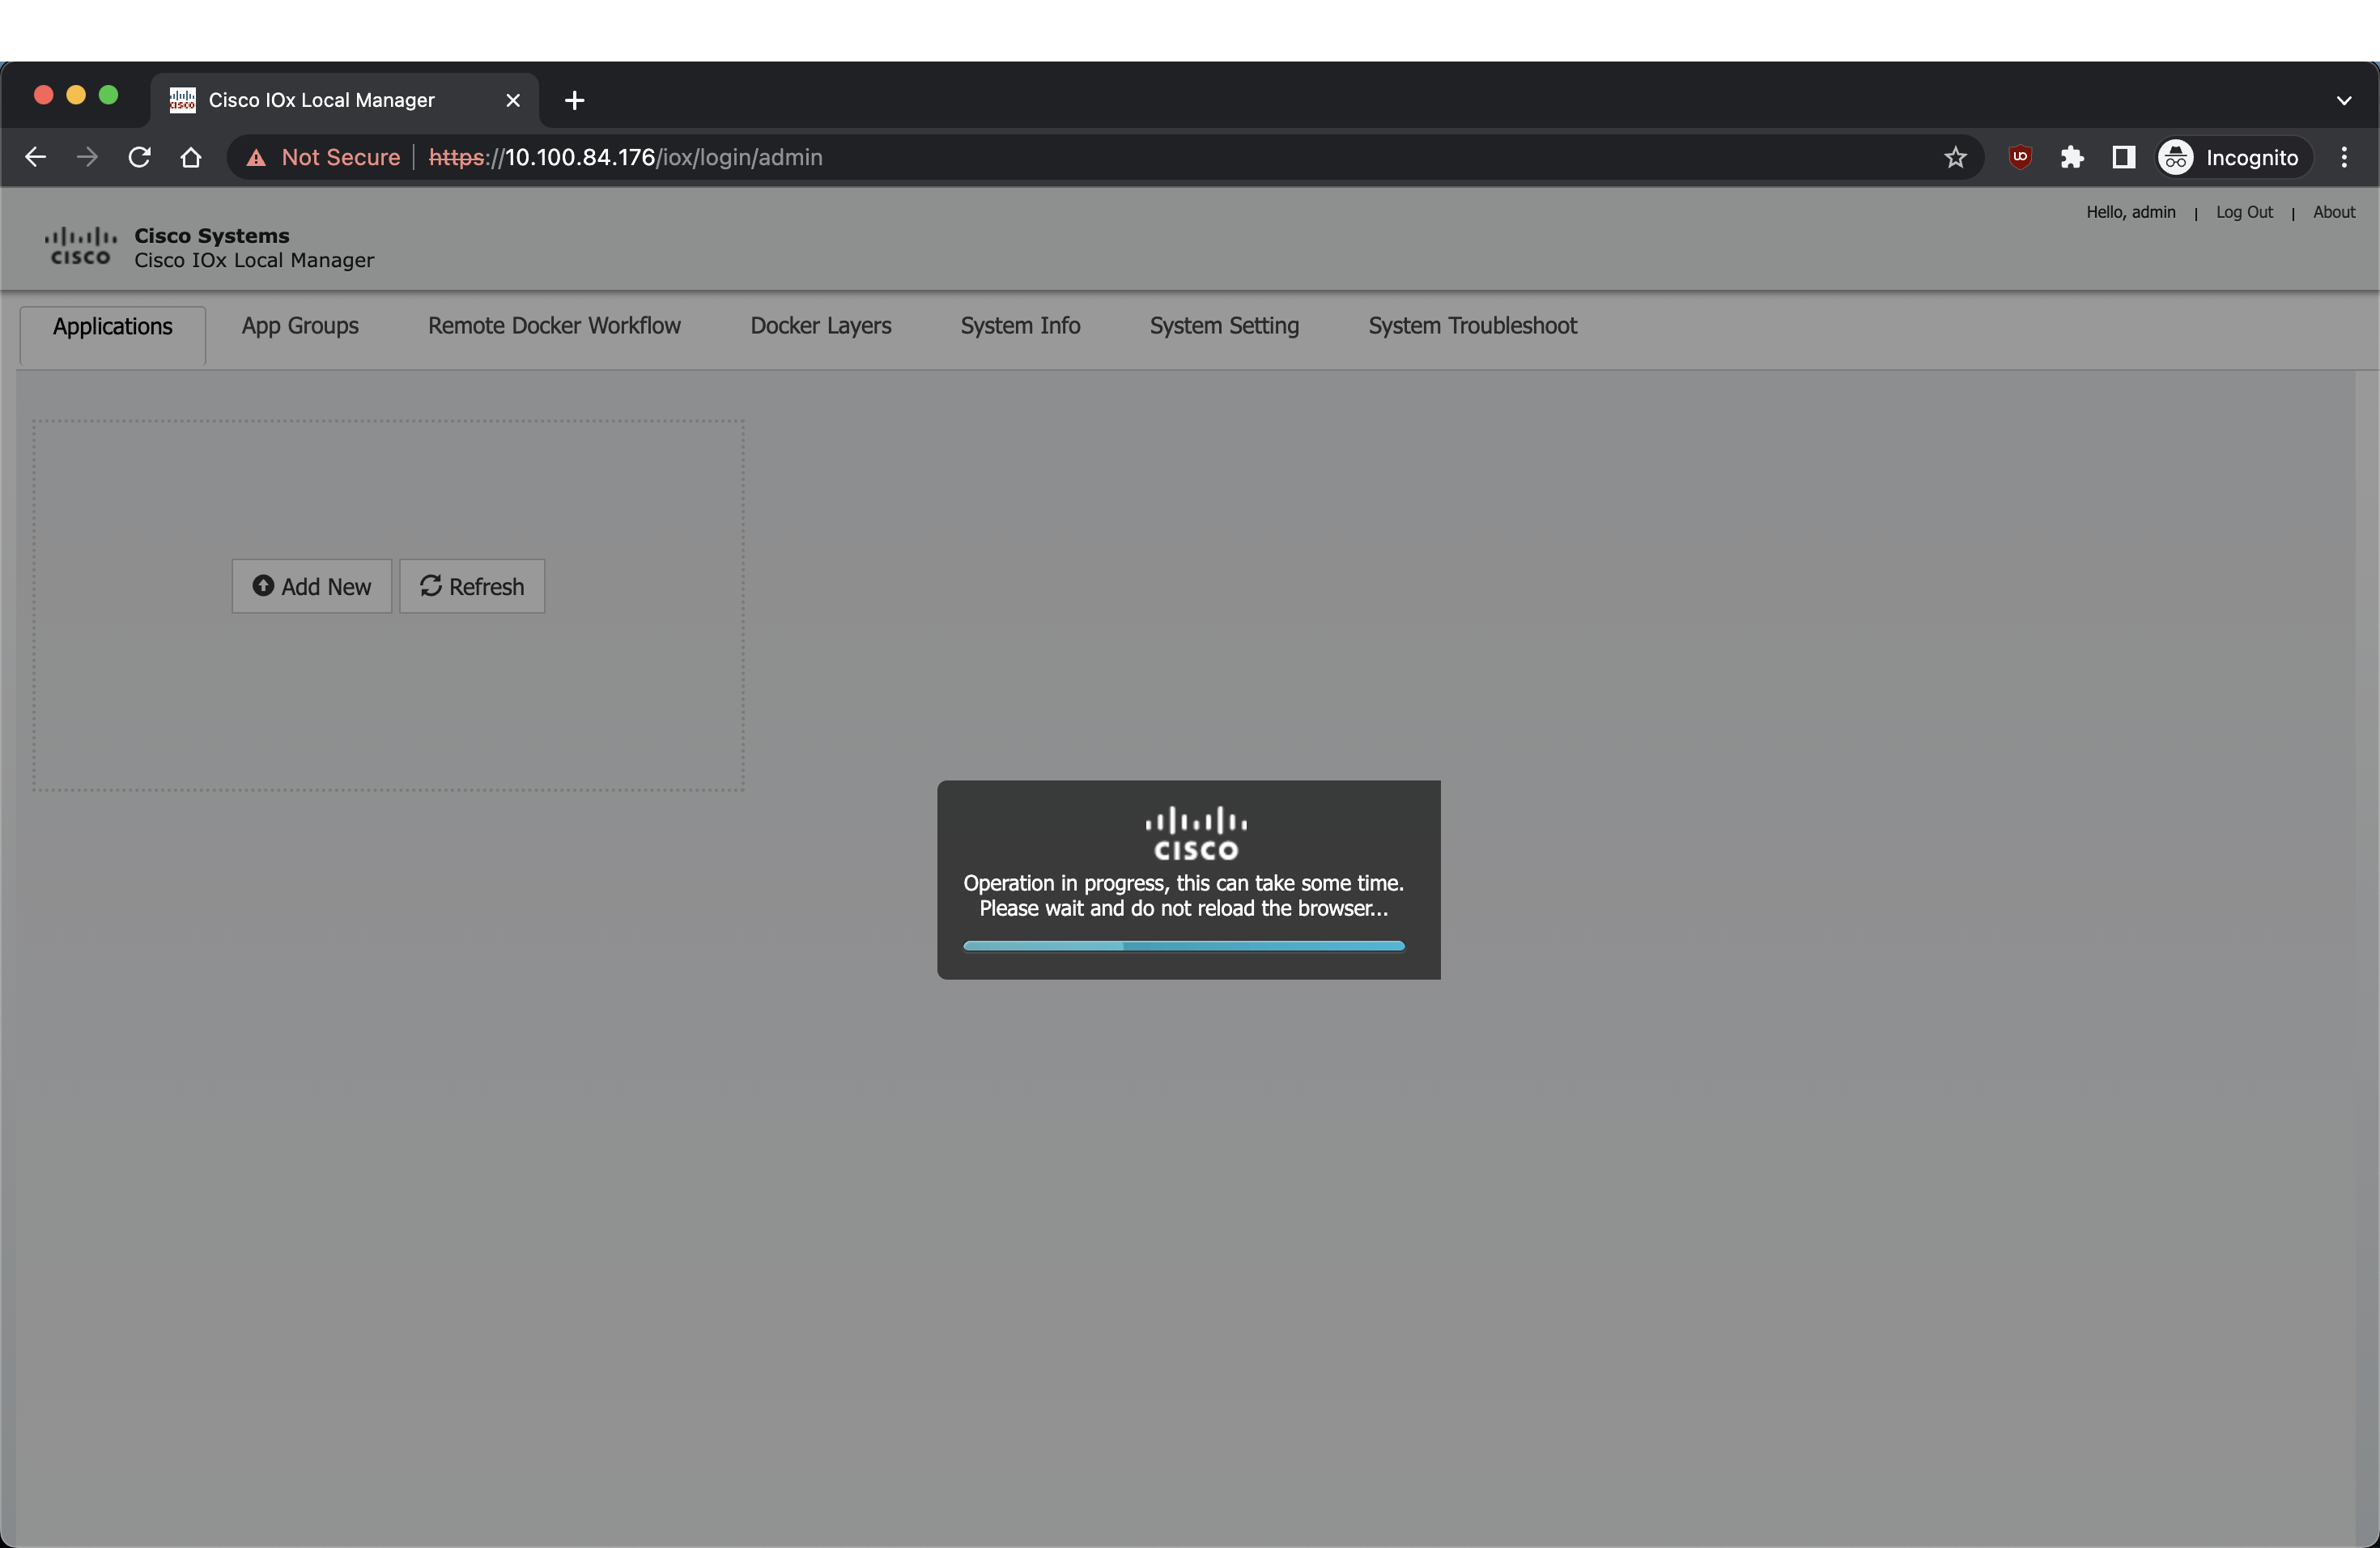
Utilisation de Cisco WebUI
Si le WebUI est activé, le moyen le plus simple pour l'installation, pour un utilisateur, est de télécharger l'application via l'UI : https://gateway_ip_address/webui/#/ioxmain (WebUI principal) ou https://gateway_ip_address/iox/login/ (uniquement IOx)
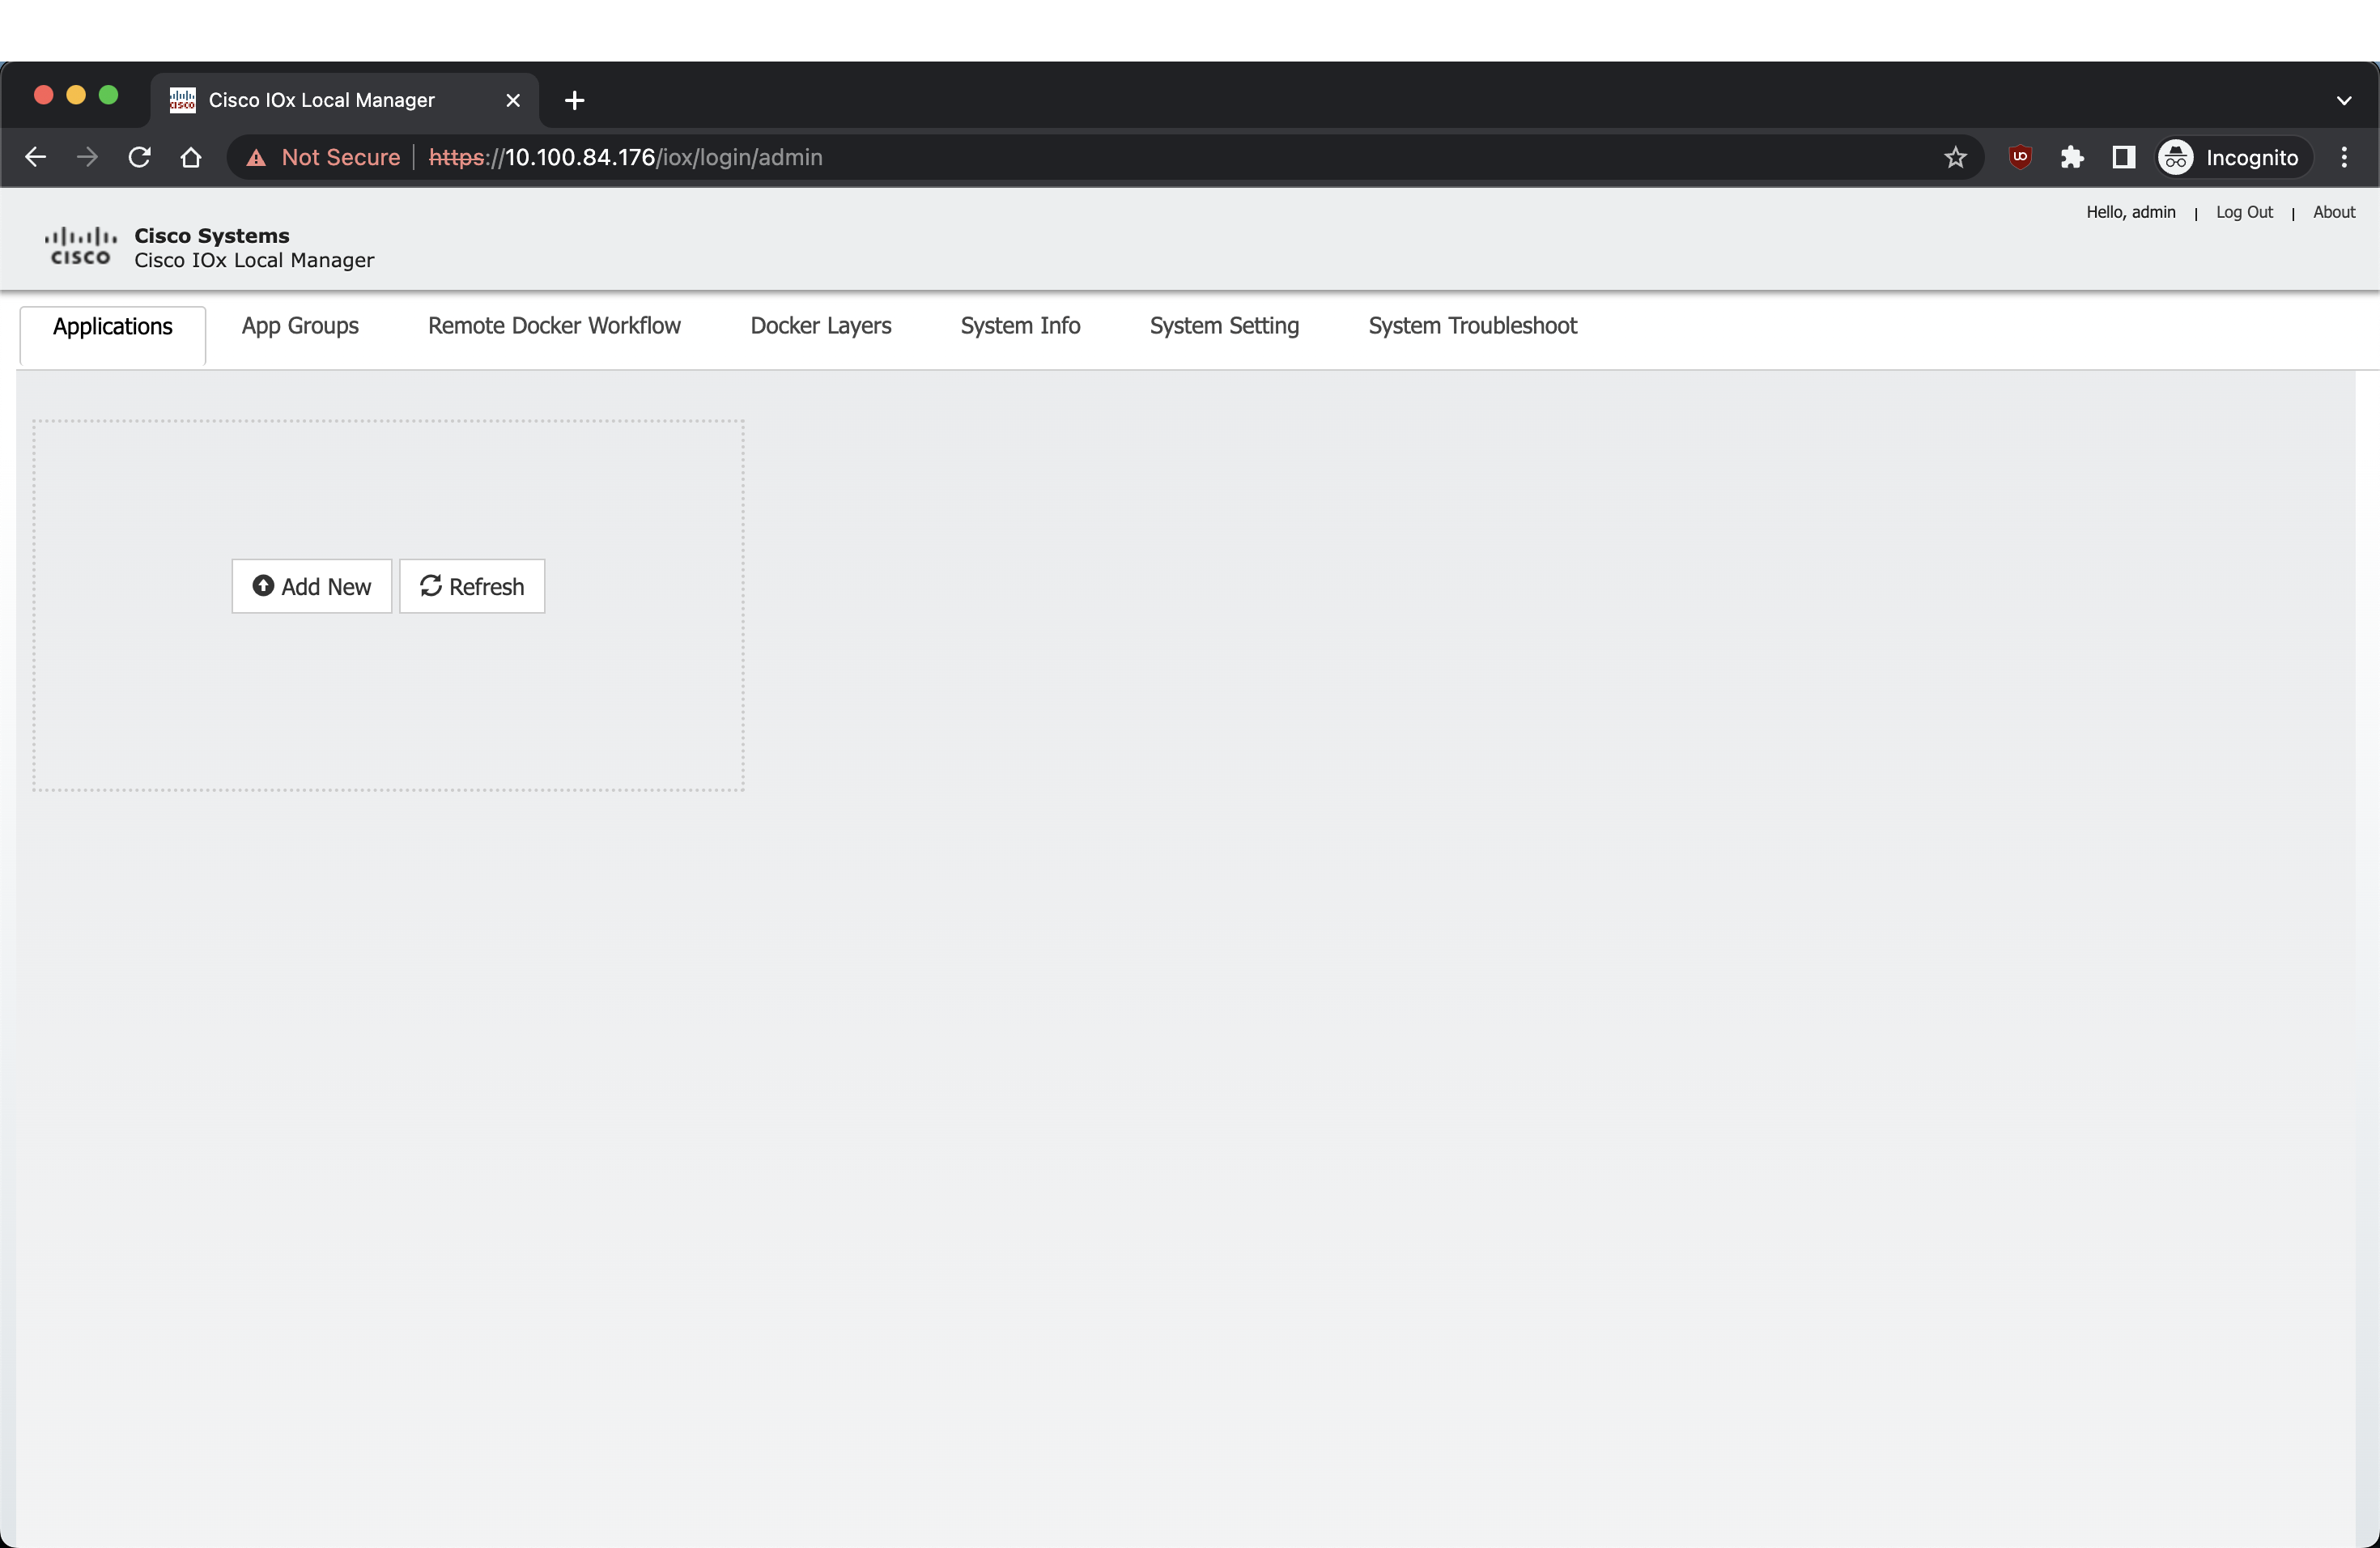
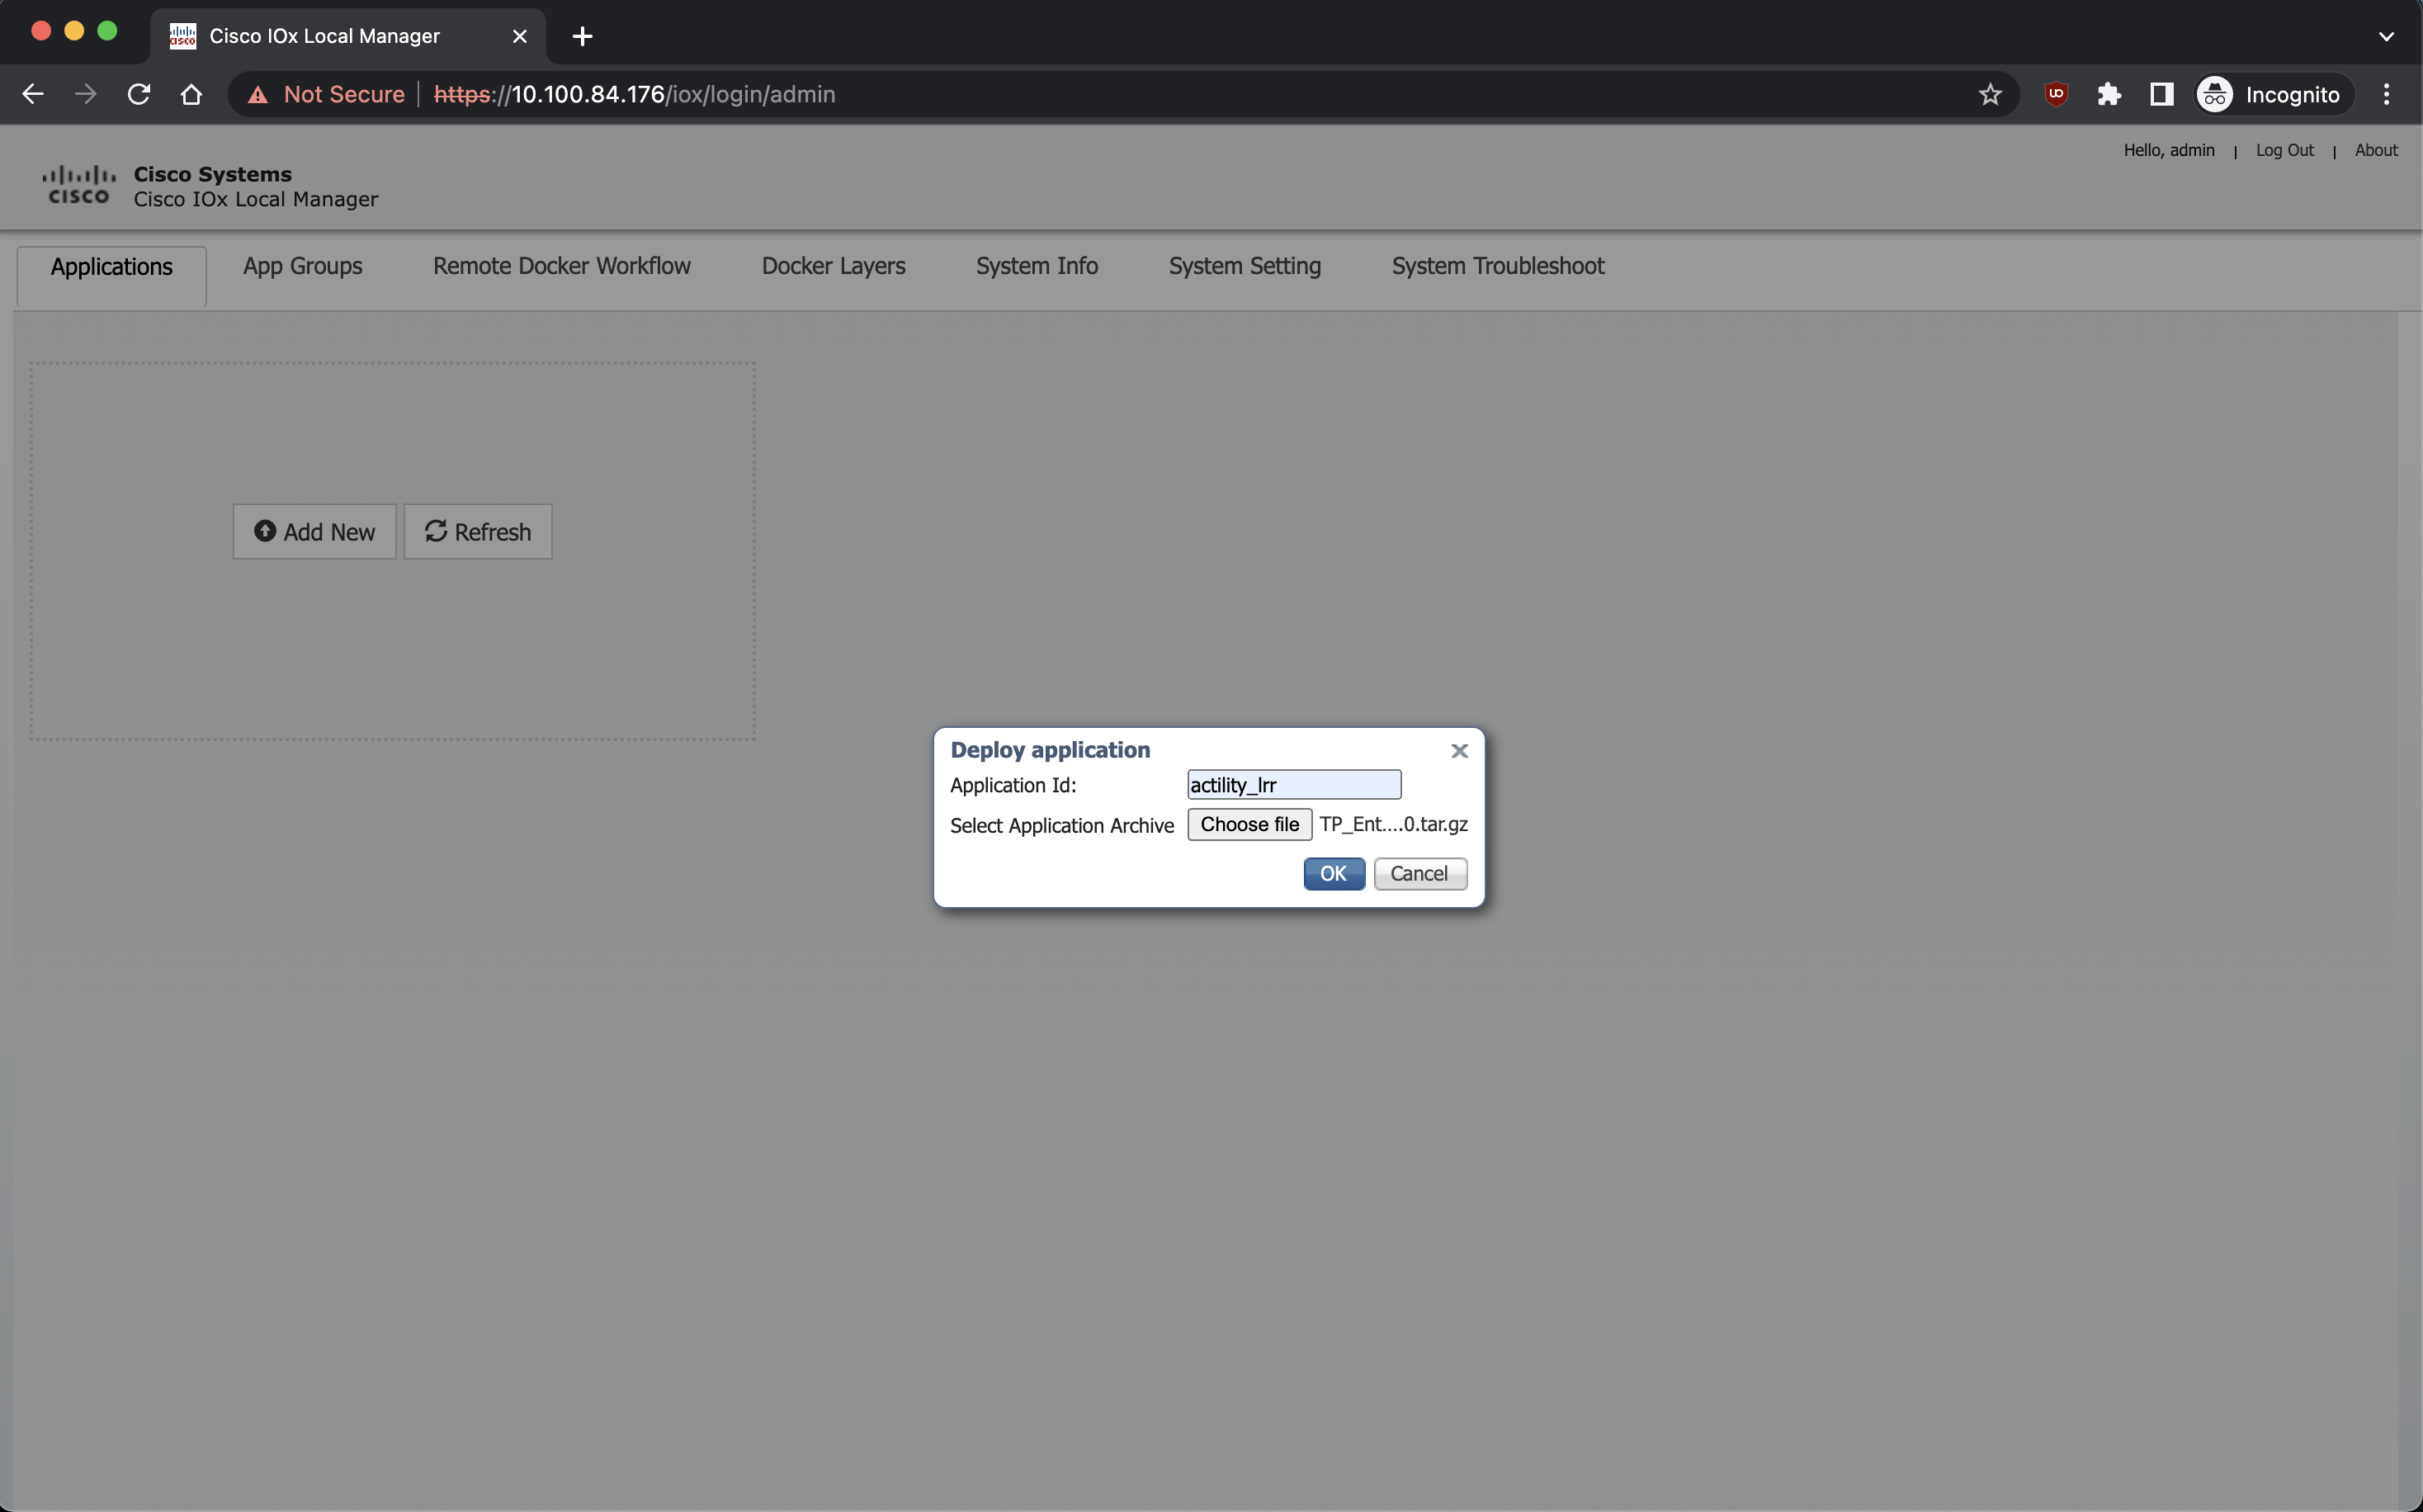
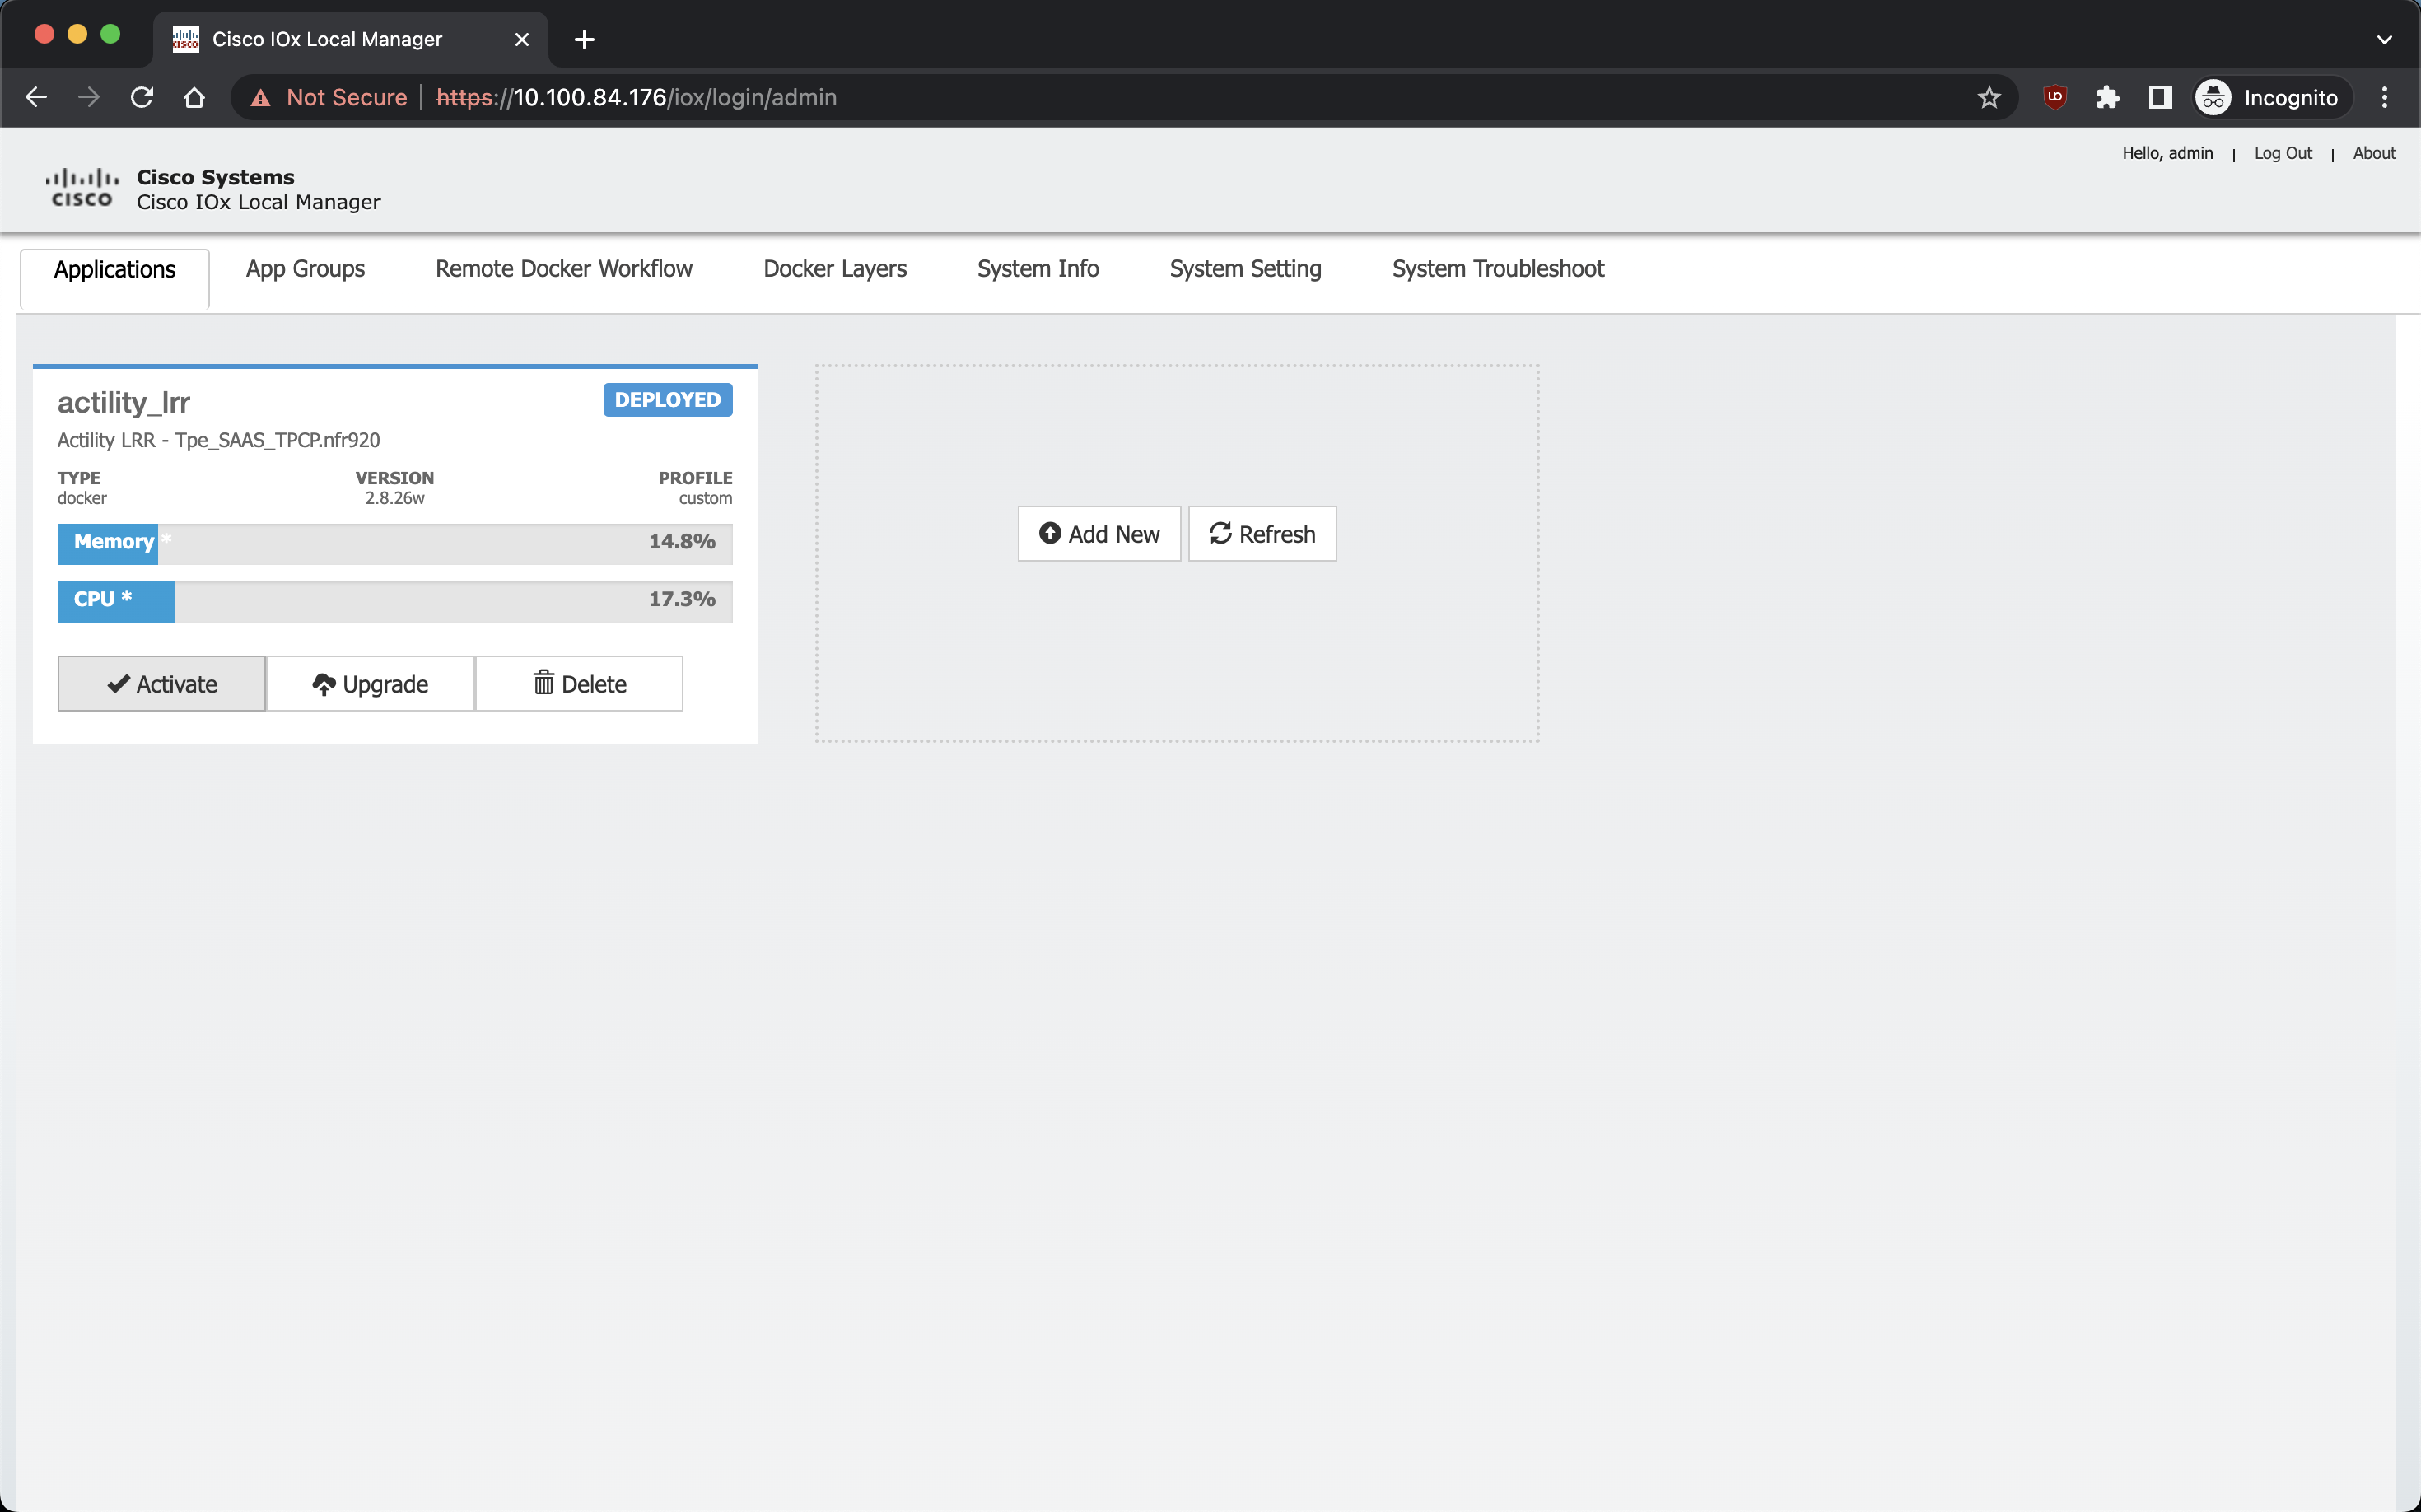
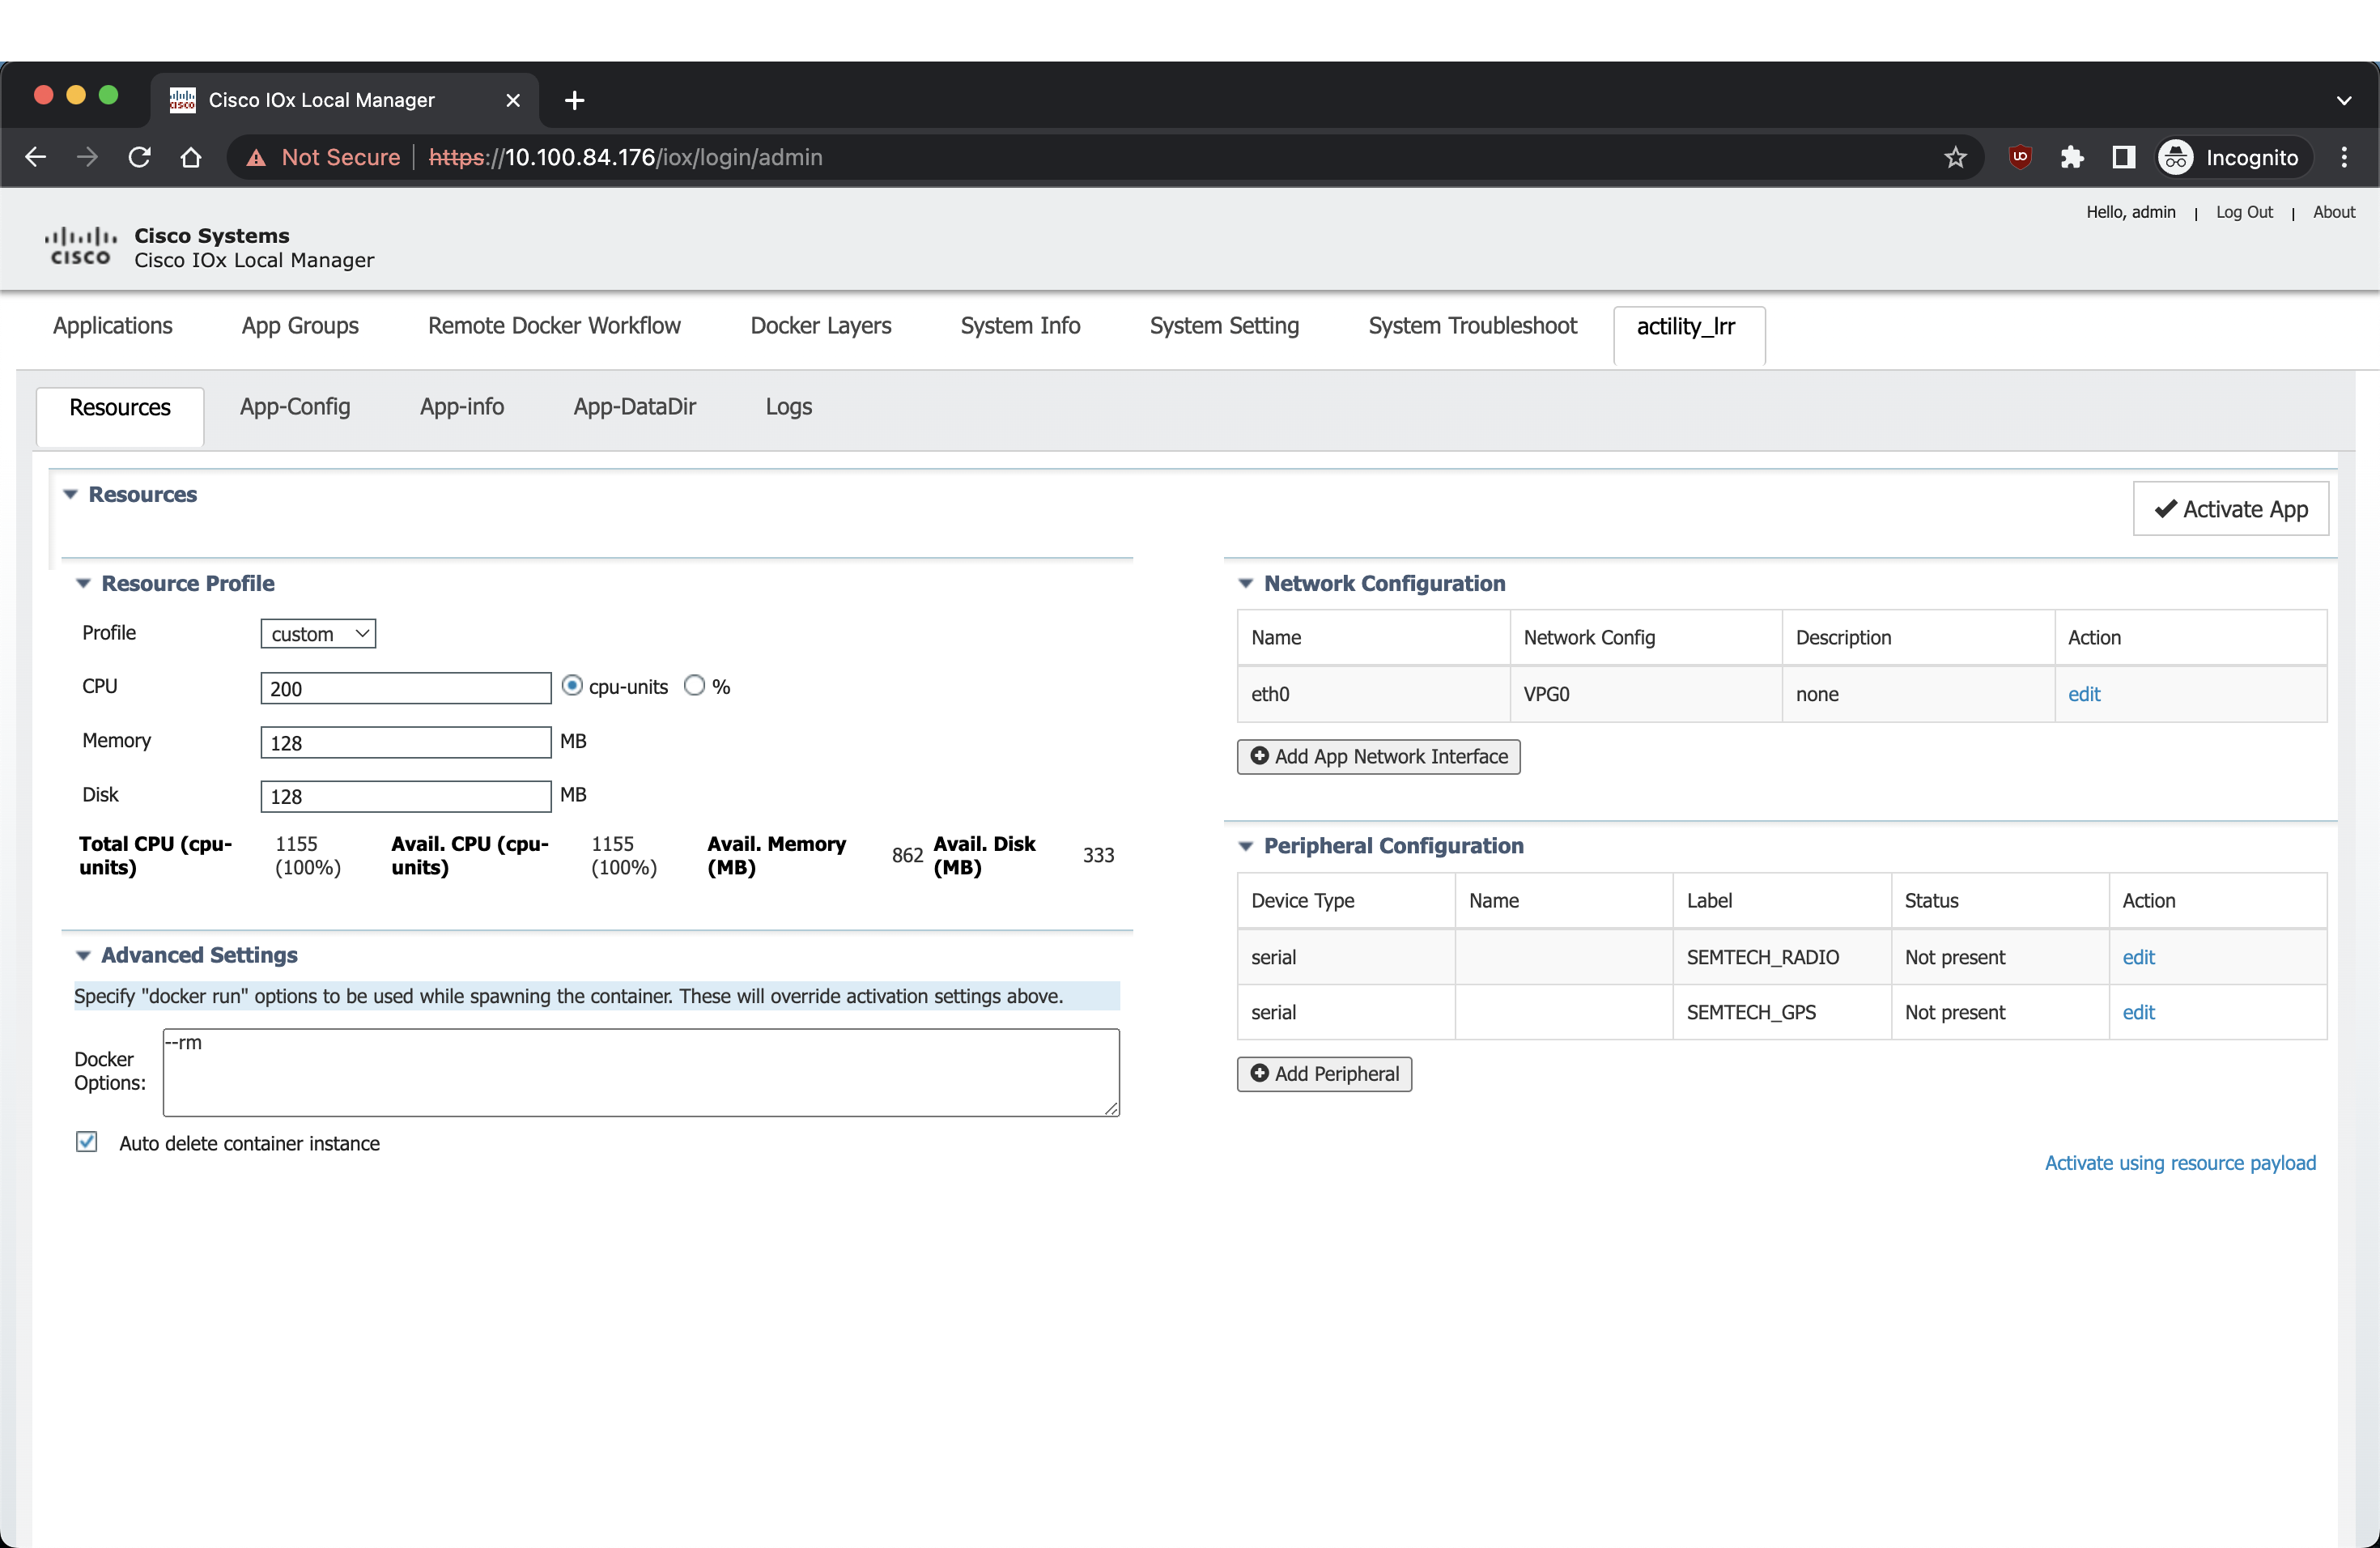
Ici, ajoutez les Docker Flags :
--env HOST_USER=actility
--env HOST_SETUP_PASSWORD=actilityPassword
--env HOST_IP_ADDR=192.168.42.1
--env THINGPARK_AUTOCREATE_KEY=true
--env HOST_AUTO_CONFIGURE_IPSEC=true
--env THINGPARK_SECURITY=TLS
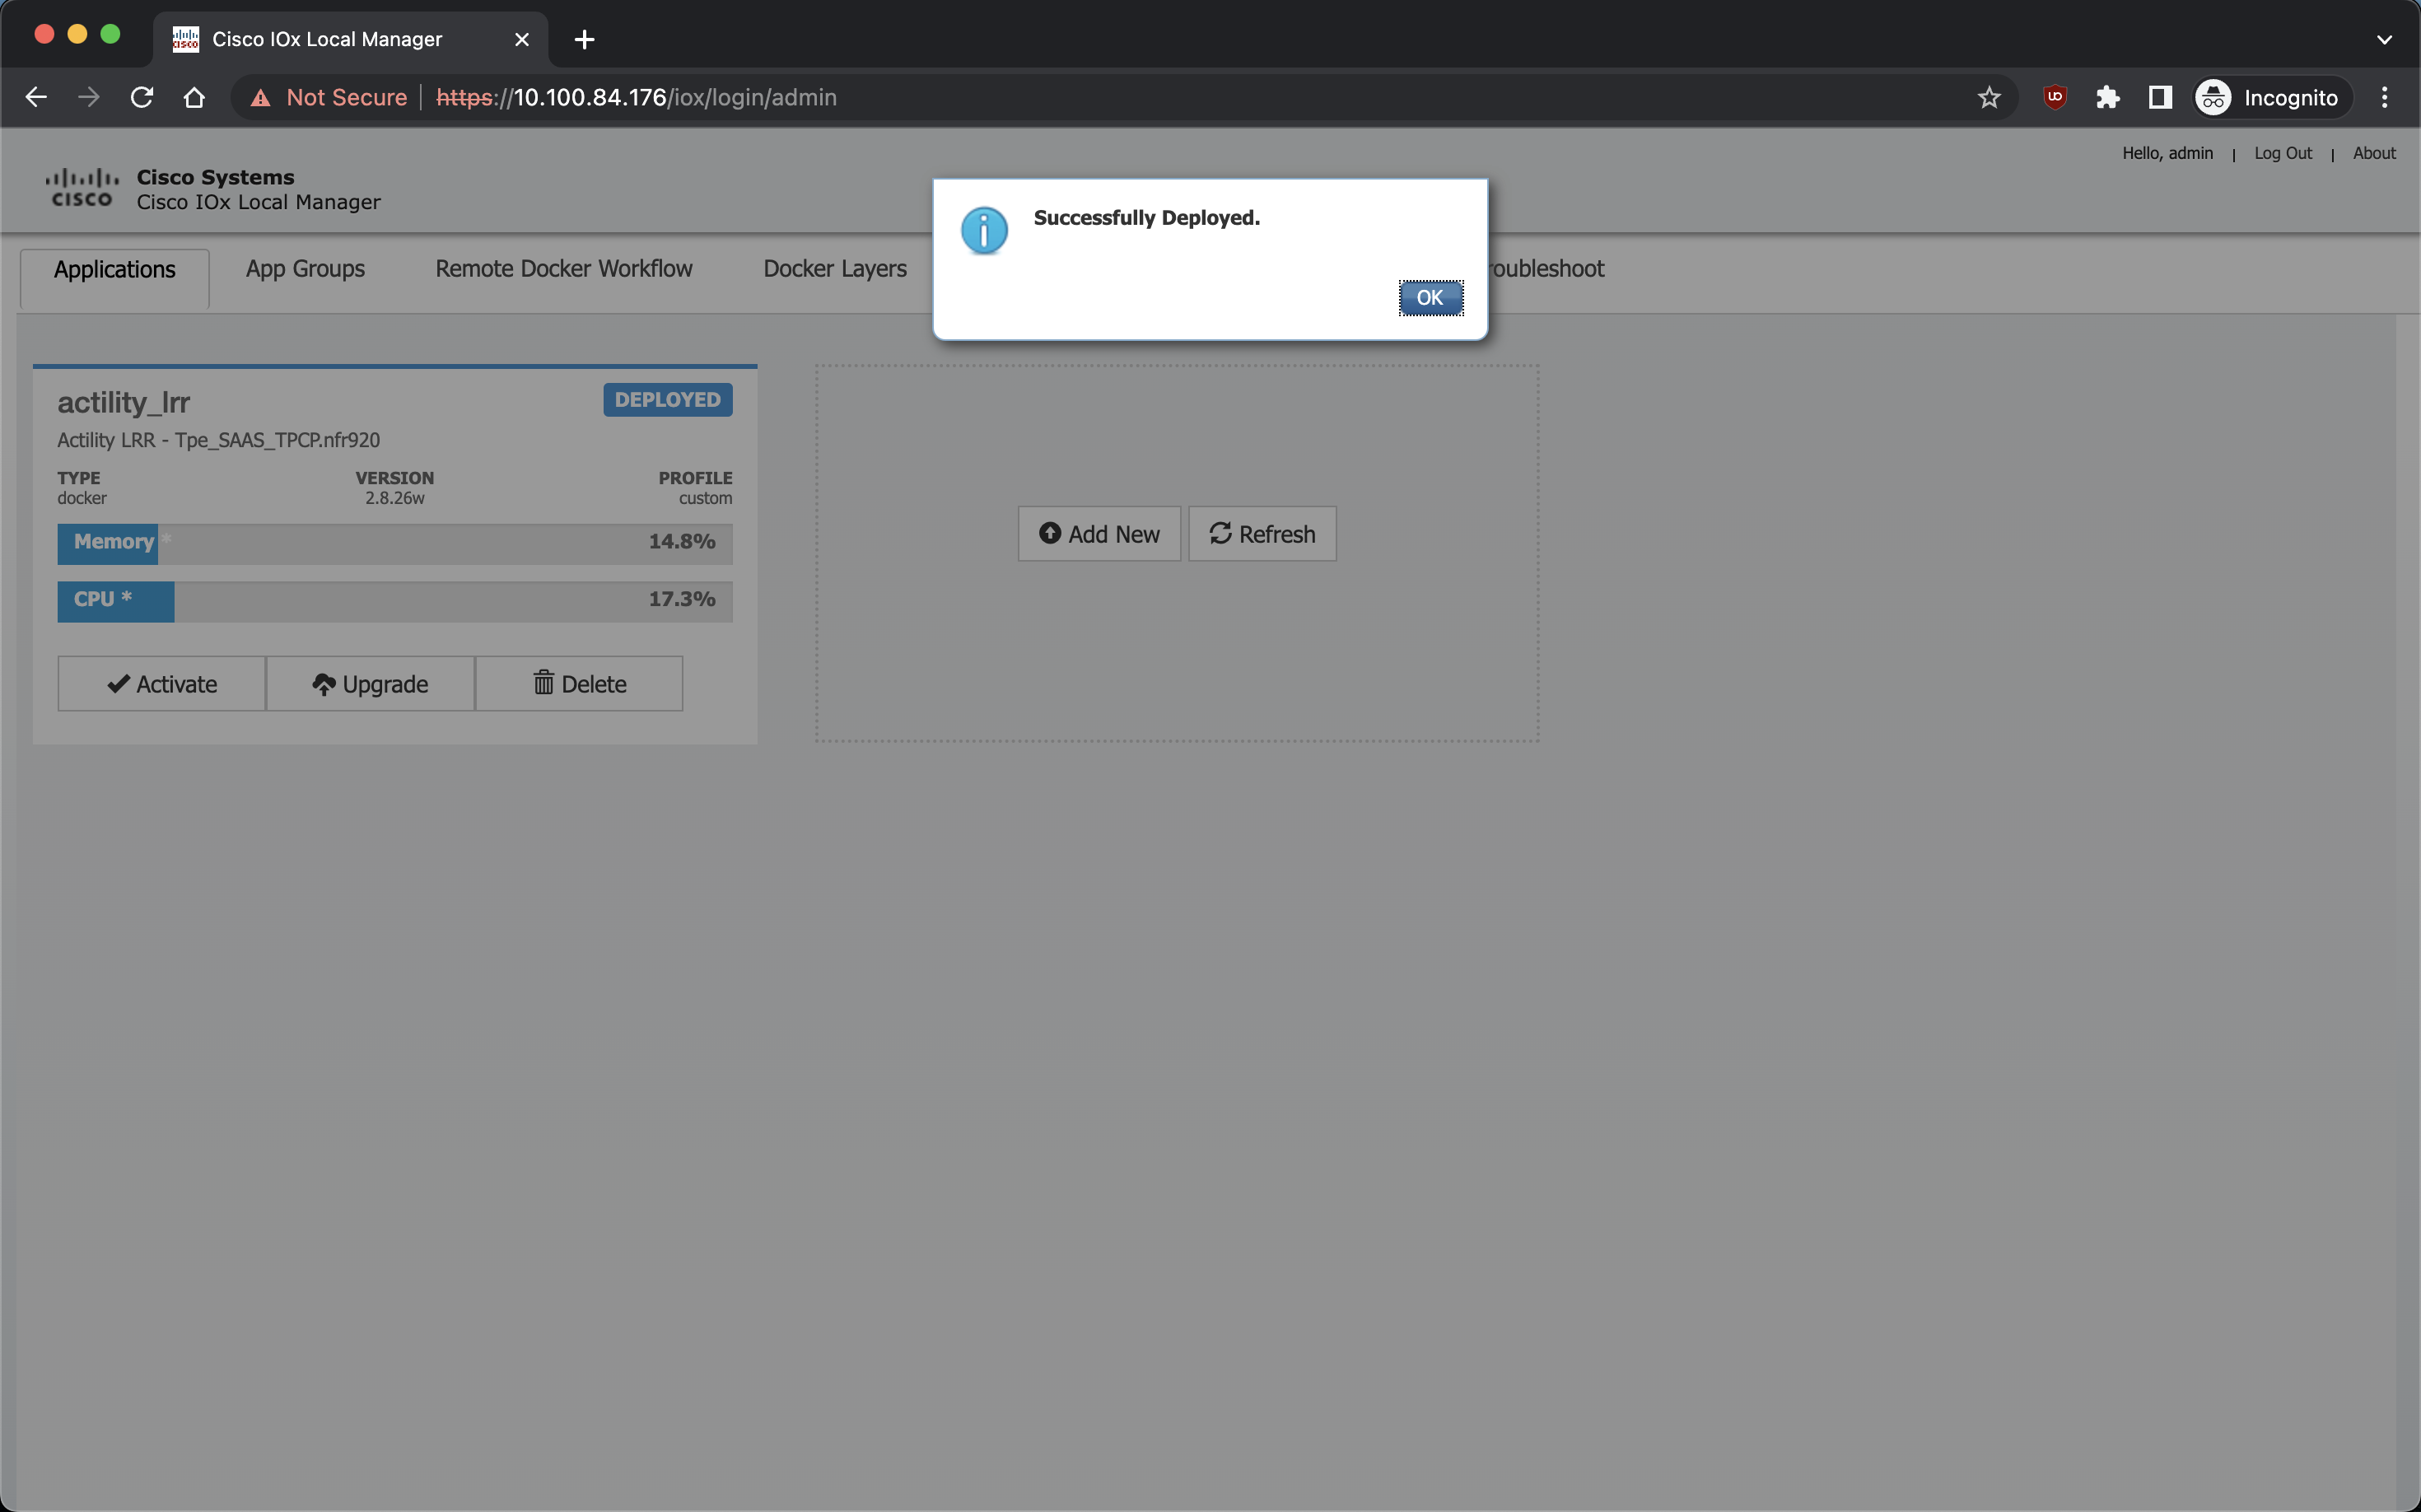
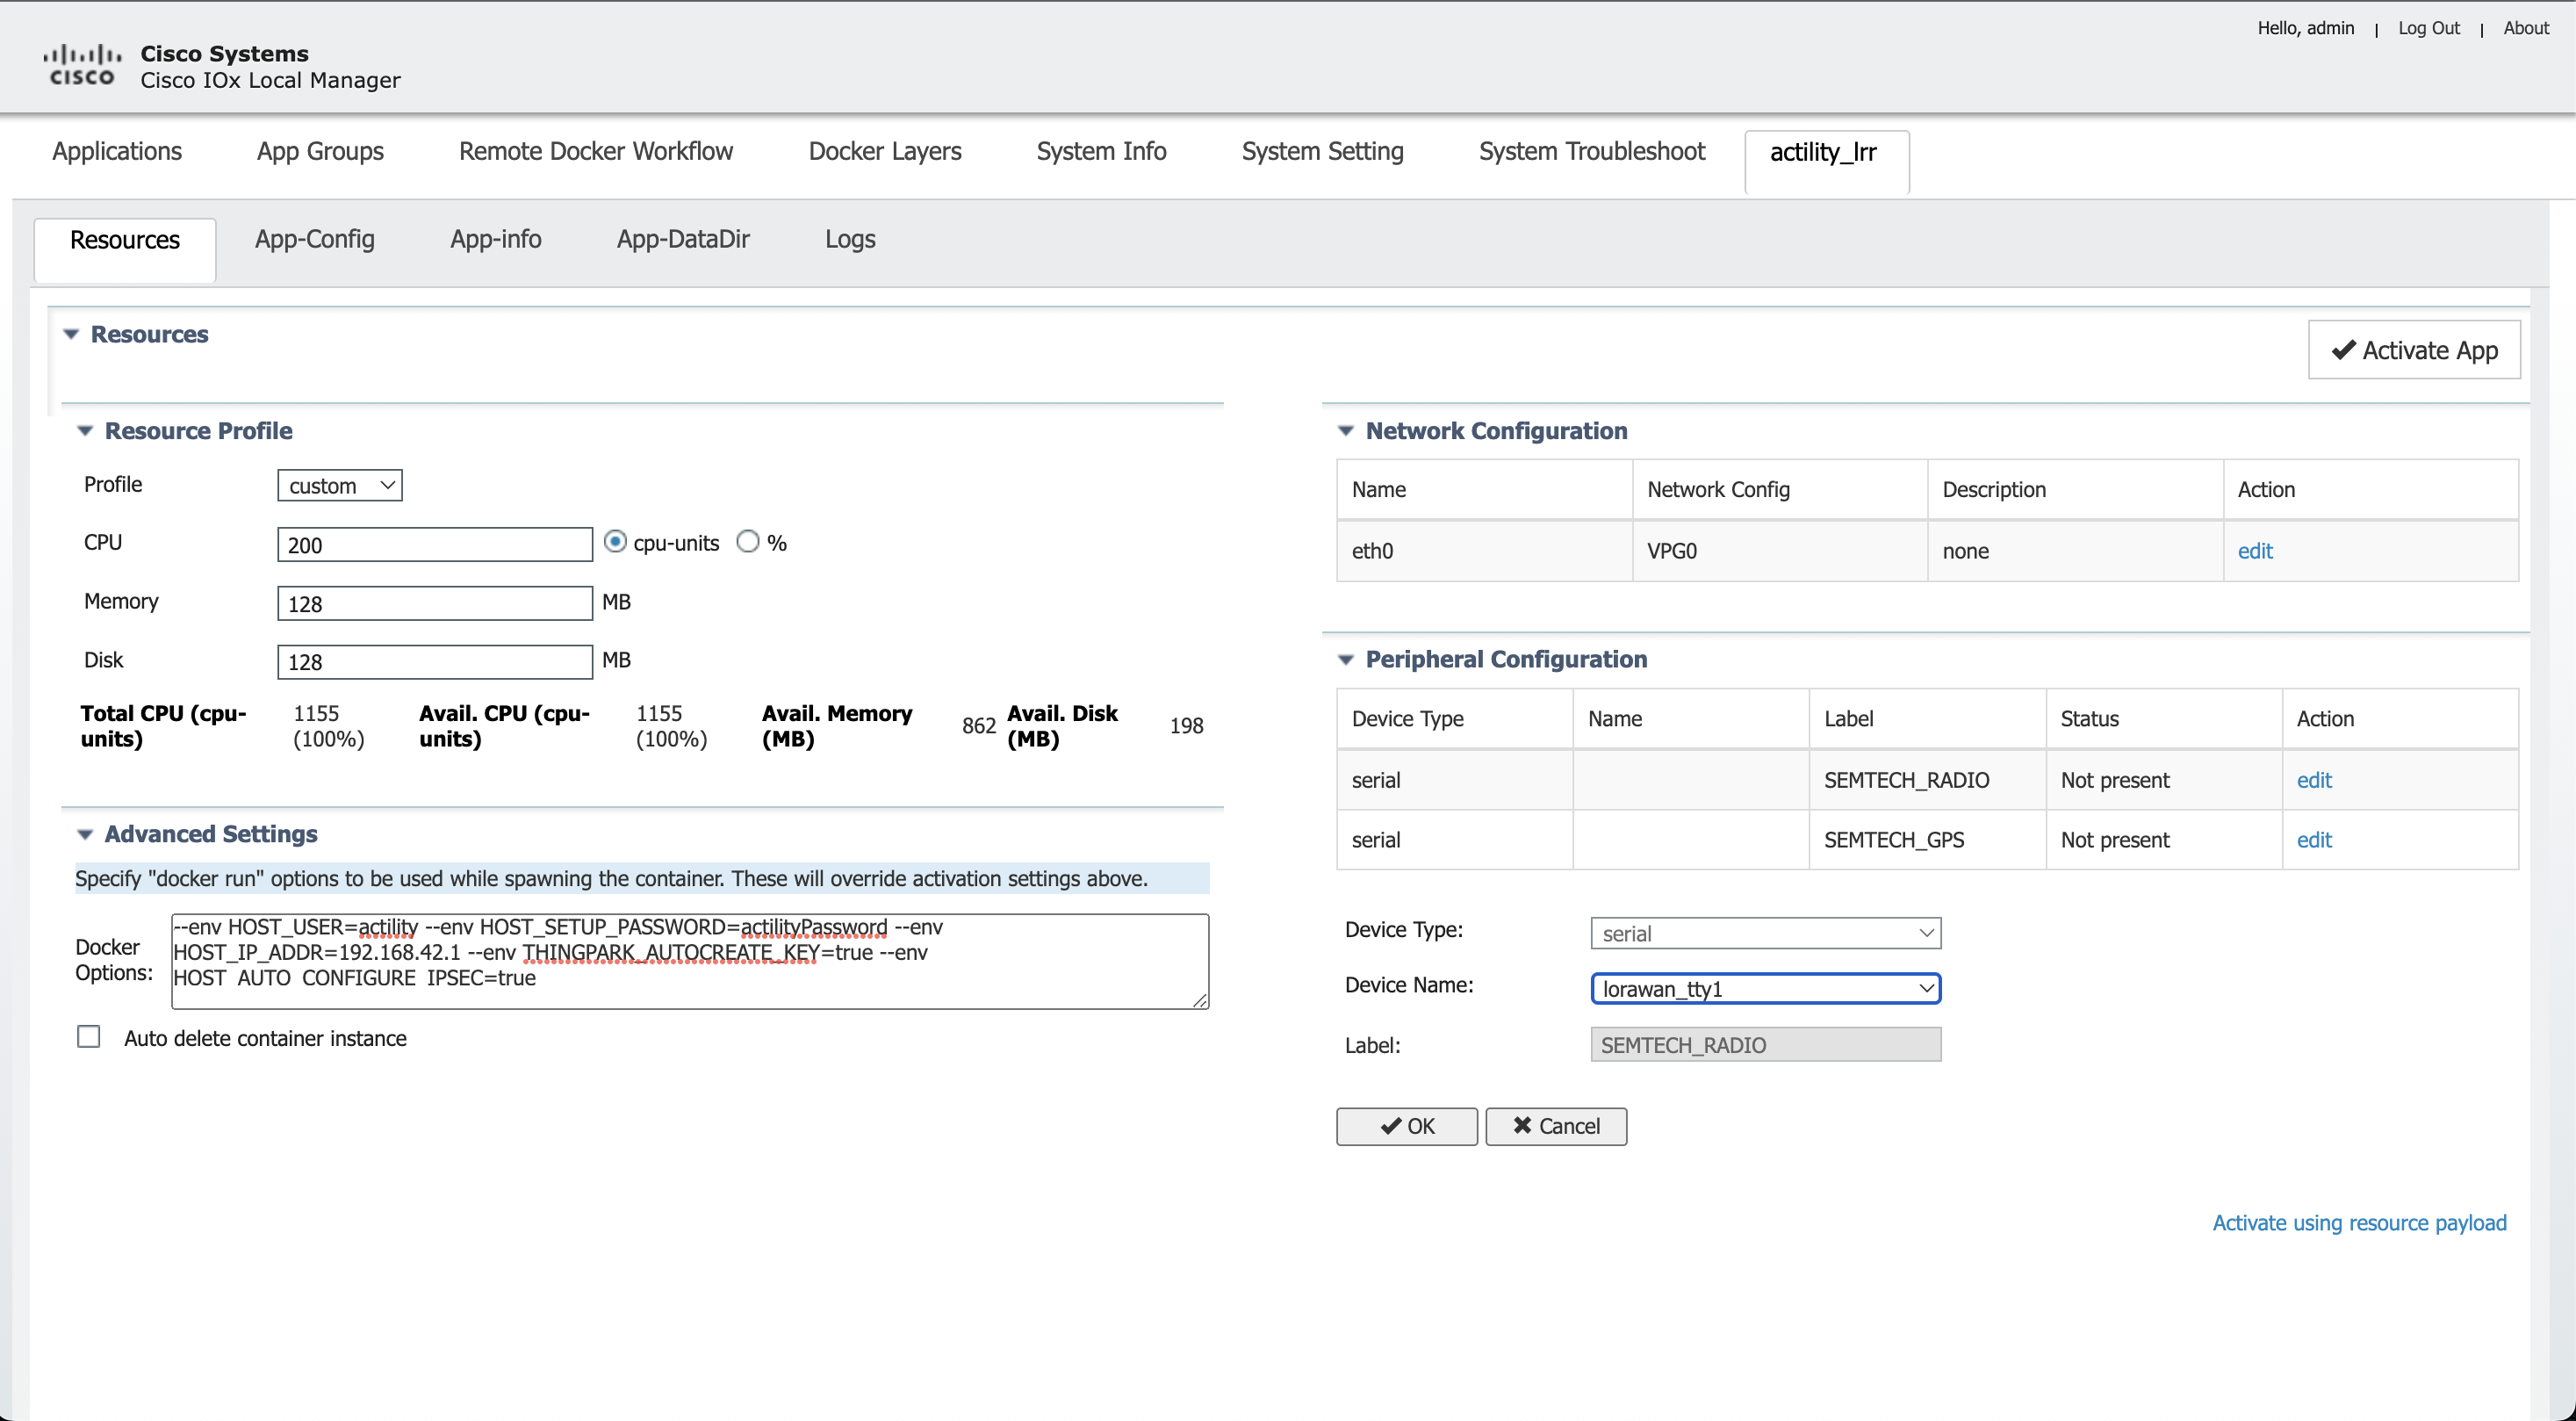
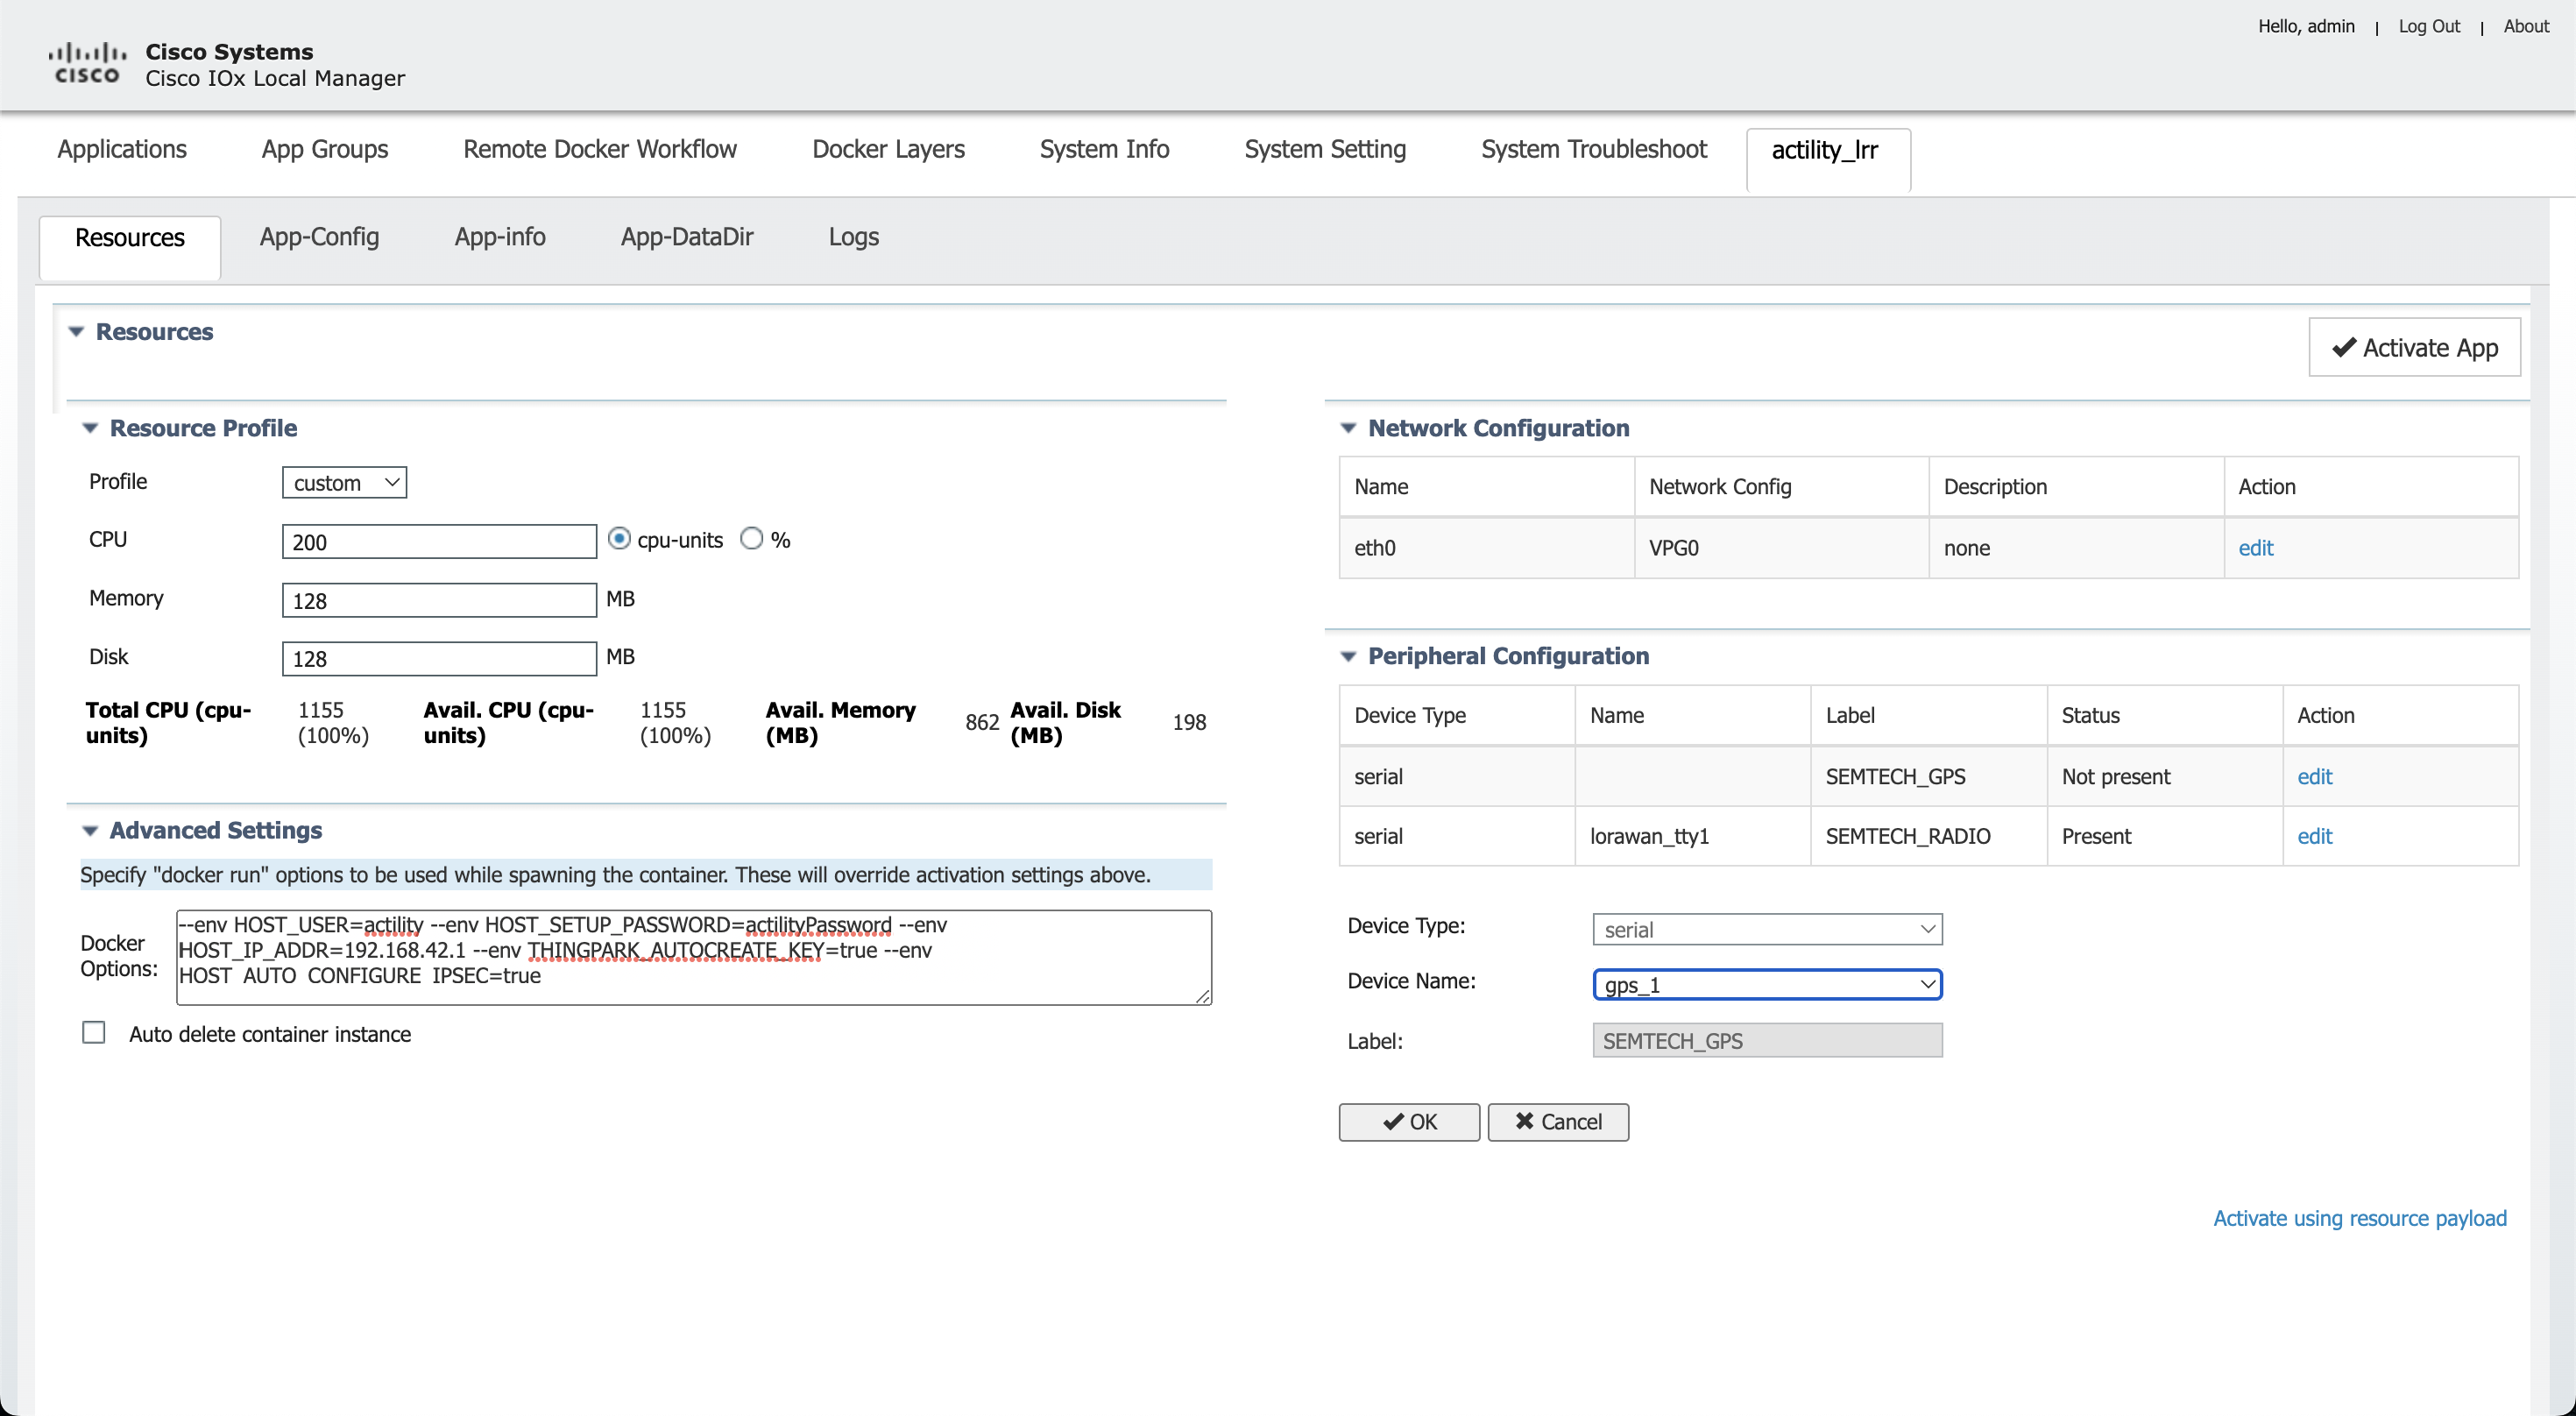
Ajoutez également le capteur SEMTECH_RADIO ainsi que le capteur SEMTECH_GPS (lorawan_tty1/gps_1 ou lorawan_tty3/gps_3).
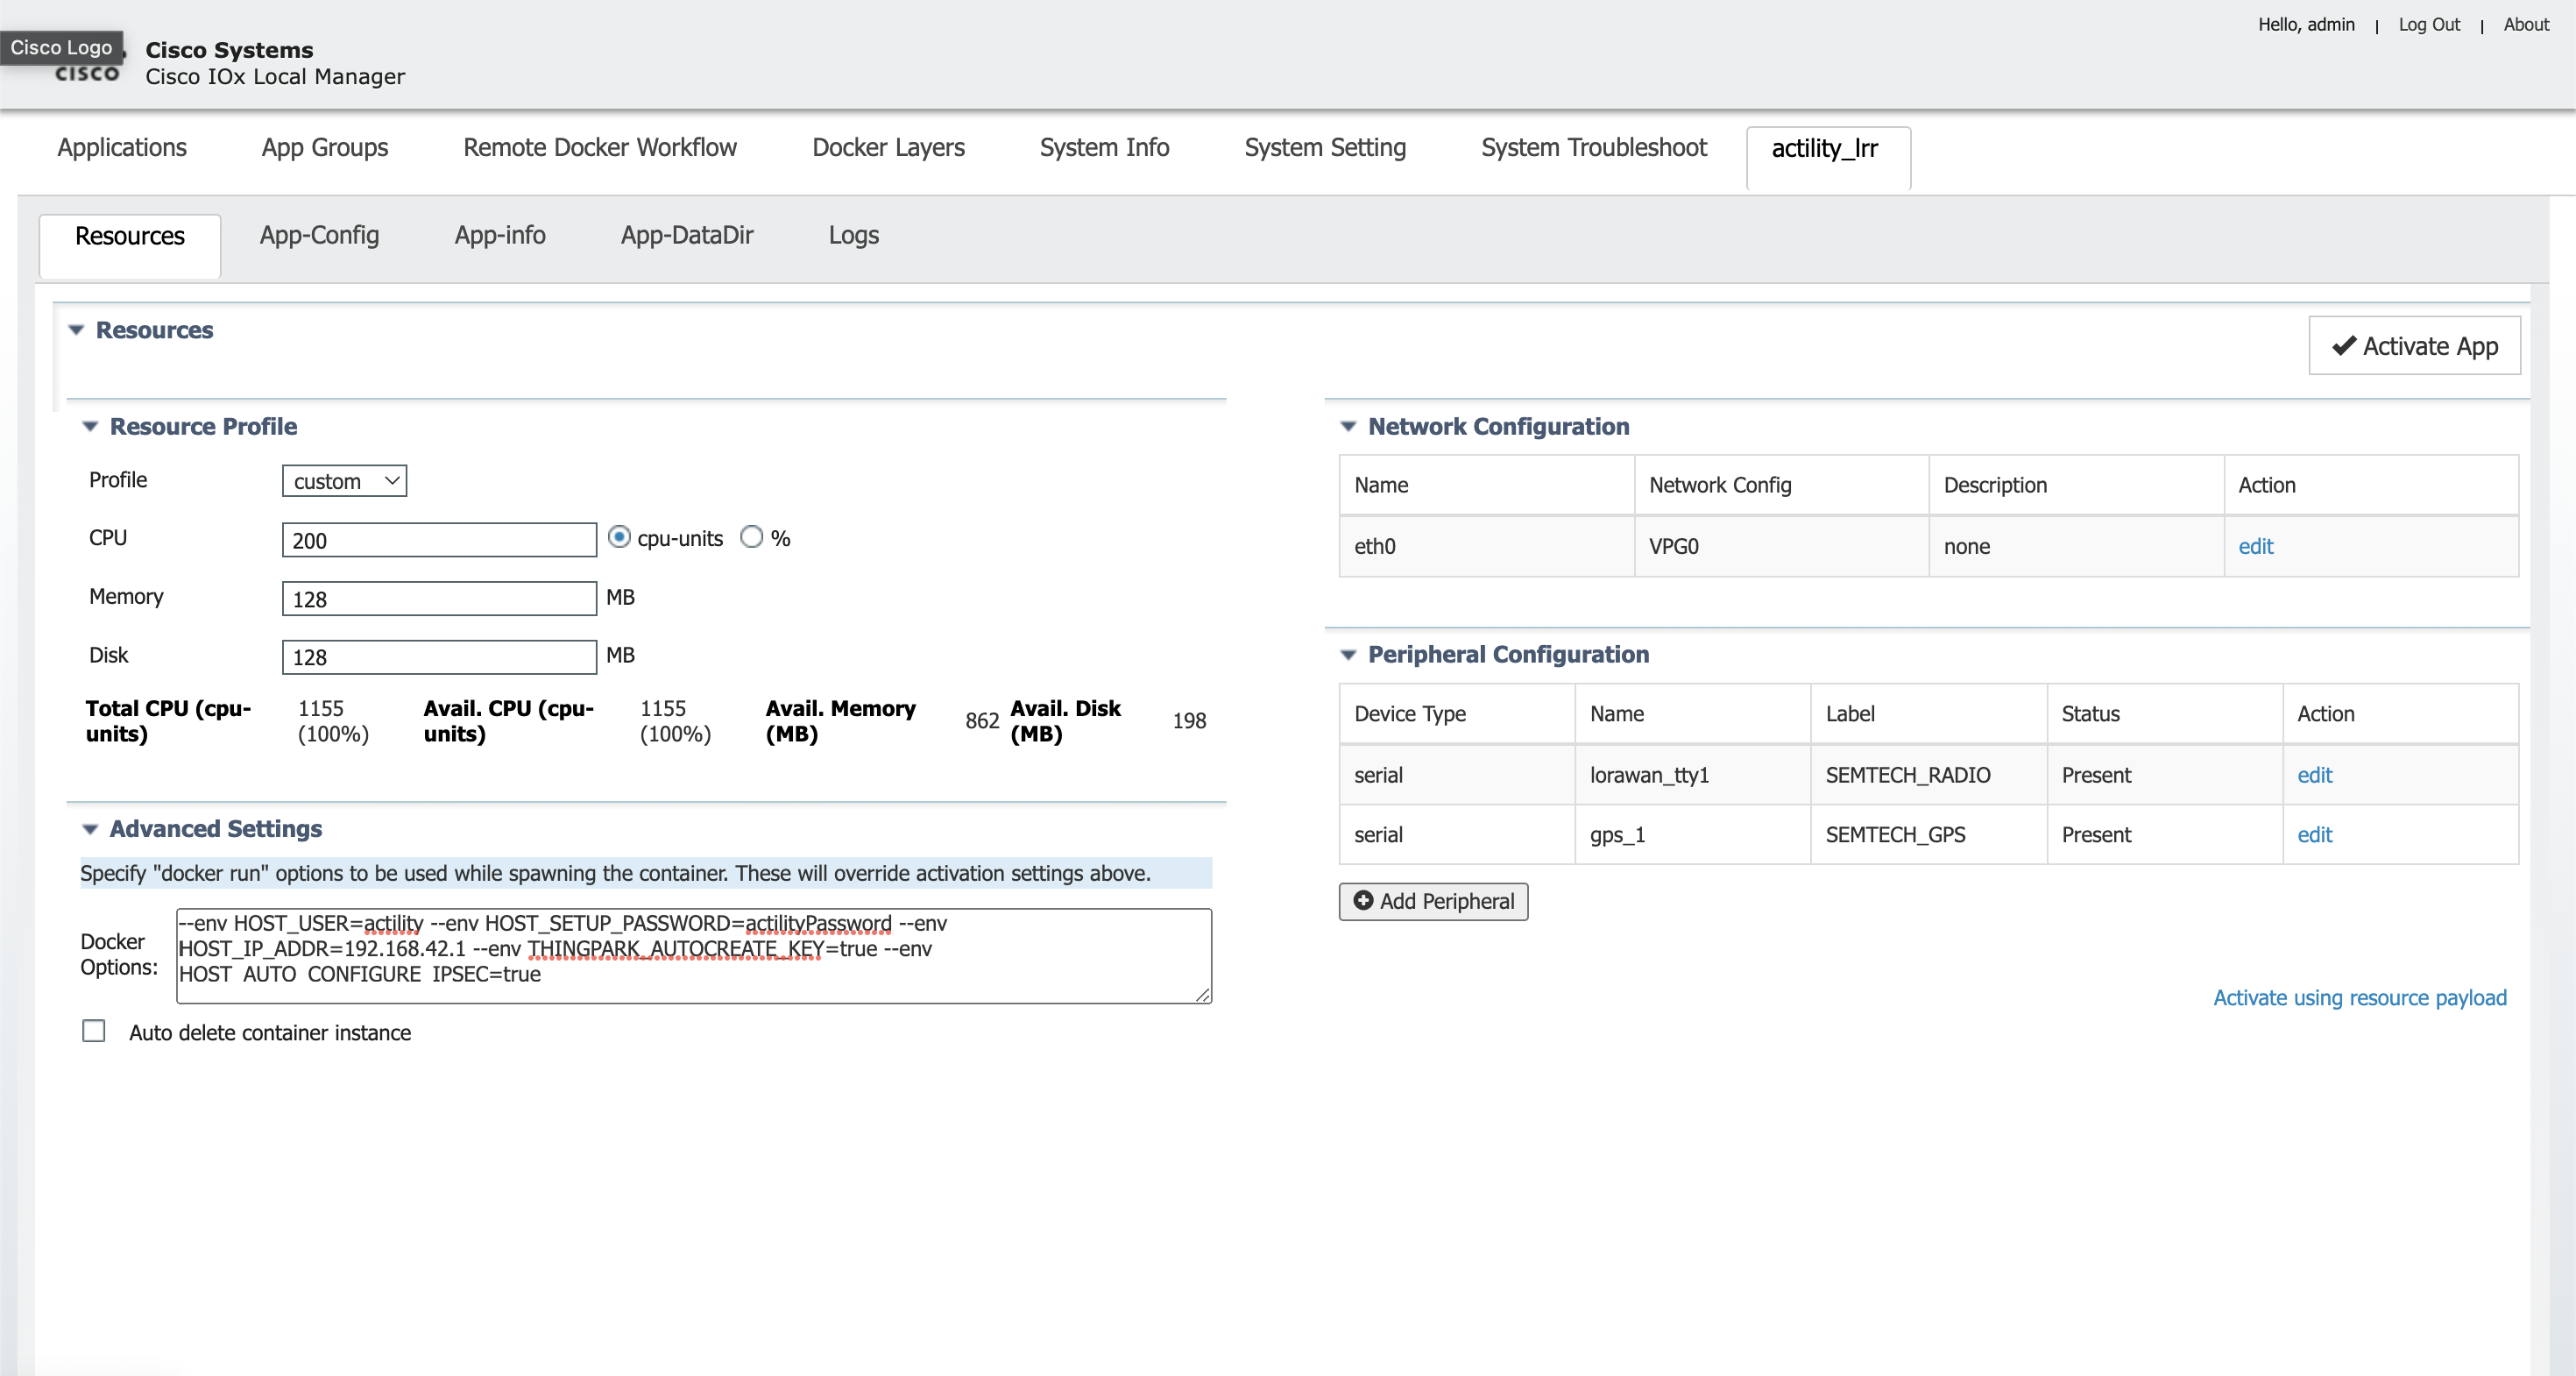
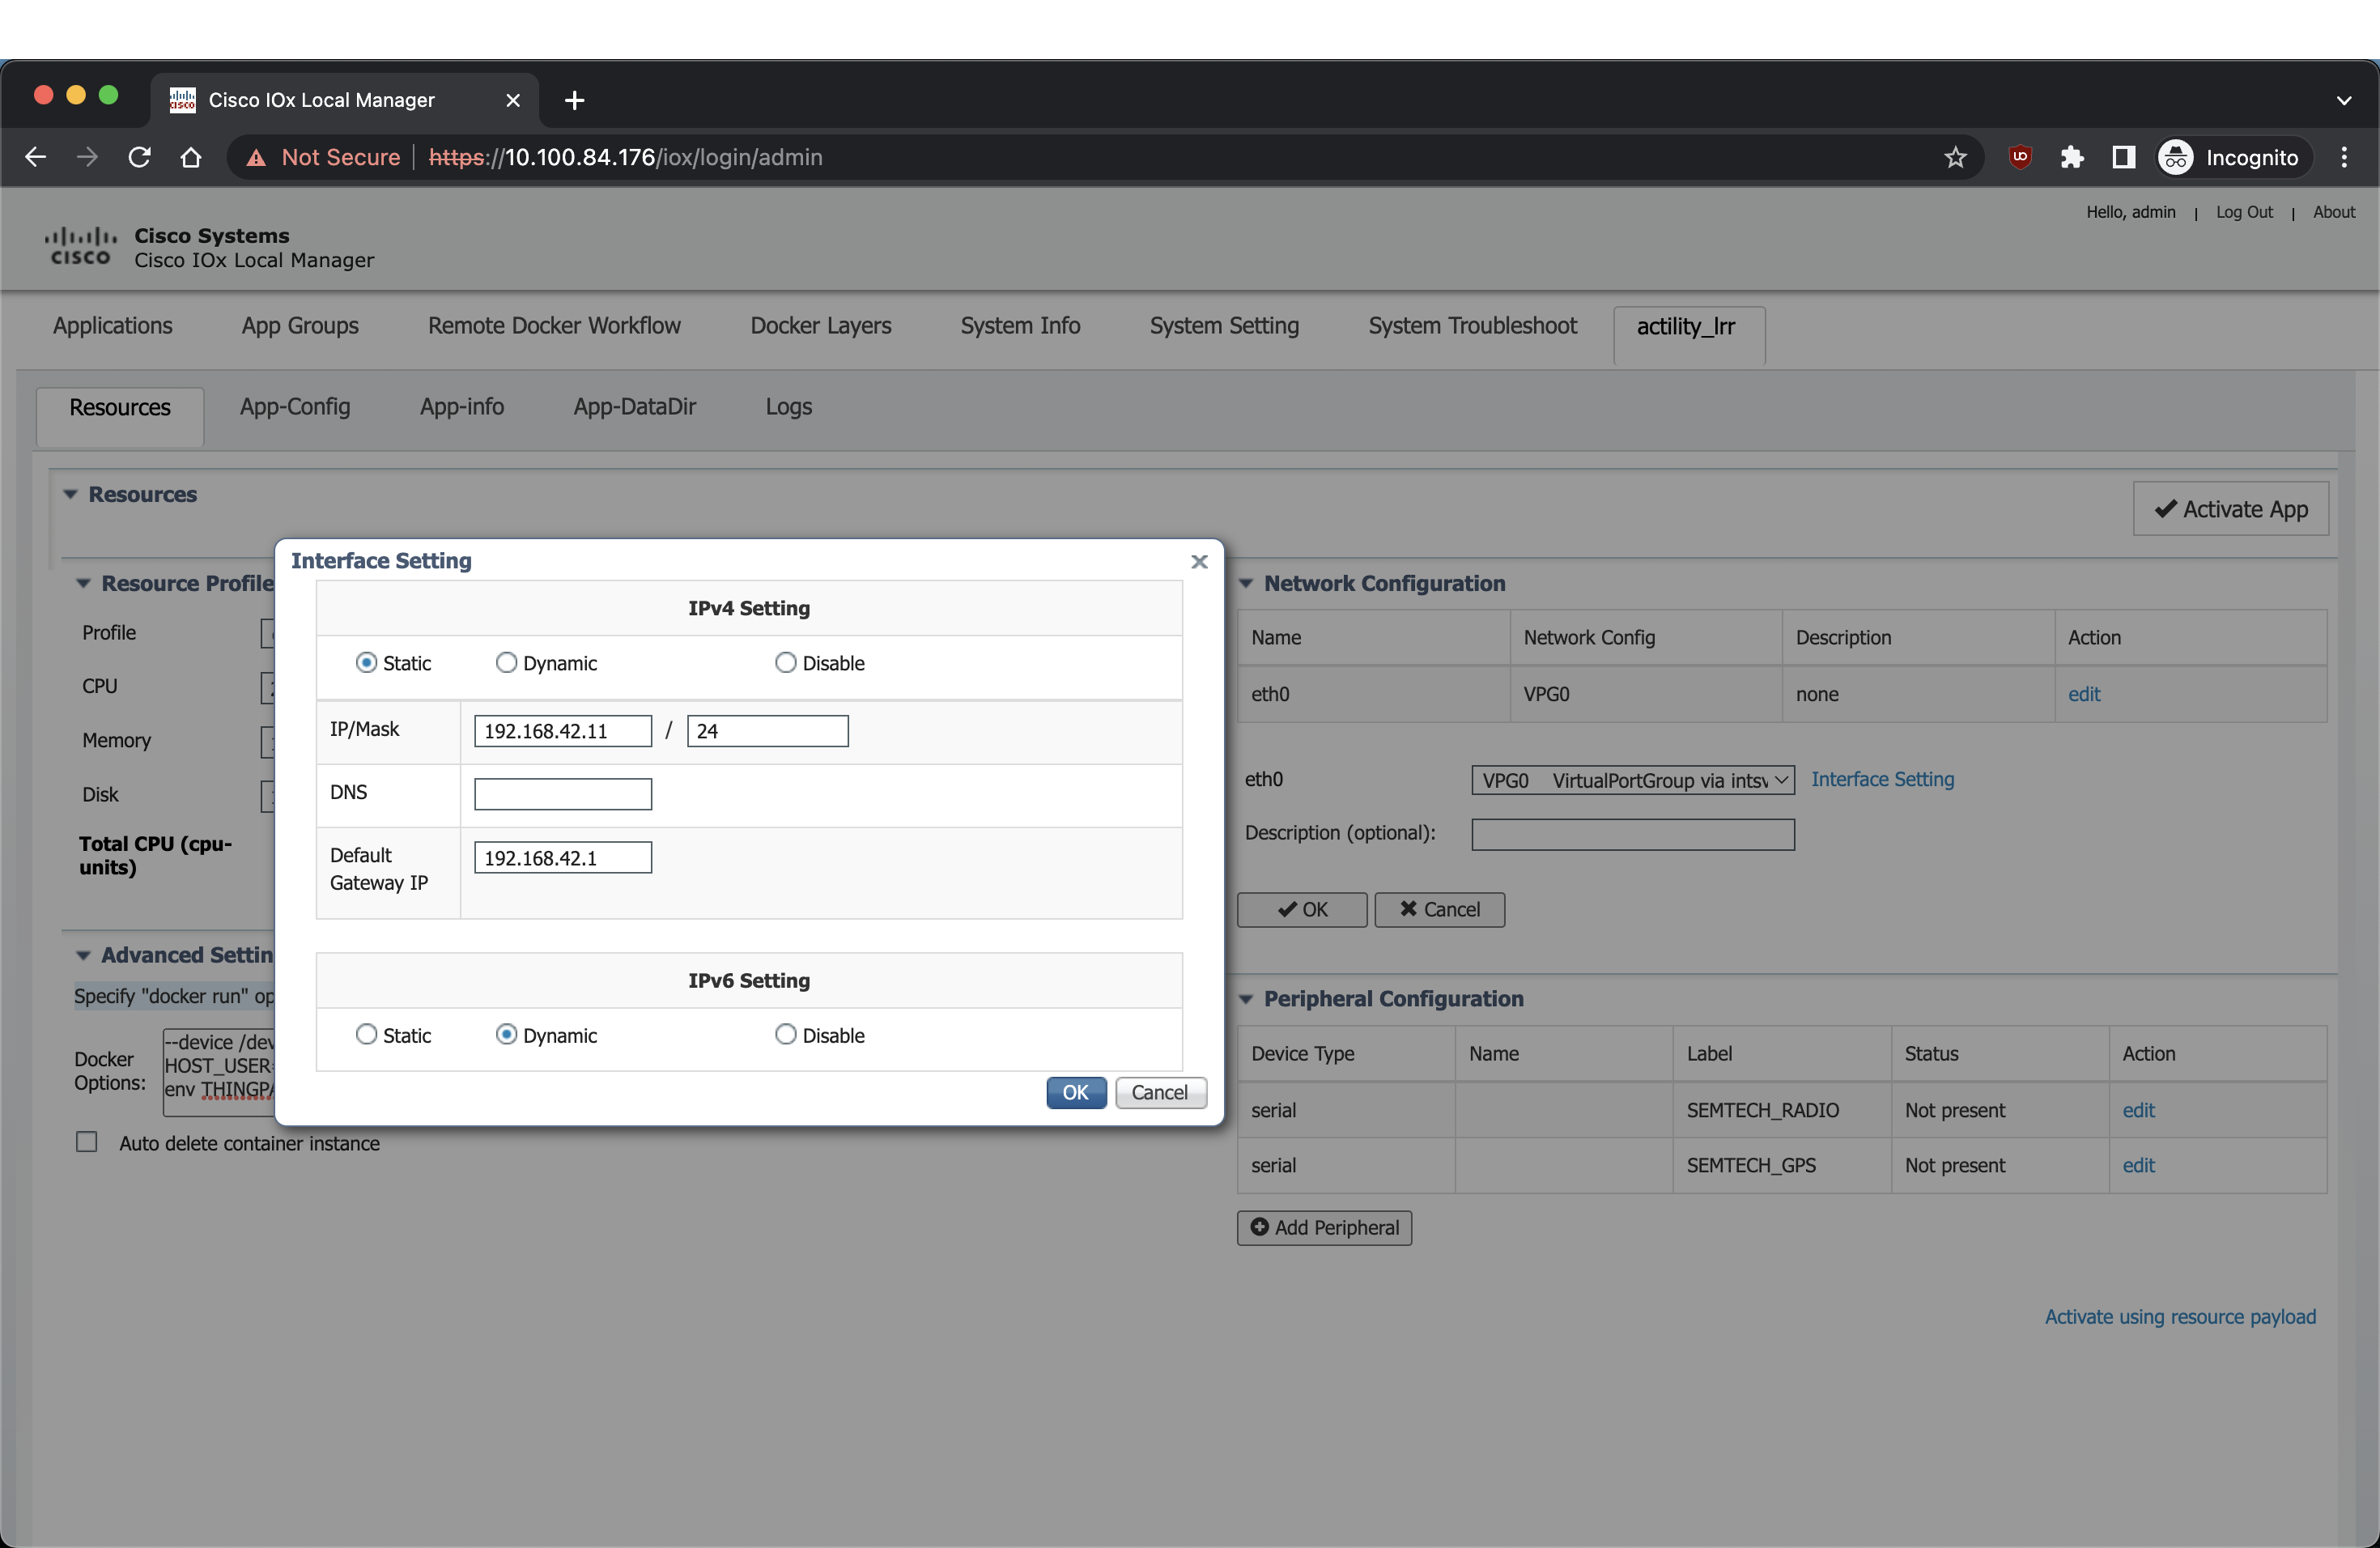
Vous devez maintenant ajouter les informations de paramètres d'interface corrects : l'adresse IP de l'application ainsi que l'IP de la passerelle par défaut (l'hôte).
Cliquez sur Configuration réseau, modifiez (eth0), Paramètre d'interface :
Utilisation de Cisco CLI
Suppression d'une ancienne application LRR :
app-hosting stop appid actility_lrr
app-hosting deactivate appid actility_lrr
app-hosting uninstall appid actility_lrr
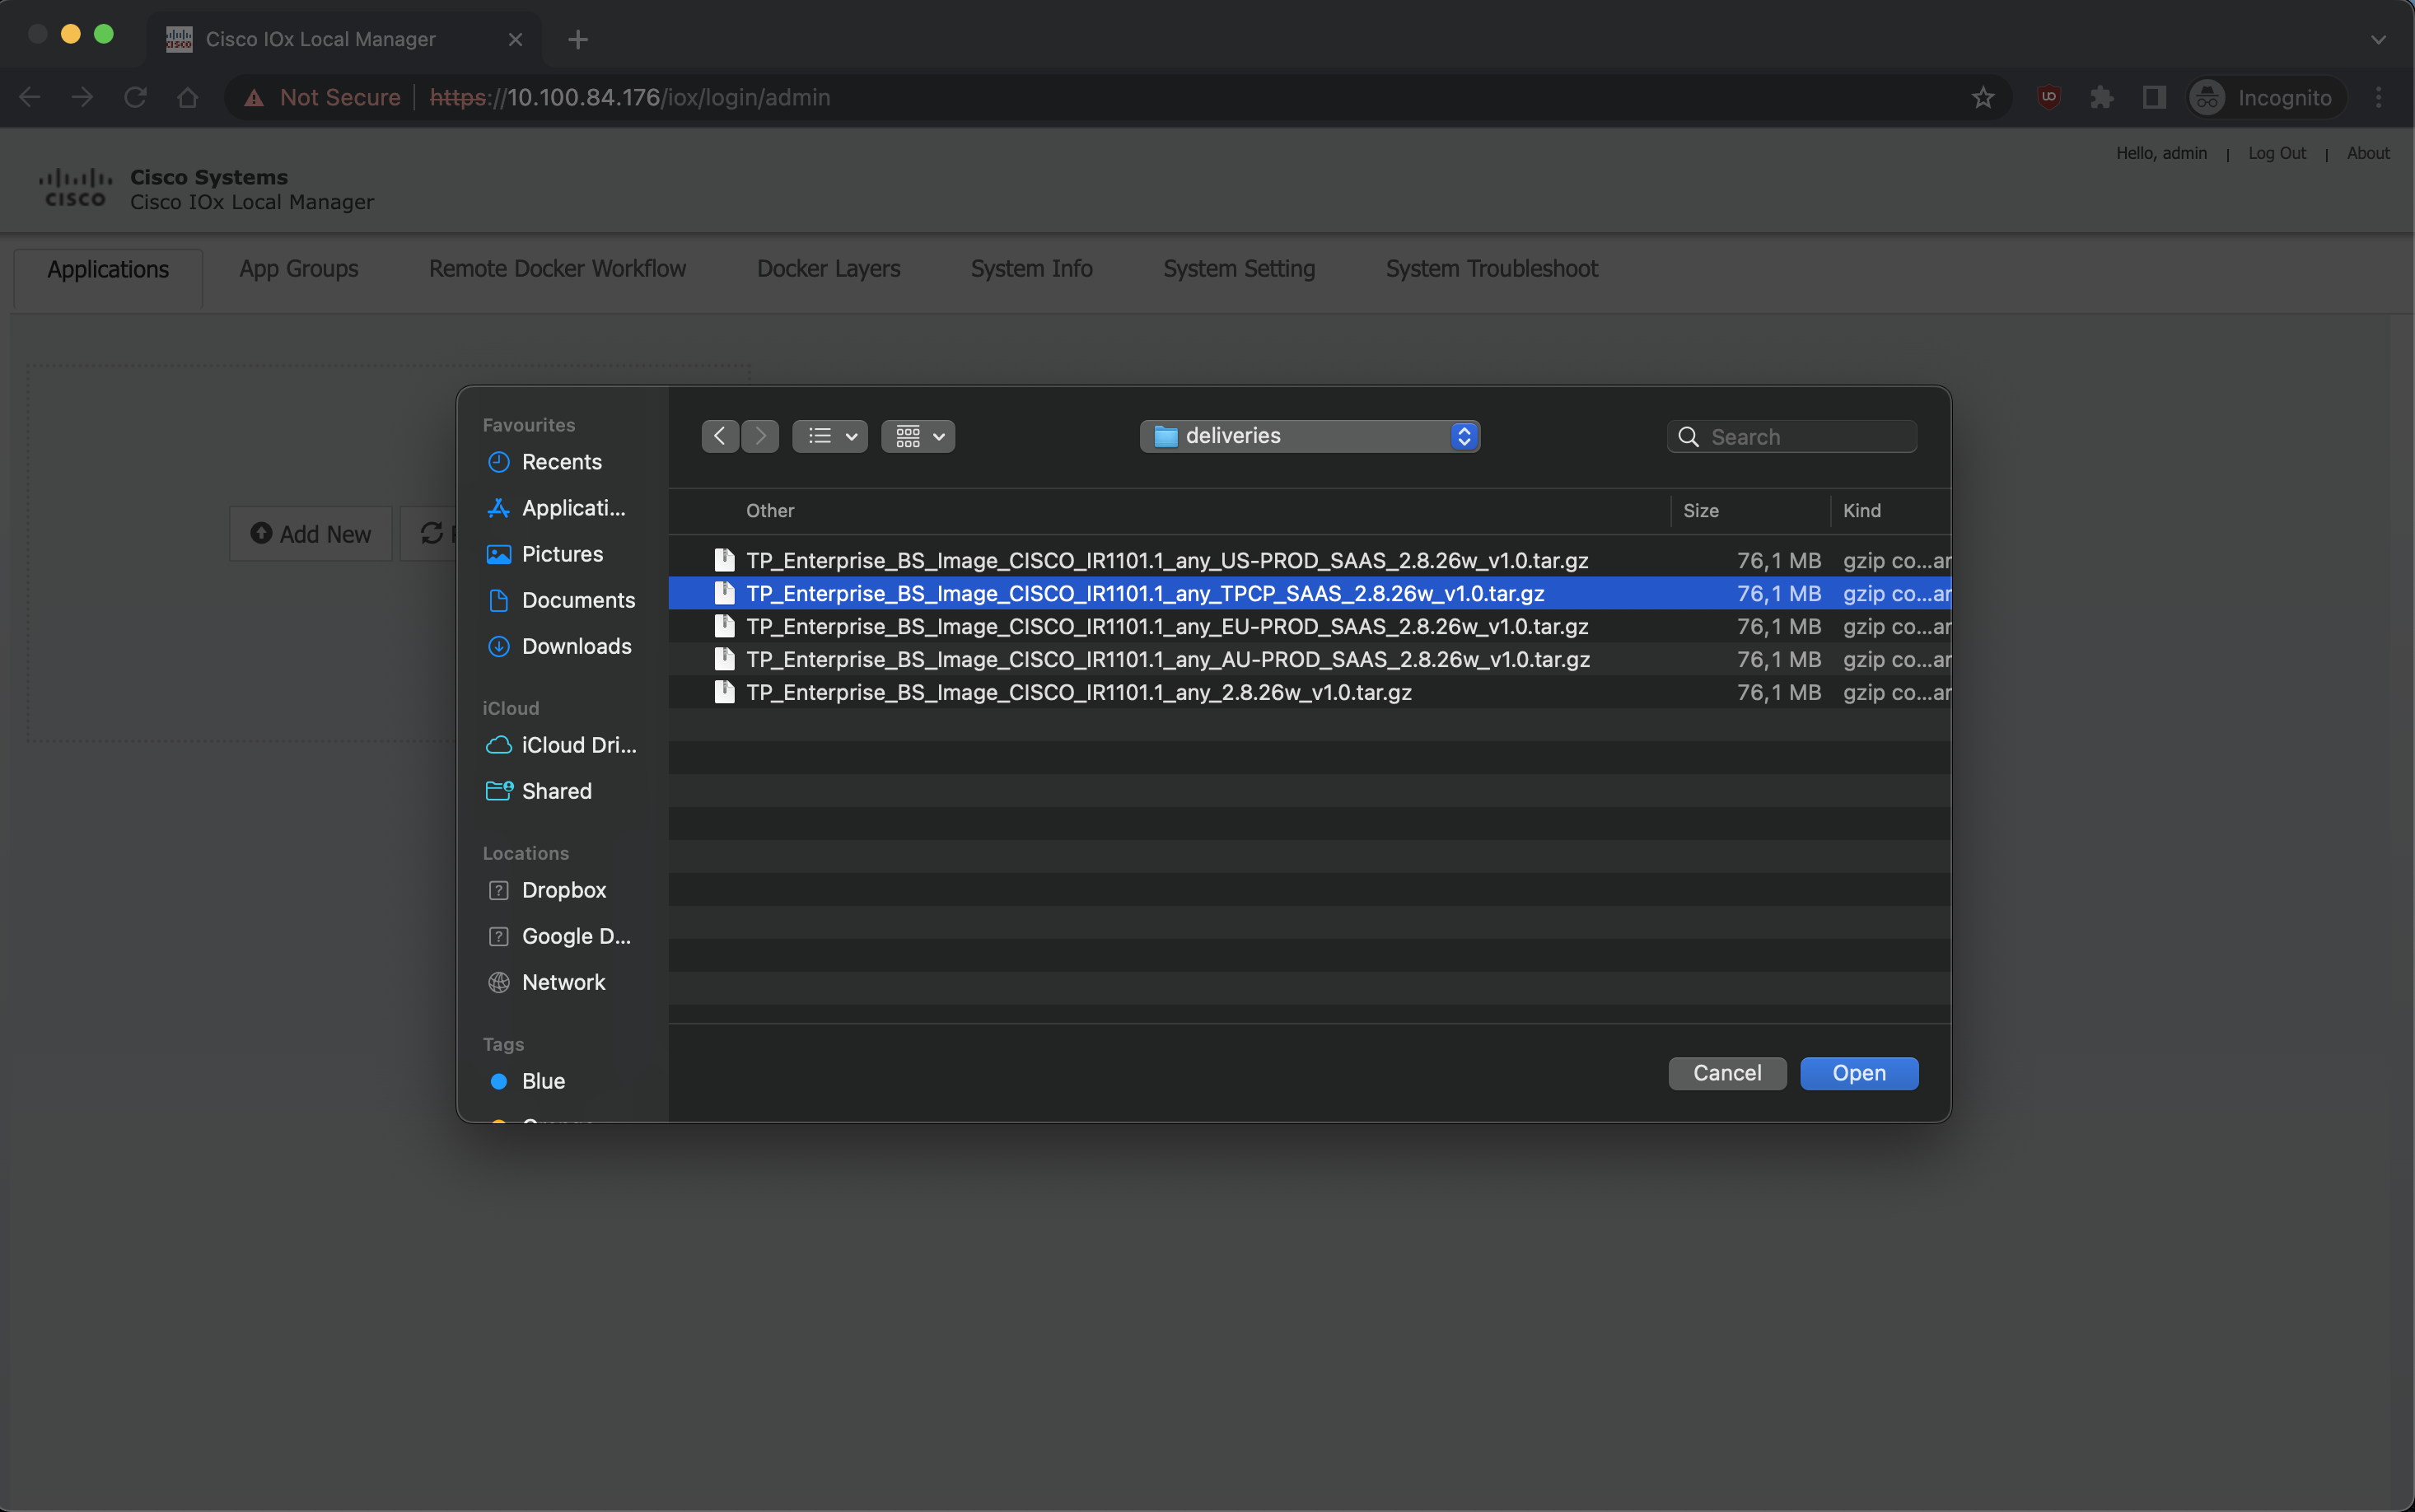
Installation d'une nouvelle application LRR :
copy scp: bootflash:
<remote IP where the .tar.gz is located, eg: 10.100.84.1>
<user, eg: actility>
<location of .bin file, eg: /Users/actility/ciscoiox_pim/TP_Enterprise_BS_Image_CISCO_IR1101.1_any_TPCP_SAAS_2.8.26_v1.0.tar.gz>
<password, eg: password>

app-hosting install appid actility_lrr package bootflash:TP_Enterprise_BS_Image_CISCO_IR1101.1_any_TPCP_SAAS_2.8.26_v1.0.tar.gz
# Installing package 'bootflash:TP_Enterprise_BS_Image_CISCO_IR1101.1_any_TPCP_SAAS_2.8.26_v1.0.tar.gz' for 'actility_lrr'. Use 'show app-hosting list' for progress.

configure terminal
app-hosting appid actility_lrr
app-vnic gateway0 virtualportgroup 0 guest-interface 0
guest-ipaddress 192.168.42.11 netmask 255.255.255.0
exit

app-default-gateway 192.168.42.1 guest-interface 0

app-resource docker
run-opts 1 "--device /dev/lorawan_tty1:/dev/lorawan_tty1"
run-opts 2 "--device /dev/lorawan_gps1:/dev/lorawan_gps1"
run-opts 3 "--env HOST_IP_ADDR=192.168.42.1"
run-opts 4 "--env HOST_USER=actility"
run-opts 5 "--env HOST_SETUP_PASSWORD=actilityPassword"
run-opts 6 "--env THINGPARK_AUTOCREATE_KEY=true"
run-opts 7 "--env HOST_AUTO_CONFIGURE_IPSEC=true"
run-opts 8 "--env THINGPARK_SECURITY=TLS"
exit

exit
exit

app-hosting activate appid actility_lrr
app-hosting start appid actility_lrr
Configuration TPE
Pour ajouter votre passerelle, vous pouvez soit vous connecter à la passerelle pour créer et copier la clé ssh, soit utiliser le WebUI et télécharger le fichier ThingPark.txt qui contient le LRR-UUID et la clé.pub à ajouter à votre ThingPark.
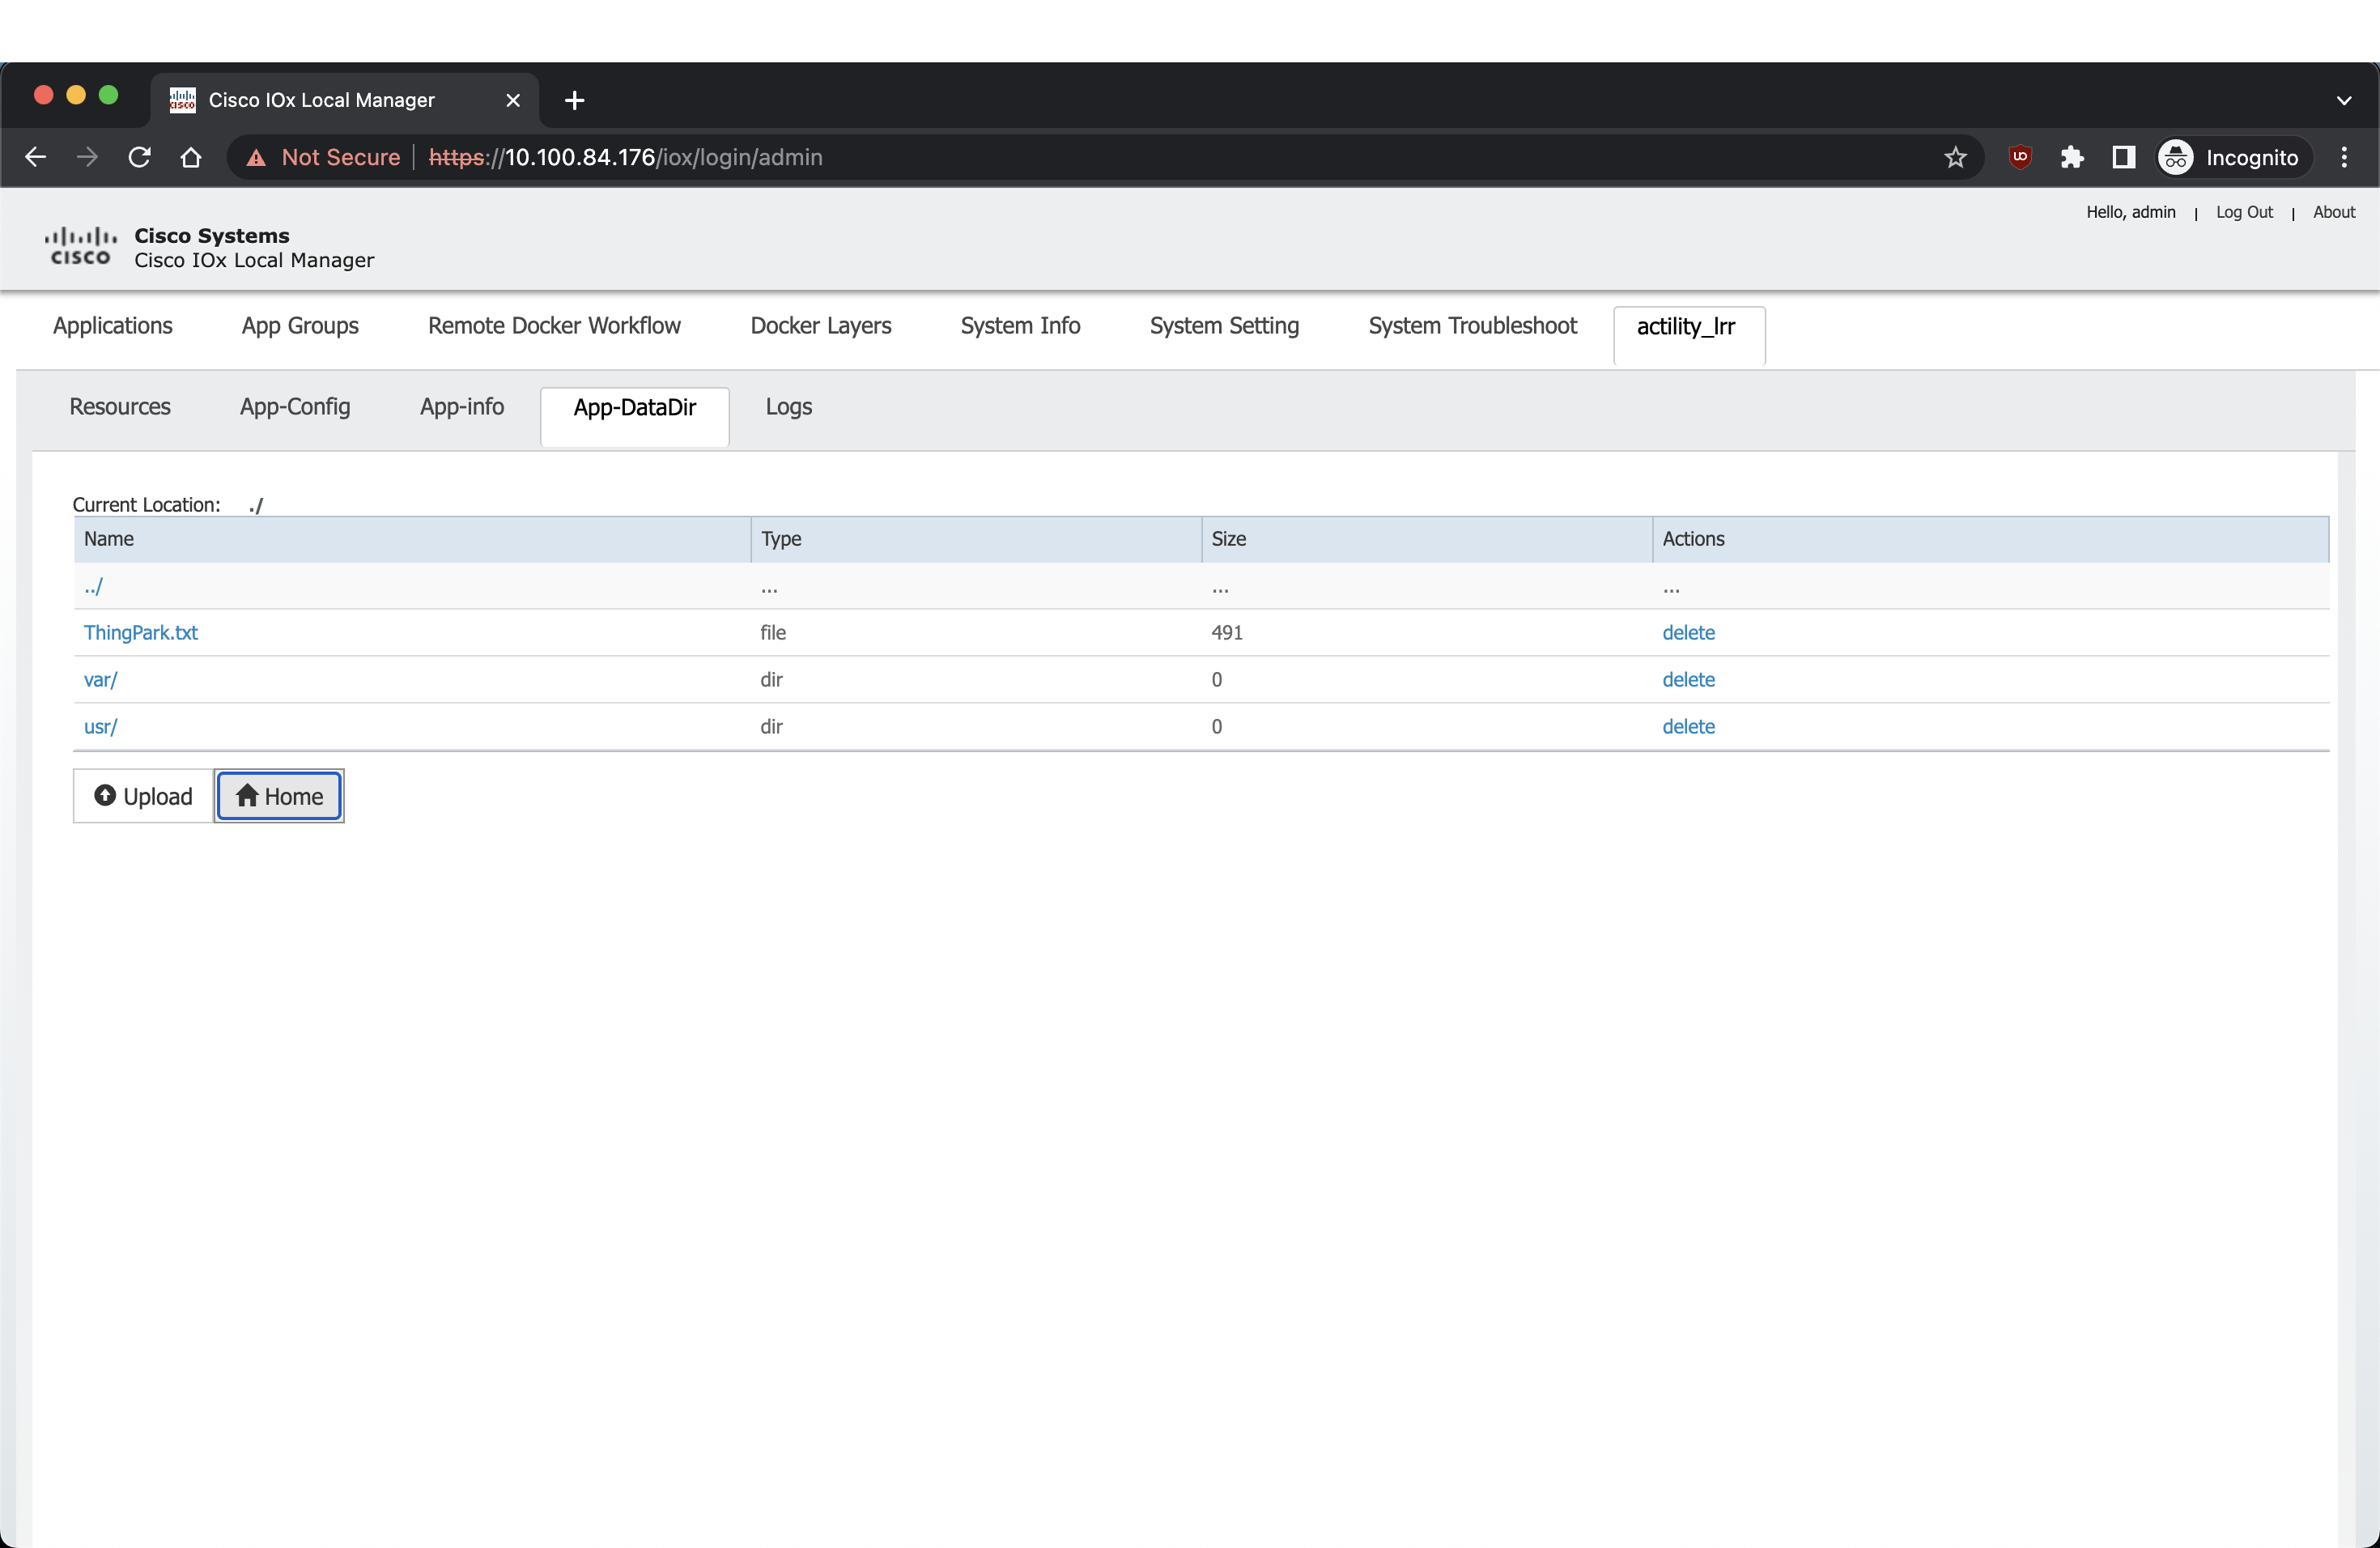

Le CLI de Cisco peut également être utilisé pour obtenir le LRR-UUID et la clé.pub :
lrriox1#more ThingPark.txt
LRR-UUID: 005F86-024B067AFB76B
key.pub:
-----BEGIN PUBLIC KEY-----
MIIBIjANBgkqhkiG9w0BAQEFAAOCAQ8AMIIBCgKCAQEA2BBc/Do7DiZt0gC2S+YA
04JsNF1r0Hc0kbDXAQlEdtF+Cn48m6pZ/7oRpfElFWnJXq4NTVvYMg1t2liI5t7A
pBvNT6TfP9r8QDNh1flp1Pp90QtLq7/Zmc4vM7uUSqHtxaCnjjKe1VpAd4cab1Vb
qJZ08YJqDcWxV49GW6iIRCmWV92NzwwqPeRd1oB2Od9mQTLkBdAlDqZCpyXNsI7q
dnKQ+m8a7OO8ow6CPWlCbpPUR6Z/842PPRtoE21im77gIuOafUIgvx5KcPmEQkin
eqYVi20OzD+xSQZ95ryNTOrJZvCxX8qSg0vqHXfBGWifKzbdw0+YUil2tbjO9vXU
BQIDAQAB
-----END PUBLIC KEY-----
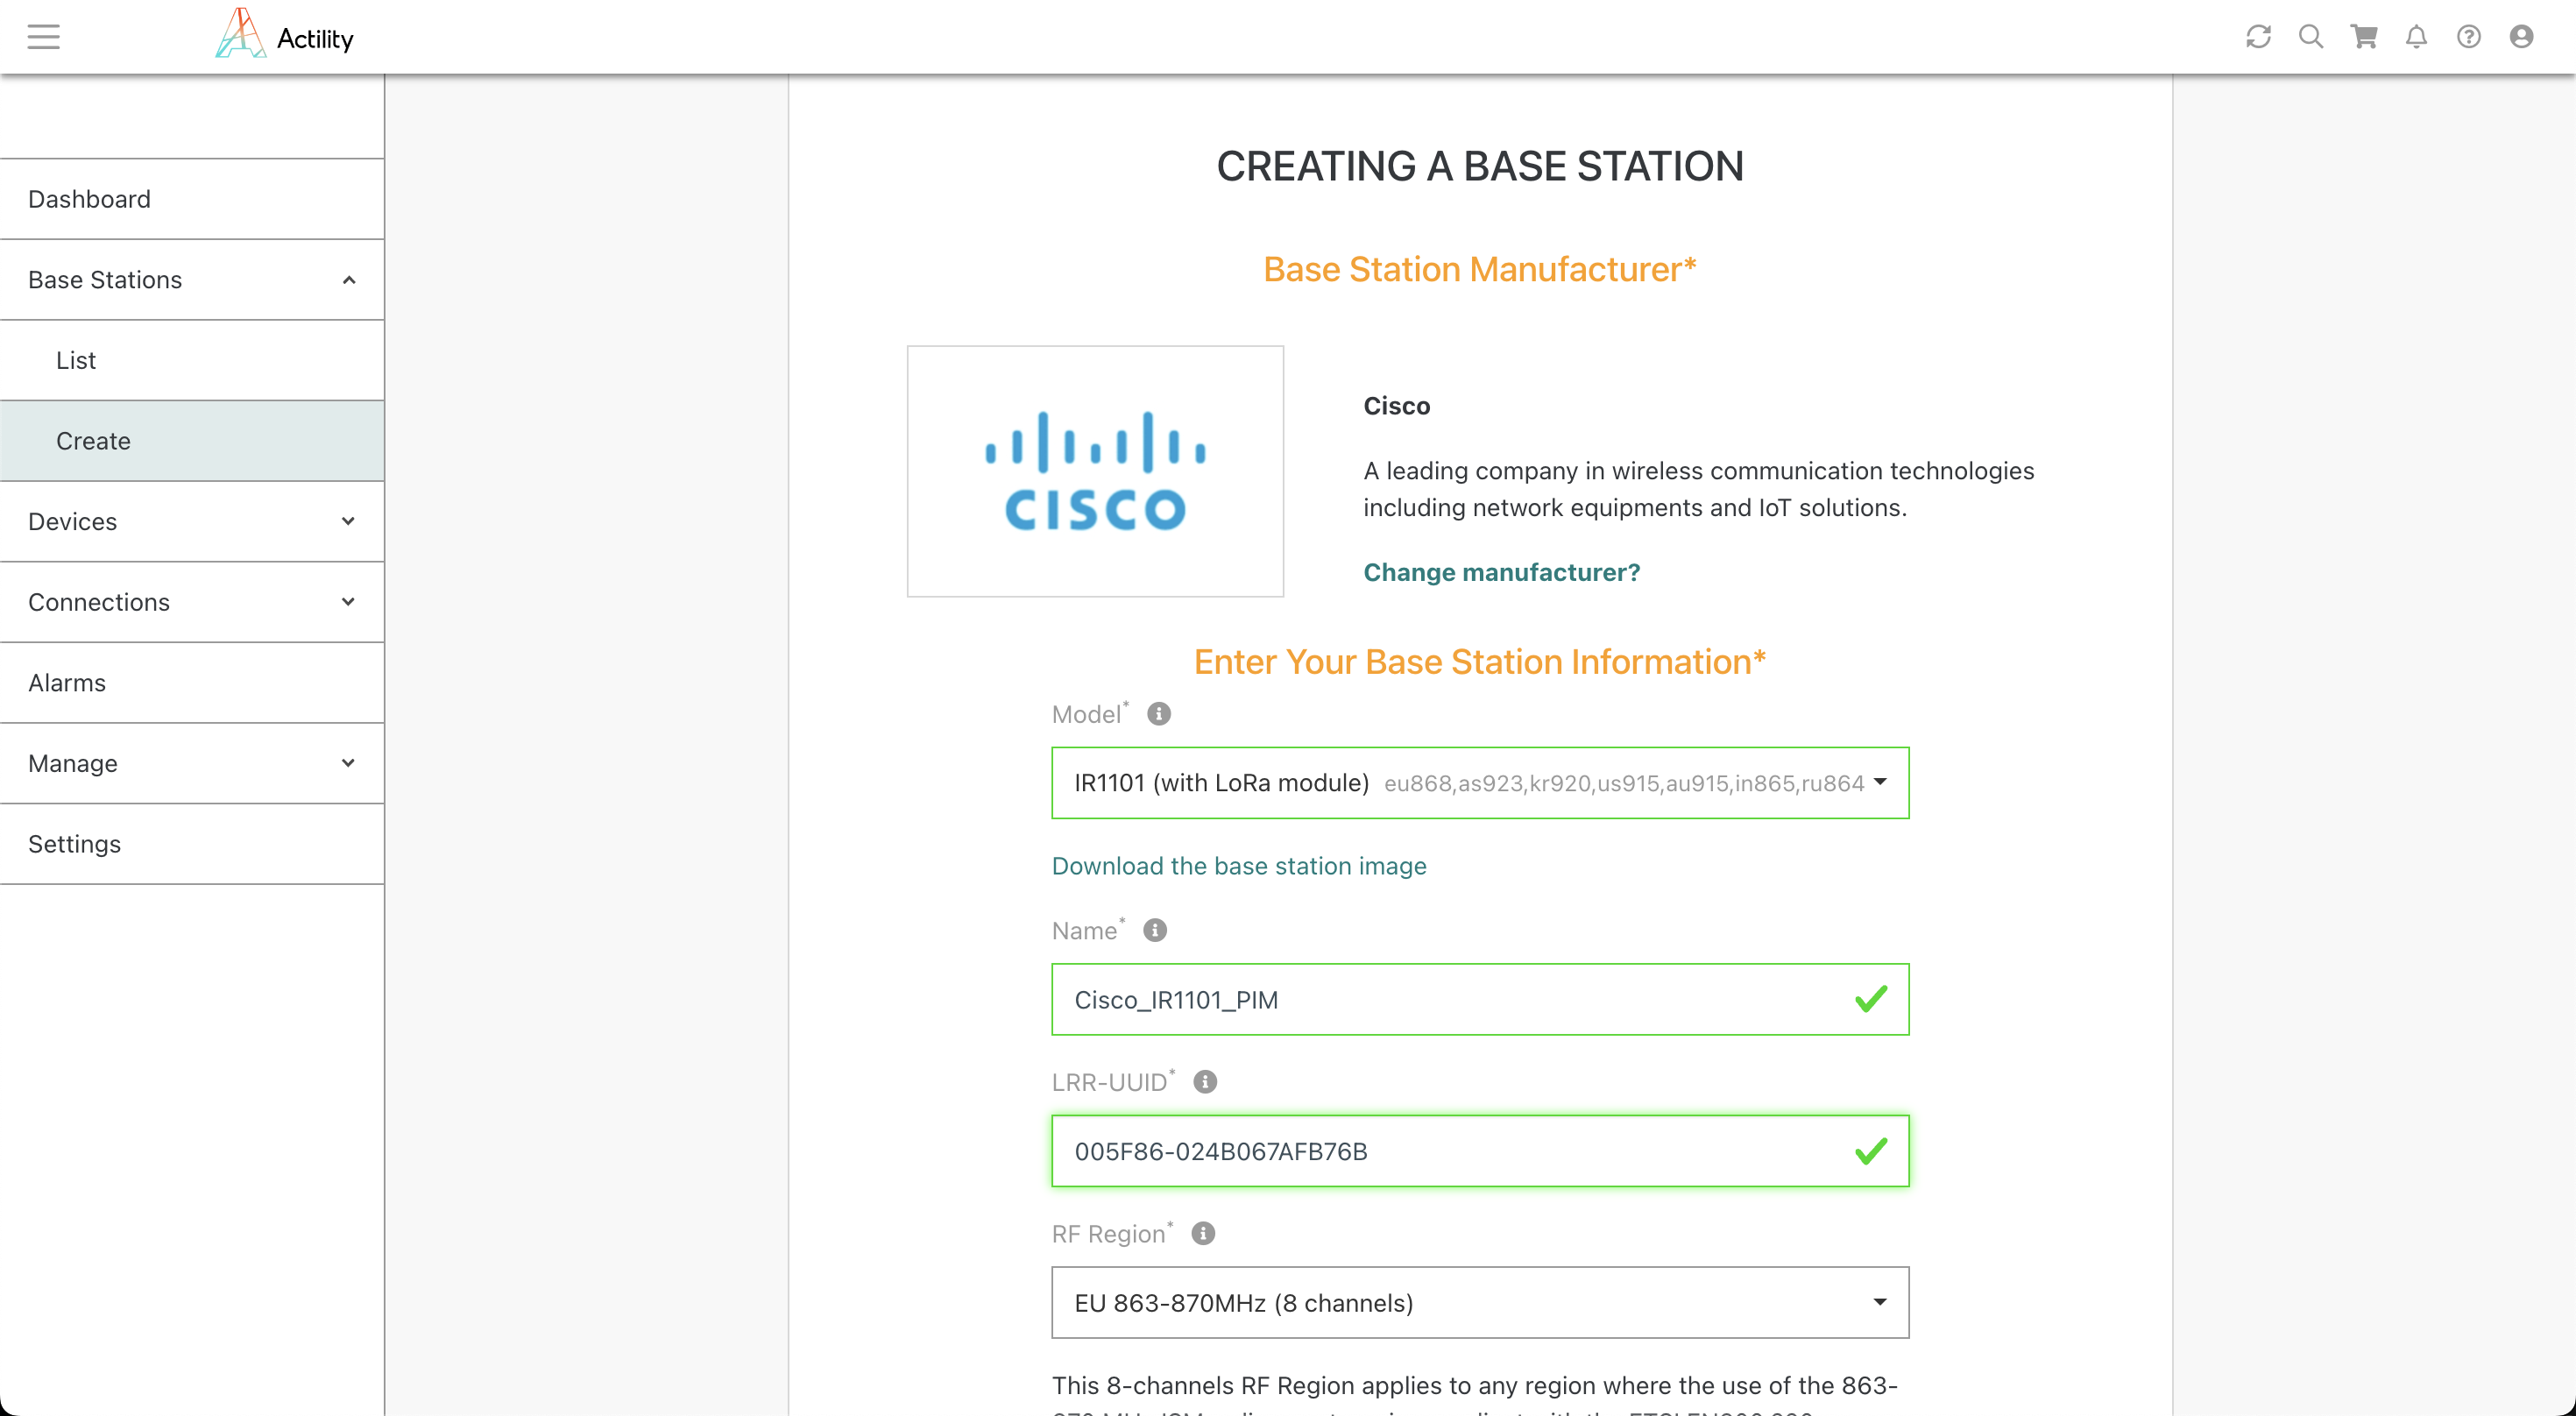
Créez une passerelle sur ThingPark avec le LRR-UUID :
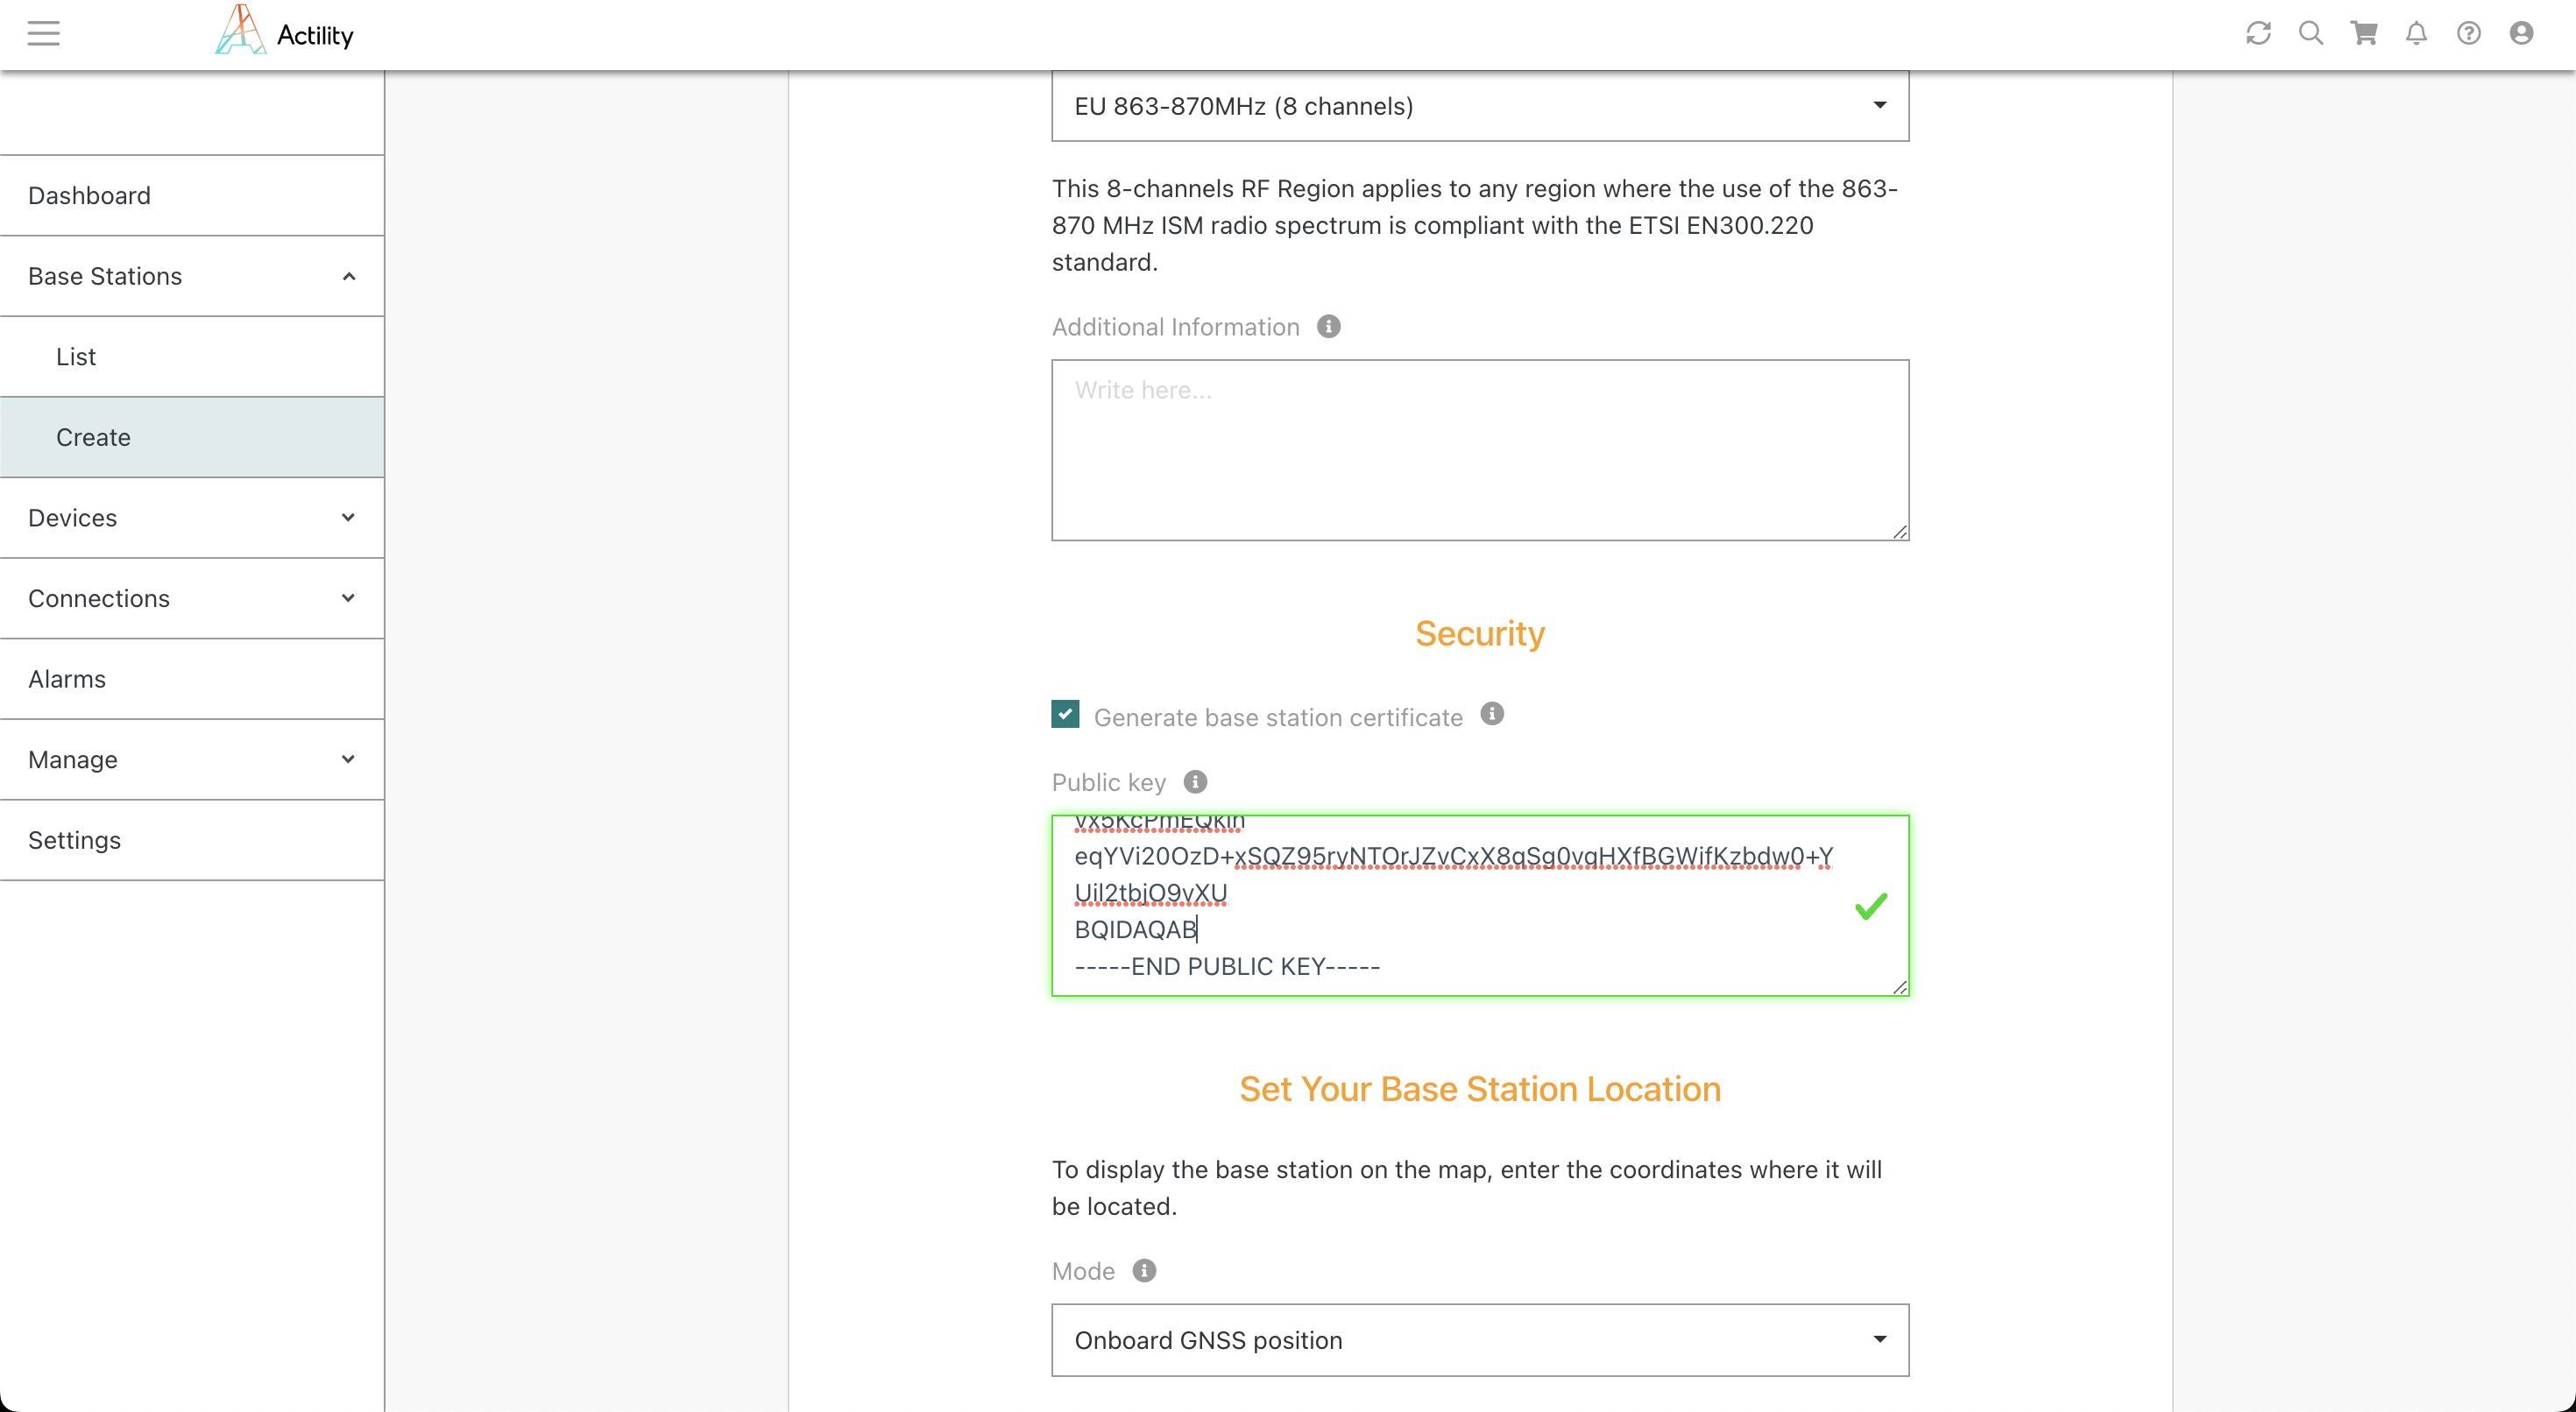
Copiez votre clé.pub dans la clé publique de sécurité :
Attendez que tous les indicateurs de statut soient verts :
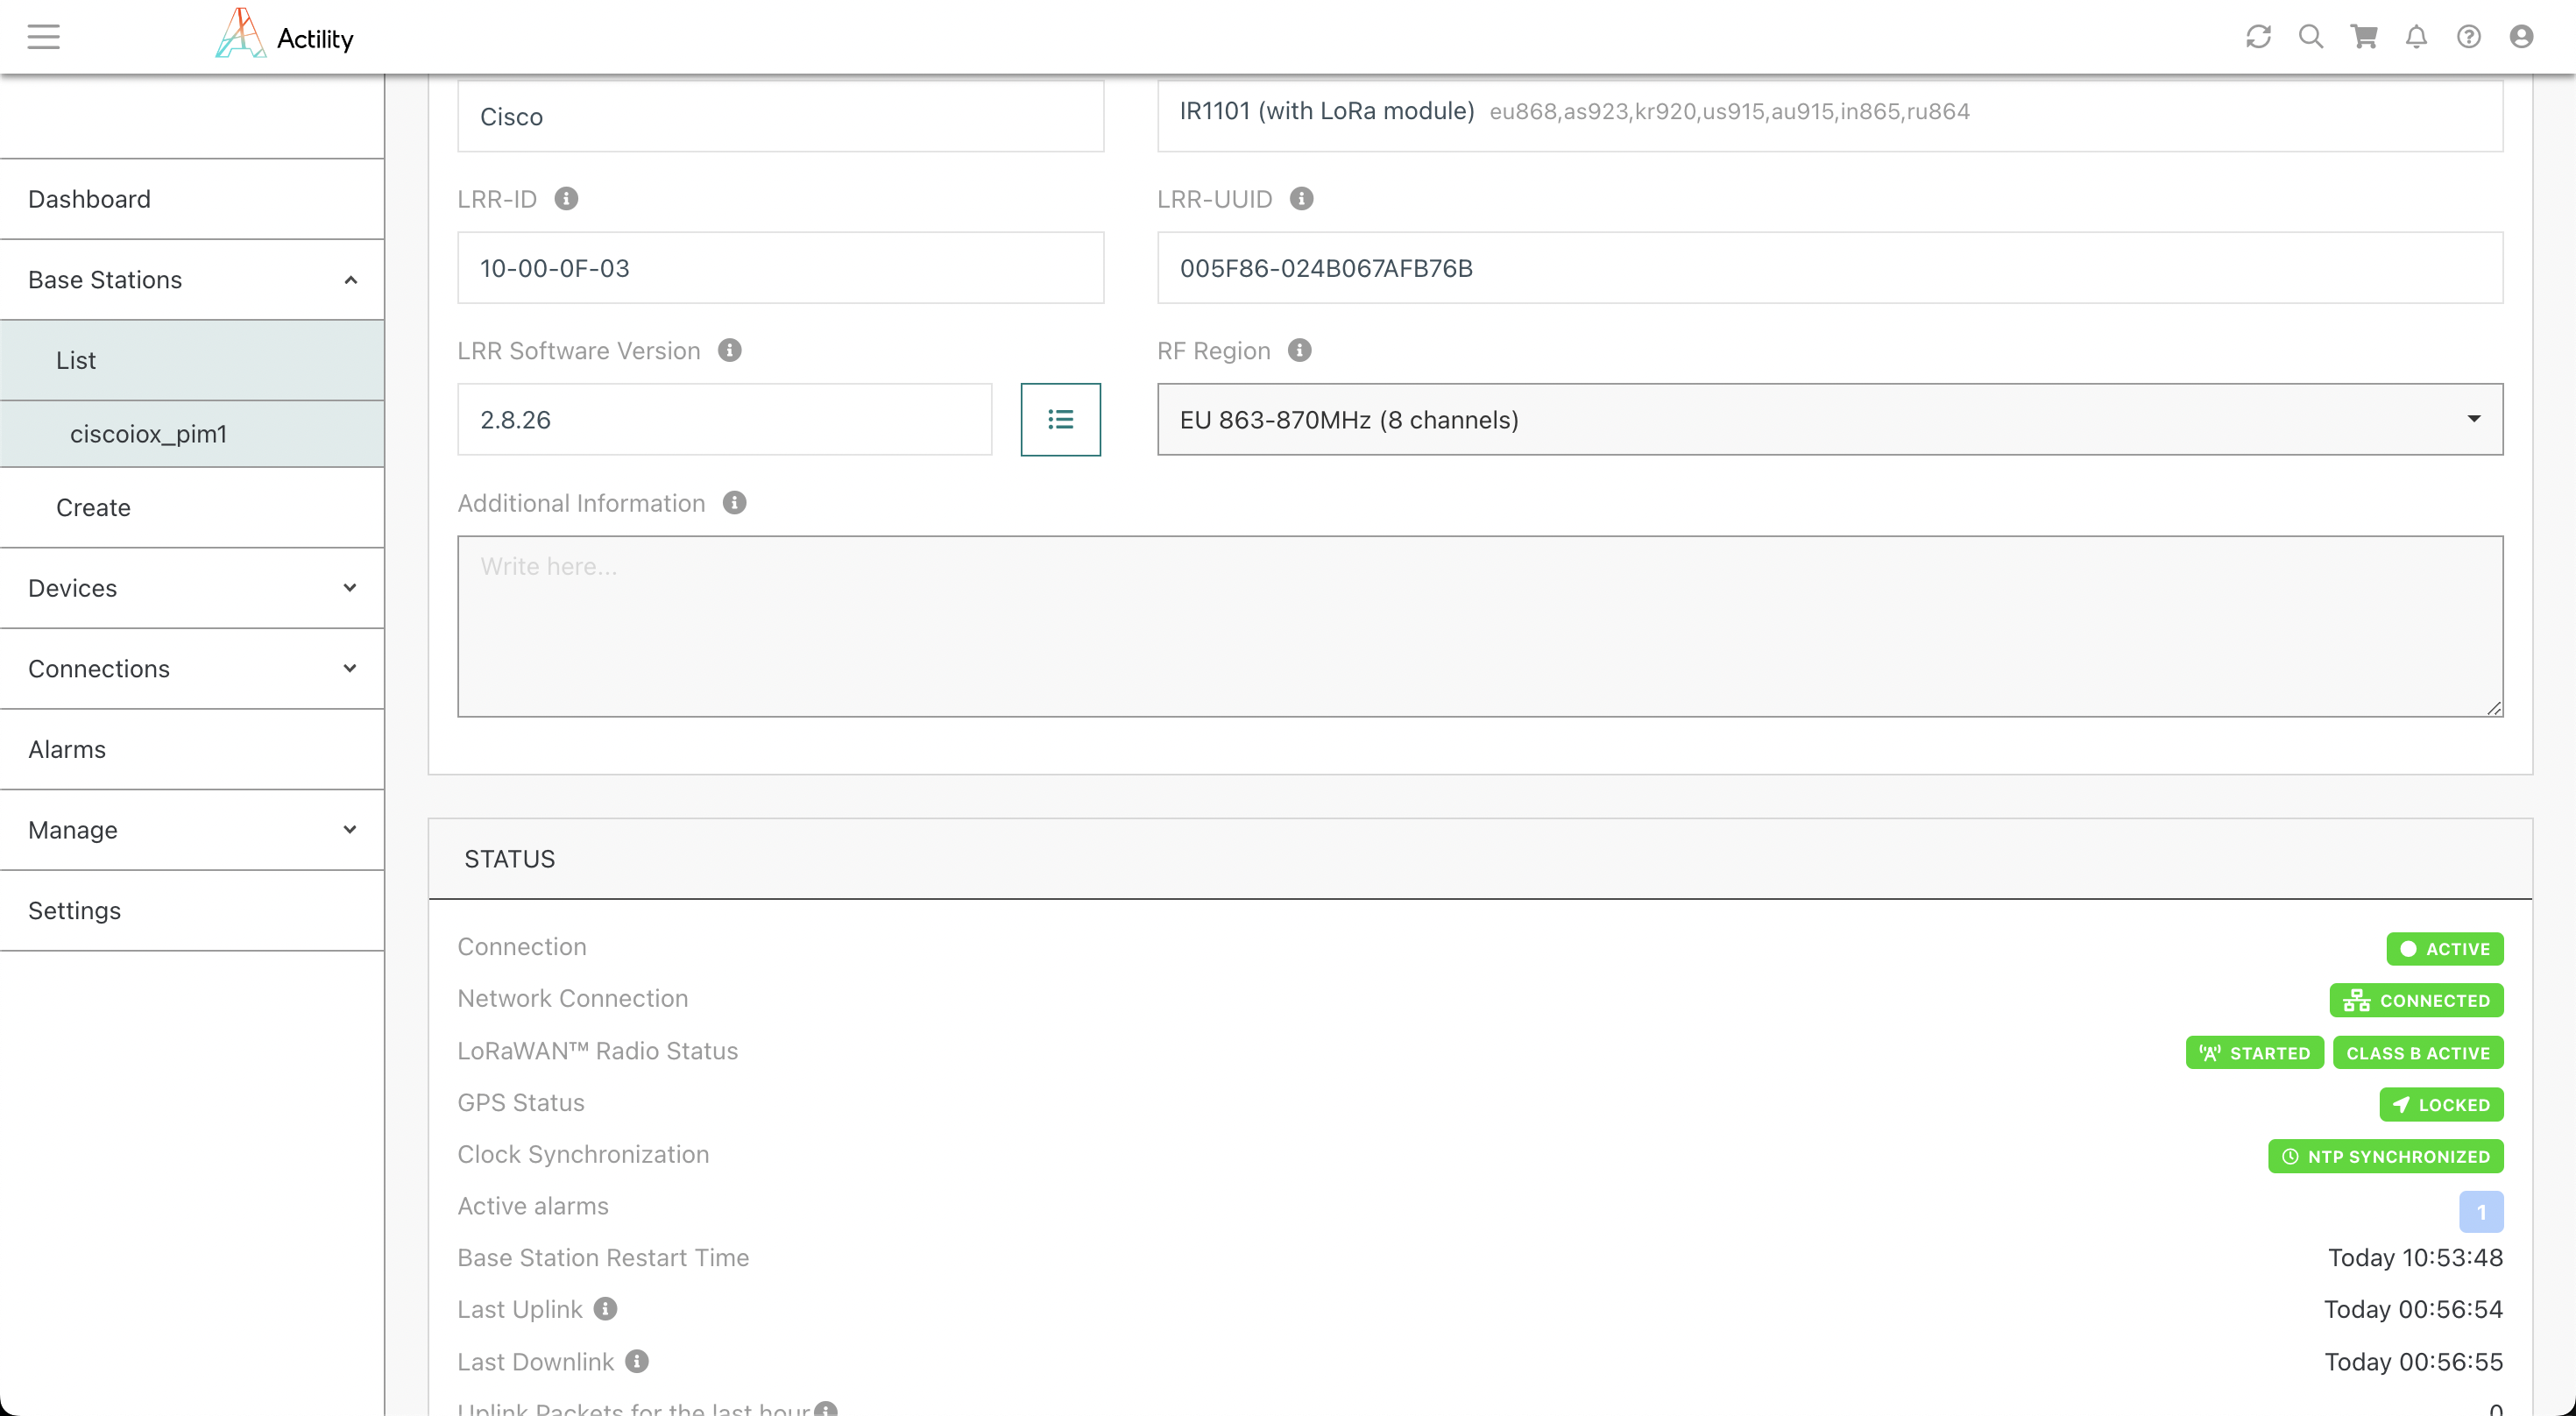
Vous êtes prêt, bravo.
Autres exemples de configuration hôte
Connexion au conteneur depuis l'hôte
# Replace actility_lrr with your container name
app-hosting connect appid actility_lrr session
Basculer entre Ethernet et Cellulaire
Ethernet primaire et cellulaire secondaire
#############################################
# Primary: Ethernet
# Secondary : Cellular
#############################################

#############################################
## Create access-list
#############################################
configure terminal
ip access-list standard 1
10 permit 192.168.42.0 0.0.0.255
20 permit any
exit
ip access-list standard NAT_ACL_Gig
10 permit 192.168.42.0 0.0.0.255
exit
ip access-list standard NAT_ACL_Cell
10 permit 192.168.42.0 0.0.0.255
end

#############################################
## Cellular SIM setup
#############################################
# If m2minternet SIM SFR
cellular 0/3/0 lte profile create 1 m2minternet none ipv4v6
y
y
# Attach created profile to Cellular
configure terminal
controller Cellular 0/3/0
lte sim data-profile 1 attach-profile 1 slot 0
end
# Configure cellular interface
configure terminal
interface Cellular0/3/0
ip address negotiated
ip nat outside
ip tcp adjust-mss 1460
dialer in-band
dialer idle-timeout 0
dialer-group 1
pulse-time 1
end

# To activate cellular
configure terminal
dialer-list 1 protocol ip permit
end

#############################################
## Activate Ethernet interface only
#############################################
configure terminal
interface Cellular0/3/0
shutdown
end
configure terminal
interface GigabitEthernet0/0/0
no shutdown
end

configure terminal
ip route 0.0.0.0 0.0.0.0 GigabitEthernet0/0/0 dhcp
# Careful for the following line which change depending on the primary
ip route 8.8.8.8 255.255.255.255 GigabitEthernet0/0/0 dhcp
no ip nat inside source list NAT_ACL_Cell interface GigabitEthernet0/0/0 overload
ip nat inside source list NAT_ACL_Gig interface GigabitEthernet0/0/0 overload
end

#############################################
## Create pings
#############################################
configure terminal
no ip sla 1
no ip sla 2
no ip sla 3
no ip sla 4

ip sla 1
icmp-echo 8.8.8.8 source-interface GigabitEthernet0/0/0
# Sets the amount of time an IP SLAs operation waits for a response from its request packet.(in milliseconds)
timeout 7000
# Sets the rate at which a specified IP SLAs operation repeats (in seconds)
frequency 15
exit

ip sla 2
icmp-echo 8.8.4.4 source-interface GigabitEthernet0/0/0
timeout 7000
frequency 15
exit

ip sla 3
icmp-echo 8.8.8.8 source-interface Cellular0/3/0
timeout 7000
frequency 15

exit
ip sla 4
icmp-echo 8.8.4.4 source-interface Cellular0/3/0
timeout 7000
frequency 15
exit

ip sla schedule 1 life forever start-time now
ip sla schedule 2 life forever start-time now
ip sla schedule 3 life forever start-time now
ip sla schedule 4 life forever start-time now
exit

#############################################
## Create tracks
#############################################
configure terminal
no track 1
no track 2
no track 3
no track 4
no track 10
no track 11
no track 20
no track 21
track 1 ip sla 1 reachability
exit
track 2 ip sla 2 reachability
exit
track 3 ip sla 3 reachability
exit
track 4 ip sla 4 reachability
exit
track 10 list boolean or
object 1
object 2
exit
track 11 list boolean and
object 1
object 2
exit
track 20 list boolean or
object 3
object 4
exit
track 21 list boolean and
object 3
object 4
exit
exit

#############################################
## Create event managers applets
#############################################
configure terminal
no event manager applet Cellular_Activate
no event manager applet Nat_Cell
no event manager applet Cellular_Deactivate
no event manager applet Nat_Gig
no event manager applet Gigabit_Deactivate
no event manager applet Gigabit_Activate

event manager applet Cellular_Activate
event track 10 state down
action 0.0 syslog msg "Activating LTE interface Start"
action 0.1 cli command "enable"
action 0.2 cli command "configure terminal"
action 0.4 cli command "ip route 0.0.0.0 0.0.0.0 Cellular0/3/0"
action 0.5 cli command "interface Cellular 0/3/0"
action 0.6 cli command "no shutdown"
action 0.7 cli command "exit"
action 1.0 cli command "interface Tunnel201"
action 1.1 cli command "no tunnel source GigabitEthernet0/0/0"
action 1.2 cli command "tunnel source Cellular0/3/0"
action 1.3 cli command "exit"
action 1.4 cli command "interface Tunnel202"
action 1.5 cli command "no tunnel source GigabitEthernet0/0/0"
action 1.6 cli command "tunnel source Cellular0/3/0"
action 1.7 cli command "exit"
action 2.0 cli command "end"
action 9.9 syslog msg "Activating LTE interface End"
exit

event manager applet Nat_Cell
event track 20 state up
action 0.0 syslog msg "Nating Cellular interface Start"
action 1.0 cli command "enable"
action 2.0 cli command "clear ip nat translation *"
action 3.0 cli command "configure terminal"
action 4.0 cli command "no ip nat inside source list NAT_ACL_Cell interface Cellular0/3/0 overload"
action 5.0 cli command "no ip nat inside source list NAT_ACL_Gig interface GigabitEthernet0/0/0 overload"
action 6.0 cli command "ip nat inside source list NAT_ACL_Cell interface Cellular0/3/0 overload"
action 7.0 cli command "end"
action 9.9 syslog msg "Nating Cellular interface End"
exit

event manager applet Cellular_Deactivate
event track 10 state up
action 0.0 syslog msg "Deactivating LTE interface Start"
action 0.1 cli command "enable"
action 0.2 cli command "clear ip nat translation *"
action 0.3 cli command "configure terminal"
action 0.4 cli command "no ip route 0.0.0.0 0.0.0.0 Cellular0/3/0"
action 0.5 cli command "ip route 0.0.0.0 0.0.0.0 GigabitEthernet0/0/0 dhcp"
action 0.6 cli command "interface Cellular 0/3/0"
action 0.7 cli command "shutdown"
action 0.8 cli command "exit"
action 1.0 cli command "interface Tunnel201"
action 1.1 cli command "no tunnel source Cellular0/3/0"
action 1.2 cli command "tunnel source GigabitEthernet0/0/0"
action 1.3 cli command "exit"
action 1.4 cli command "interface Tunnel202"
action 1.5 cli command "no tunnel source Cellular0/3/0"
action 1.6 cli command "tunnel source GigabitEthernet0/0/0"
action 1.7 cli command "exit"
action 2.0 cli command "end"
action 9.9 syslog msg "Deactivating LTE interface End"
exit

event manager applet Nat_Gig
event track 11 state up
action 0.0 syslog msg "Nating Gigabit interface Start"
action 1.0 cli command "enable"
action 2.0 cli command "clear ip nat translation *"
action 3.0 cli command "configure terminal"
action 4.0 cli command "no ip nat inside source list NAT_ACL_Cell interface Cellular0/3/0 overload"
action 5.0 cli command "no ip nat inside source list NAT_ACL_Gig interface GigabitEthernet0/0/0 overload"
action 6.0 cli command "ip nat inside source list NAT_ACL_Gig interface GigabitEthernet0/0/0 overload"
action 7.0 cli command "end"
action 9.9 syslog msg "Nating Gigabit interface End"
exit
exit

#############################################
## Save the configuration
#############################################
copy running-config startup-config