Operating LoRaWAN® relays in ThingPark
Supported use cases and known limitations
The following use cases are supported:
-
OTAA end-devices under the exclusive coverage of one or several relays.
In case of several relays, the nearest relay to the end-device is selected by the network server. This best relay selection mechanism relies on a set of criteria such as the link budget between the end-device and the relay, as well as the number of end-devices currently served by each relay (for sake of load balancing).
ImportantTo avoid WOR ACK collisions, an end-device cannot be associated with more than one relay at the same time.
-
OTAA end-devices under a mixed coverage of conventional gateways and relays.
In this case, the uplink packets received by conventional gateways (direct mode) + the best-serving relay (relay mode) are deduplicated by the network server. To maximize the delivery success rate of downlink packets, whenever possible, the network server leverages the mixed mode to send downlinks to the end-device via both the best-serving gateway (over the device's RX1 or RX2 slot) and the relay (over RXR slot).
-
Thanks to the automatic discovery mode supported by the LoRaWAN relay protocol, end-devices may be served in relay mode without initiating a new join cycle. Example of use cases:
- A new relay is installed close to an existing end-device to improve its RF coverage.
- A moving end-device enters the relay's coverage area.
- Relay replacement, for instance due to hardware failure.
This automatic discovery relies on the relay notifying the network server of the presence of a new device through the
NotifyNewEndDeviceReqMAC command. In cases where multiple end-devices share the same DevAddr (device address), which can occur under the same subscriber account, the network server may not be able to respond to the standardNotifyNewEndDeviceReqcommand. To mitigate this DevAddr collision issue, ThingPark supports theExtendedNotifyNewEndDeviceReqMAC command, which provides additional information to uniquely identify the end-device.When a new relay is deployed to enhance the radio coverage of an existing end-device that is already served by another relay, the end-device switches to the new relay without initiating a new join cycle.
The following limitations apply to ThingPark release 8.1:
- Only OTAA end-devices may connect to ThingPark via relay, ABP mode is not yet supported.
- The MAC command
EndDeviceConfReqis not yet supported in the current release, but all the other MAC commands specified in TS011 are supported. - Only the default WOR channel is supported, since the MAC command required to configure a second WOR channel on the end-device is not yet supported in this release.
Provisioning relays
Starting release 8.1, to fully leverage the relay functionality, devices operating as relays should be associated with a model where the relay mode is enabled. For instance, the Abeeway Compact Relay model included in the catalog has the relay capability enabled in its device profile:

To provision a LoRaWAN relay on ThingPark, you should:
-
Apply all the steps described in Activating new devices, while selecting the Model having the relay capability activated through the device profile.
-
Once your relay device is provisioned, if you want to personalize its default configuration, you may go to its detailed page, then click the Relay tab to configure it as described in Configuring relays.
Once provisioned, a relay may forward uplink packets from end-devices over FPort 226. Such forwarded packets are not sent to the application server(s) associated with this relay, to avoid spamming the application servers if the relay acts as a regular sensor (reporting data to applications) besides its relay functionality.
The multi-tenant traffic isolation feature of ThingPark Enterprise applies to relays: a relay belonging to a ThingPark subscription can only serve end-devices belonging to this same subscription, not those belonging to other subscriptions, unless several subscriptions share their radio network through the same SegregationID or the same NetID higher than 0x000001.
Configuring relays
It is not required to statically associate end-devices with relays:
the list of trusted end-devices that each relay can serve is automatically
configured by the network server and sent to the relay over the air.
-
Go to the Relay tab of the device you want to configure.
noteThe relay mode is automatically enabled after provisioning the relay. If you do not want to immediately enable it, click the DISABLE THE RELAY button in the WOR CONFIGURATION widget.
-
In the WOR CONFIGURATION widget, set the following parameters (they are conveyed to the relay through the
RelayConfReqMAC command):-
CAD periodicity: this parameter defines the delay between two consecutive Channel Activity Detection (CAD) scans on each WOR channel. The default setting is 1 second. Using lower values shall increase the relay's battery consumption.
-
Default channel: this parameter defines the index of default WOR channel. The LoRaWAN Regional Parameters document (RP002) defines two channel indexes (with their frequencies) for the default channel in each regional profile.
-
Second channel configuration: if enabled, the user should set the frequency, data rate and WOR-ACK frequency offset of this second channel.
If the second channel is enabled, the relay alternates CAD between the default and the second channels, as described in TS011.cautionThe use of a second WOR channel is currently in restriction because the MAC command
EndDeviceConfReqis not yet supported in the current release.
-
-
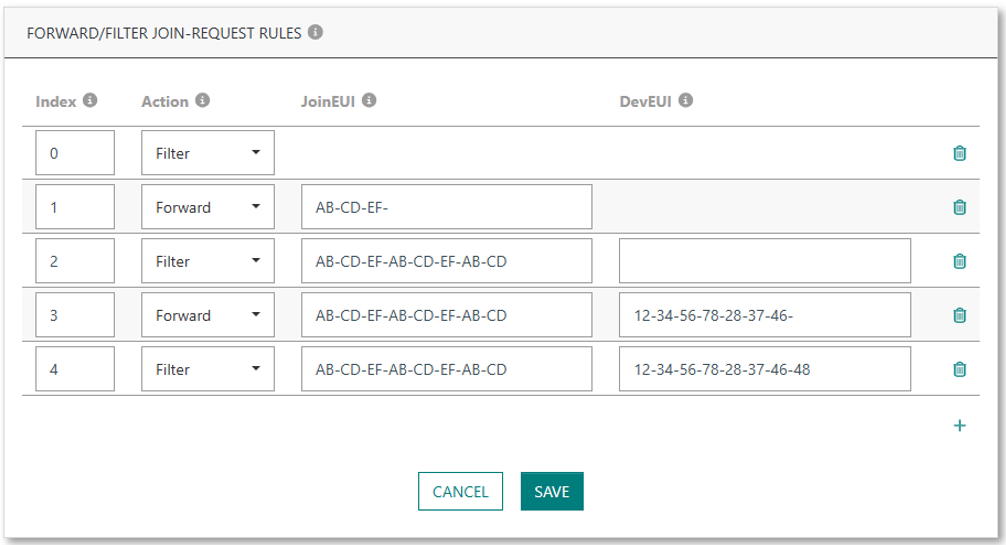
In the FORWARD/FILTER JOIN-REQUEST RULES widget, you may optionally configure whitelist and/or blacklist of JoinEUI-DevEUI pairs. These rules are conveyed to the relay in the
FilterListReqMAC command.tipTo add a rule, click
 , whereas to delete a rule, click
  .
.- The first rule (index 0) is mandatory and cannot be deleted: it defines the default behavior for all Join-Request messages that do not match any other rule.
- The rules with index 1-15 are optional and can be added/updated/deleted at any time:
they define the behavior to apply on Join-Request messages matching JoinEUI/DevEUI pairs.
Forwardmeans that the relay shall accept Join Request messages matching the JoinEUI/DevEUI pair, whereasFiltermeans that the relay shall drop them.- You may set a JoinEUI prefix by setting the leftmost bytes without filling the whole 16 hexadecimal characters, but in this case you cannot set a DevEUI for this same rule.
-
In the FORWARDING LIMITATIONS widget, you may change the default settings related to the relay token buckets.
This mechanism is defined in TS011 to allow relays to optimize their battery consumption and limit the amount of forwarded traffic. For each type of traffic where the limitation is enabled, the relay only forwards the uplink when it has at least 1 token remaining for that type of message, and it decrements the associated bucket by 1 token after each transmission.
If the forwarding limits are different from the default settings, they are conveyed to the relay in theConfigureFwdLimitReqMAC command.- The parameter "Reset token counters" instructs the relay to reset (or not) all the token counters.
- For each type of LoRaWAN traffic forwarded by the relay: if you do not want to limit this traffic, switch on the Unlimited forwarding option. Otherwise, set the target hourly reload rate and maximum bucket size for each case.
- Besides the forwarding limitations per traffic type, a global limit applies to all types, aggregating all the forwarded uplink messages. This is the scope of the parameters set under Global limit. Hence, this limit should never be set lower than the biggest individual limit defined in the preceding sections.
Monitoring relays
Searching relays in the device list
In the device list, the Relay column indicates if the device can act as a relay (relay capability) and whether the relay activity is enabled (relay activation).
- Not supported: the device model does not support the relay capability. this information is inherited for the device profile associated with each device model.
- Disabled: the device model supports the relay capability but this feature is currently disabled for this device.
- Enabled: the device model supports the relay capability and this feature is currently enabled for this device.
To easily filter devices according to their relay status, use the checkboxes available at the bottom of the device filter form (Not supported and Disabled are grouped together for simplicity):

Additionally, on the device map, relays are represented with a distinct marker (the marker color depends on the displayed metric):
- Relay feature is supported but disabled:

- Relay feature is supported and enabled:

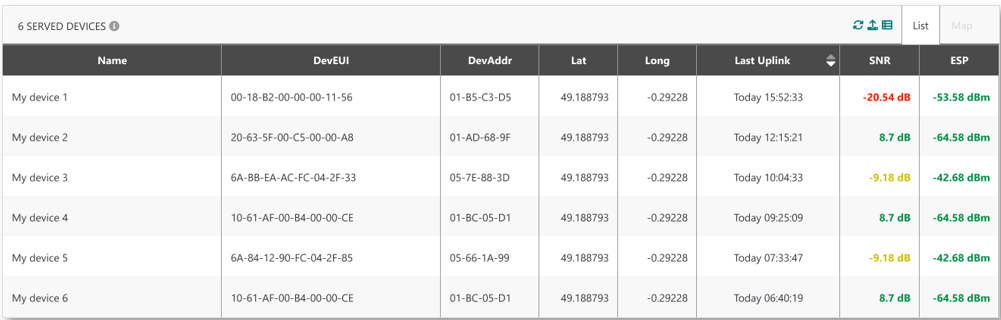
Viewing the end-devices served by each relay
The list of trusted end-devices associated with each relay is displayed in the SERVED DEVICES widget of the Relay tab.
Analyzing relay traffic in WLogger
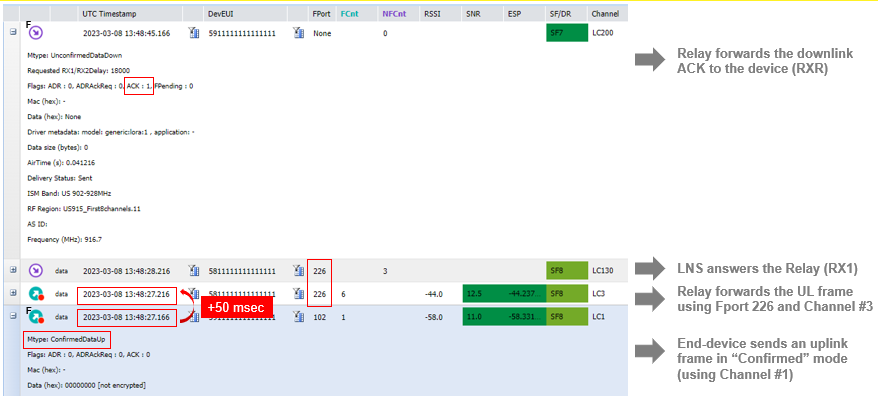
ThingPark users can monitor and analyze the relay traffic through the Wireless Logger application.
-
The end-device traffic is associated with the device's DevEUI/DevAddr.
Relayed traffic can be identified by theFsymbol on its logo, such as and
and  for uplink
and downlink packets respectively.
for uplink
and downlink packets respectively. Fstands for "Forwarded".
Additionally, the ID of the relay used to forward the packet is explicitly indicated in the "Relay ID" column, this ID refers to the relay's DevEUI.noteIn case of mixed coverage, for a given end-device, through direct gateways and via relays:
- Uplink packets received by both a base station and a relay appear once in WLogger: only the message received by the base station is displayed since it arrives first at the network server, the copy received via the relay is deduplicated by the network.
- Downlink packets sent through both the base station and the relay appear twice in WLogger:
the transmission through the base station is associated with RX1 or RX2 slot, whereas the transmission
via the relay is associated with the RXR slot and flagged
RXR repetitionin WLogger.
-
The encapsulated UL/DL traffic sent by the relay is associated with the relay's DevEUI/DevAddr. Such traffic may be easily identified by the FPort field - displaying
226 Relay.
To make traffic analysis simpler, WLogger displays the content ofForwardUplinkReqandForwardDownlinkReqpayloads in decoded format. The same thing also applies to the content of the relay-specific MAC commands.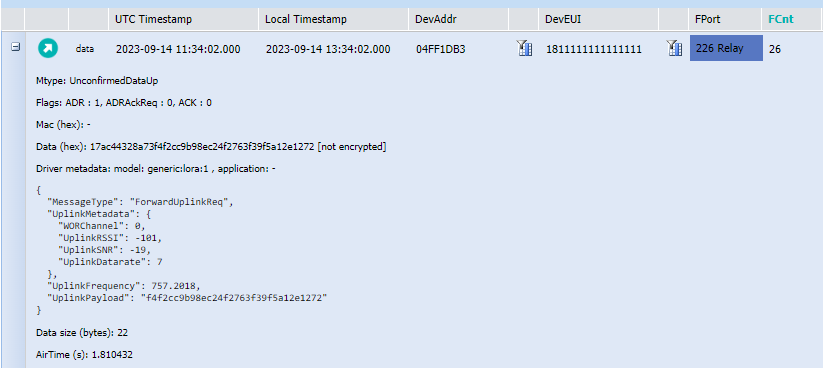
The following screenshot shows a typical example of an OTAA end-device joining the network through a relay. The sequence starts by the relay itself joining the network.
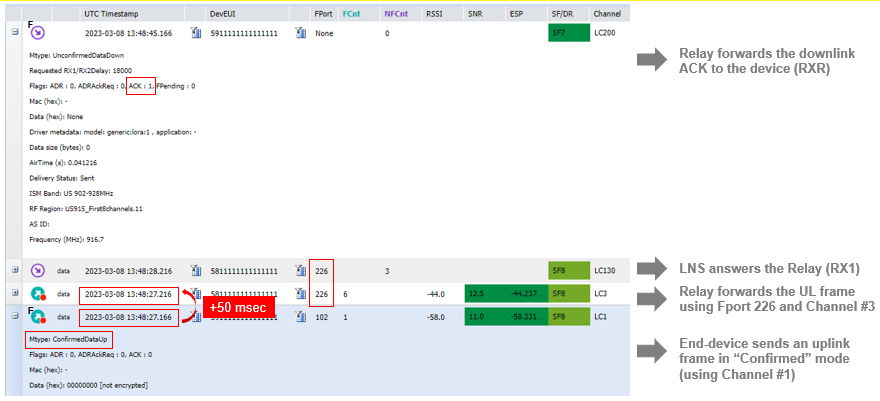
Here is an example of uplink/downlink packets exchanged between the end-device and the network through a relay:
To learn more about using Wireless Logger application, see Wireless Logger user guide.