Step 5 - Provisioning your devices
Payload drivers
To deliver ready-to-use decoded payloads to business applications, ThingPark Enterprise All-in-one embeds a very rich set of over 750 payload drivers from over 150 IoT device manufacturers.
Once you choose the manufacturer and model of each device, as described in the following sections, ThingPark automatically associates it with the right driver without any action on your side.
Provisioning devices one by one
The below example assumes a device using the Over-the-Air Activation (OTAA) mode.
-
From the left panel of the user interface, go to Devices, then click ADD A DEVICE.
-
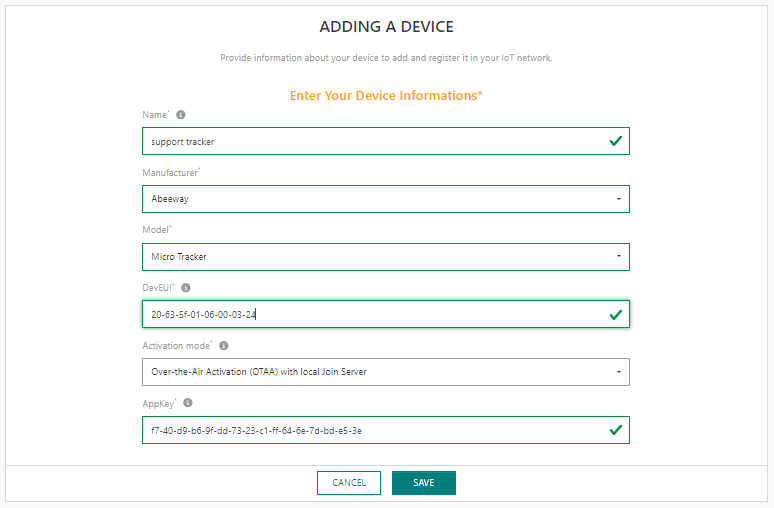
Fill the form and click Save when finished:
 tip
tipAlways favor associating your devices with a branded manufacturer/model from the built-in catalog instead of using the "Generic" manufacturer.
Use the "Generic" manufacturer only if you do not find the real manufacturer and model of your device in the list. Unlike branded device models, the models associated with the "Generic" manufacturer cannot use the built-in catalog of payload drivers to deliver decoded payloads to your business applications.
-
Your new device will appear in the list.
tipTo update the list, you can use the browser's refresh button, or press F5 key.

- The device is created in "Initialization" state (orange status), this means that the device has not yet been activated in the network.
- DevEUI is displayed, but the DevAddr not yet assigned for the OTAA device. This DevAddr assignment will only happen when the device sends its first Join-Request message.
-
Once the device transmits its Join-Request message and successfully completes its network registration, the device status will be automatically updated:

- The device is connected (green status).
- "Last uplink" gets a timestamp.
- DevAddr is now assigned by the network.
- FCntUp represents the uplink counter.
- Other RF metrics are displayed: uplink Signal To Noise Ration (SNR) and Spreading Factor (SF).
Provisioning devices in bulk (device import)
You can also use the bulk-import feature to import multiple devices in one click.
-
From the left panel of the user interface, go to Devices, then click IMPORT DEVICES.
-
Download the "SAMPLE FILE" to learn more about the required format of the input csv file.
-
Download the "MODELS LIST" to retrieve the "Profile ID" that corresponds to your device profile.
-
Create a csv (comma separated value) file and save it in utf8 format when using a simple text editor.
-> You should have something like this at the end (OTAA and ABP device sample) :
CREATE_OTAA,70B3D53260001A75,,LORA_GenericA.1.0.2a_ETSI_Rx2-SF12,,31FD21B72E9CF9F861CF27450D4160E6,,device_1
CREATE_ABP,000000000539B181,0539B180,LORA_GenericA.1.0.2c_ETSI,2B7E151628AED2A6ABF7158809CF4F3C,2B7E151628AED2A6ABF7158809CF4F3C,,device_2 -
Click
to open the import dialog box and select your file, then click IMPORT.
-
In case of errors, the user interface displays a page describing each error, ordered by line number.

You must correct the erroneous lines before re-importing the file. Note that you must only re-import the devices that were not successfully imported in the previous attempt.
-
When everything is done, and you have no errors, you can directly return to the device list and start working with your devices.
OTAA device import .CSV file
To import OTAA devices, a definition is given for each column of the table available in the .CSV file.
| Column | Definition | Cardinality | Description |
|---|---|---|---|
| A | Directive | Mandatory | Device import directive: 'CREATE_OTAA' for OTAA device import. |
| B | DevEUI | Mandatory |
|
| C | n/a | ||
| D | Device model ID | Mandatory | Identifier of device model. Device models IDs can be retrieved in a CSV file via the MODELS LIST button on the device import page. |
| E | n/a | ||
| F | AppKey | Mandatory |
|
| G | n/a | ||
| H | Device name | Mandatory |
|
ABP device import .CSV file
To import ABP devices, a definition is given for each column of the table in the .CSV file.
| Column | Definition | Cardinality | Description |
|---|---|---|---|
| A | Directive | Mandatory | Device import directive: 'CREATE_ABP' for ABP device import. |
| B | DevEUI | Mandatory |
|
| C | DevAddr | Mandatory |
|
| D | Device model ID | Mandatory | Identifier of device model. Device models IDs can be retrieved in a CSV file via the MODELS LIST button on the device import page. |
| E | NwkSKey | Mandatory |
|
| F | AppSKeys | Mandatory |
|
| G | n/a | ||
| H | Device name | Mandatory |
|